| BitFenix Shinobi Mid-Tower Computer Case |
| Reviews - Featured Reviews: Cases | ||||||||||||||||||||||||||||||||||||||||||||||||||||
| Written by Steven Iglesias-Hearst | ||||||||||||||||||||||||||||||||||||||||||||||||||||
| Monday, 01 August 2011 | ||||||||||||||||||||||||||||||||||||||||||||||||||||
BitFenix Shinobi Window Mid-Tower Case
Manufacturer: BitFenix Co. Ltd. Full Disclosure: The product sample used in this article has been provided by BitFenix Co. Ltd. Here at Benchmark Reviews we like to bring you the most up to date hardware reviews, our latest sample is the BitFenix Shinobi Window Mid-Tower PC case model number BFC-SNB-150-KKW1-RP. This case has been out now for a few months but is still quite recent, it was the elegant design that first attracted me to this case, the second point that made this case rather appealing was its raw mod-ability. There seems to be a trend lately with many people cursing overly plastic PC cases but I think the Shinobi is somewhat different, it isn't perfect but for its price you can't really want for more. For under $70 you get a very good looking 'windowed' case with a painted interior, motherboard cut-out's and room to manage and hide cables effectively, a bottom mounted PSU, two 120mm fans pre-installed with capability for seven and mesh venting on all intakes bar the window. Let's not leave it there though, there is more to see so let's get to it.
BitFenix Shinobi Window Features
Killer Looks
Choose Your Destiny
Maximum Expansion
Efficient Cooling
Plenty of Connectivity
DIY Friendliness
BitFenix Quality BitFenix Shinobi Window Specifications
Source: BitFenix.com Closer Look: ExteriorIn this section we will have a good look at the exterior styling of the BitFenix Shinobi Window case to get a good idea of what it has to offer.
The Shinobi Window case ships in a rather plain cardboard box, nothing too fancy which helps to keep costs down. The main features of the case are depicted in picture form with very brief explanations of these features.
The looks of the front of the Shinobi will surely leave us divided, I quite like the straightforward no frills approach and I think this will be the new trend. There are too many 'in your face' jagged line/abstract looking cases on the market and not enough profesional looking cases in this price range. My only concern here is air intake and how restricted it might be, the mesh running up either side is where most of the air will be drawn in.
The front mesh design carries on over to the top of the case and there is also some nice mesh venting here for exhaust fans. The front I/O panel looks rather nice too.
Rather than just cutting a square hole in the side panel and slapping in some perspex BitFenix have opted for an abstract window design for the window edition Shinobi case. The window is a very dark smoked color and actually restricts view quite a lot, unless you have interior lighting inside your case you won't really see much through the window.
The rear of the Shinobi looks normal by today's standards of PC cases, with all of the normal features that are popular amongst us enthusiasts. A good indicator of how much room you have to play with inside the case is to look above the rear I/O space and below the bottom PCI expansion slot, in this case it looks rather tight. While this might hinder installation a little, it will be good from a cable management perspective as you will be able to get all of your cables tight and close to the motherboard top and bottom. The rear fan mount allows for a 120mm fan (installed) or a 92mm fan, and there are two grommeted watercooling pass through ports. It is a little shame that the PCI expansion covers are not vented but this is another cost saving method that doesn't affect the overall case too much.
The right side of the case is rather plain and doesn't matter too much as it is normally hidden out of sight anyway. I see this side panel as a blank template should you want to inflict your own design on a side panel, both side panels are generally interchangeable so do with this one as you wish.
Looking at the bottom of the case now we can see extra venting for intake airflow (left side) this alleviates my earlier concerns about restricted air intake a little, but still doesn't quite compare to straight forward intake airflow from a fully vented case front. In the center and towards the rear are two vented cut-outs, the middle one is for air intake and allows for a 120mm fan to mounted inside the case and the rear one is for PSU air intake. Both of the air intakes have a plastic honeycomb mesh dust filter which is better than nothing but will only stop large dust particles. Detailed Exterior FeaturesIn this section we will have a closer look at the exterior features of the BitFenix Shinobi Window case.
The front I/O consists of four USB 2.0 ports, microphone and headphone ports, HDD and power LED's and a big power and small reset button. We also have a close-up shot of the mesh strips that follow the front to the top.
To remove the front panel you have to pull really hard from the bottom, this requires a lot of effort and when it comes free you really know to it. Once it is removed you are greeted with a 5.25" to 3.5" drive bay adapter and a mesh covered air intake. The drive bay adapter allows you to install a card reader/USB 3.0 front panel/floppy drive (your choice), the intake fan is installed on the inside and you can access the fitting screws from this side, the front intakes only allow for 120mm fans.
Looking inside the front panel you can see that the BitFenix badge and the mesh strips are removable as are the drive bay covers. You remove the drive bay covers and the BitFenix badge by pulling the plastic tabs to the side and you can remove the mesh by bending out the several metal tabs along the length of the panel. BitFenix will soon be selling the badges and mesh strips in various colors as an aftermarket option to allow you to make your case more personal, or you can paint them yourself.
Removing the top panel is much the same as the front panel and there is a cut out at the rear of the case that allows you to do this easier, you will need to ensure the front panel cables are free or you will not be able to remove the panel. Once removed you have access to the two top exhaust fan mounts, there are no fans installed by default but you can install a pair of 120mm or a pair of 140mm here.
Looking at the inside of the top panel you can see once again that the mesh is easily removed. Also, the front I/O panel cables are modular so if you do not use certain parts of it then you can simply disconnect the wires and have a much tidier install.
The BitFenix Shinobi Window doesn't come with rubber feet pre-installed, you must do this yourself. They are found inside the small accessory package and have adhesive already applied so it's a case of simply sticking them on, this is likely another cost saving technique by BitFenix. Here is also a close up of the mesh, like I mentioned before I doubt you will be catching any fine dust with this filter, but some level of protection is better than none. Closer Look: InteriorNow let's take a look at the interior of the BitFenix Shinobi case. No matter how nice the exterior looks, it could all be for nothing if the interior is not well thought out.
The interior of the Shinobi case is nicely laid out, there are plenty of cut-outs for cable management and the intake airflow is not restricted by the HDD bays. There are three tool free 5.25" drive bays, one of which is occupied by a 5.25" to 3.5" / 2.5" adapter and there are eight tool free 3.5" hard drive bays. The motherboard standoff holes are all nicely lablled and there is a key inside the 'H' that tells you which holes you need to use for each particular size of motherboard. Important dimensions to note are as follows; From the rear PCI expansion slots to the HDD bays (width for video cards) is 32.5cm and from the motherboard tray to the side panel (depth for CPU coolers) is 17.5cm by my own measurement.
The rear of the motherboard tray is merely a reflection of the front, with the main difference being that there are no tool free retention clips for the 5.25" bays on the reverse. There are plenty of cable tie down points on the reverse of the motherboard tray that allow for some very tidy cable management, but I'm not too keen on the space between the edge of the motherboard tray and the HDD rack because this makes hiding cables that bit more difficult.
A quick look at the front interior section of the case here with the main focus on the 3.5" HDD rack and the tool free retention clips. There are upsides and downside here, the main upside is that the HDD rack isn't restricting airflow with no HDD's installed and of course you won't need to mess about with screws to install or remove a hard drive. The downsides to this setup are that there are no anti vibration materials used, and from a cable management perspective the power and SATA cables will be more visible with HDD's mounted in this orientation.
Looking at the PSU area inside the case here we can see four pads that raise your PSU slightly and avoid any scratches where the PSU would make contact with the case. The mount for the 120mm intake fan towards the front of the case is quite close to the PSU area, this may cause an issue if you have a big PSU (in my case my PSU comes within millimeters of the fan mount) and getting a fan in here without the wires getting in the way could prove difficult. Also note that the PSU is slightly offset from the motherboard tray and that there is a nice cut out here too, this allows you to route your front panel USB and audio leads here for a nice clean install. Detailed Interior FeaturesLets have a detailed look at the interior features of the BitFenix Shinobi.
When you open the case for the first time you are greeted with an installation guide and a basic accessory package (tucked neatly in a little brown box). You get a little bag of assorted screws and the motherboard standoffs, the rubber feet for the case and a dozen or so cable ties.
The 5.25" tool free retention clips are simple yet effective, to open simply push underneath on a plastic tab to release the clip, install your optical drive (or other 5.25" device), line up the screw holes and push the clip back into place. Each one has the BitFenix logo on it, which I think is a nice little touch.
Similar story with the 3.5" tool free retention clips, no real explanation is needed as the picture above says it all really. One thing to note here is that these retention clips come free of the case when you unlock them and can be a little fiddly to get back into place but it's nothing major.
Here is the 5.25" bay adapter removed from the case, this allows you to install an external 3.5" device or an internal 2.5" drive. The front face has the same finish as the 5.25" drive bay covers that are clipped into the front panel meaning you won't sacrifice looks when you install an external 3.5" device.
Installing a 2.5" device in the bay adapter is accomplished by screwing it in from the underside, it's a shame that the provision for two 2.5" drives were not catered for as it could have easily been achieved with a bit of creative thinking, but those of us that think like this won't have a problem finding a way to install more than one 2.5" drive anyway.
the rear of the motherboard tray is 2cm deep which is more than enough room for hiding you cables away, you may have noticed that there are certain recessed areas of the motherboard tray but they are only around 5mm deep so it is not a problem.
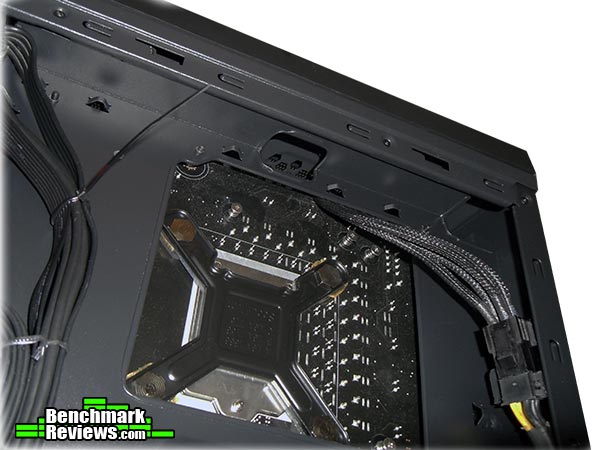
for more cable routing goodness you only need look up at the top of the case to find yet another two cut-outs that allow for routing of the CPU power cable and/or any fan cables you may have. System Build and TestingMy favorite part of building a system is the satisfaction of doing a good job, the more effort you put into it the more satisfaction you will get from it. Knowing that you built it yourself with your own two hands and knowing that you did a good job makes it all worthwhile in the end.
When going for a neat and tidy install its always a little difficult to decide on what to install first, I generally start with the motherboard and then the PSU, removing them where necessary to route cables in the most efficient way possible. Now that I have a 3.5" HDD installed I am not overly keen on the HDD rack, I like things to be hidden as best as possible but that's just me.
Even though it will never be seen I like to keep my cables tidy, there is nothing worse than sifting through a tangled mess of wires just to upgrade one piece of hardware, so tidy is the way forward people. The Shinobi comes with a nice big cut-out for access to the CPU backplate but on my Intel 1156 motherboard it seems just that bit too small. Cable management is made very easy thanks to the numerous cable tie down points and cable routing cut-outs, there is still room for improvements but I am not complaining.
This is where it all pays off, careful planning and placement and a few hours of your time can lead to much gratification. After all it is your system and you must make it personal to yourself, sure you could have someone else do it for you but that defeats the object, it's called a personal computer for a reason. Testing and Results
|
||||||||||||||||||||||||||||||||||||||||||||||||||||


 Testing Methodology


Comments
I like that there are plenty of options for adding more fans into the box if it's needed. I like that it's not expensive.
I usually buy CoolerMaster cases, but will consider a build using this case.