| NZXT Phantom Full-Tower Case PHAN-001BK |
| Reviews - Featured Reviews: Cases | |||||||||||||||||||||||
| Written by Mathew Williams | |||||||||||||||||||||||
| Friday, 13 August 2010 | |||||||||||||||||||||||
NZXT Phantom Full Tower Case ReviewNZXT took the wraps off its newest Crafted Series case last month and, when it becomes available this September, the NZXT Phantom promises to the be an enthusiast favorite. With room for seven fans, a fully integrated fan controller, and an enthusiast-inspired design, it's easy to see why expectations of this case are high. Benchmark Reviews has been provided with an early sample and, hoping it will live up to the hype, we take an in-depth look at the Phantom Full Tower Case (PHAN-001BK) and deliver a verdict on this latest offering from NZXT. With any computer case, there are several aspects we examine here at Benchmark Reviews. First, and foremost in my mind, is functionality. In other words, how easy or difficult is the installation and how well does the case support the components once installed. Along the same lines, I'll be looking at overall quality, as this plays an important role in both of these areas. It also leads to another key priority, particularly for the enthusiast crowd this case is aimed at, thermal performance. While we won't be running a thermal test in this review, with fours fans, and room four three more, you can expect the Phantom fare pretty well here. The Phantom also, in my opinion, racks up some points when it comes to appearance. Although a bit more subjective, appearance is also an important aspect of case design and is what we'll take a look starting on the next page.
Before we move on, though, it's worth pointing out our fifth and final review category: value. It helps keep everything else in perspective. With unlimited funds, I'm sure we could all dream up the perfect case, but with an MSRP of $139.99, it's clear NZXT tried to squeeze everything in that they could at a relatively fair price-point. We'll revisit this value perspective throughout this review.
Manufacturer: NZXT Corporation Full Disclosure: The product sample used in this article has been provided by NZXT Corporation. NZXT Phantom Features
Phantom Full Tower Case Specifications
Closer Look: ExteriorAt first glance, I'm completely satisfied with the NZXT Phantom's external appearance. In fact, I'm thoroughly impressed. The clean lines and high-gloss paint job definitely provide for a professional, attractive look. As you can imagine, and as you'll see throughout the review, though, that paint job loved to attract finger printers. It also reflected just about everything around it--not really con in the real world, but a pain to photograph at times!
The image above highlights some of the exterior styling of the Phantom. The front and top panels are composed of plastic, while the sides and rear of the case are metal. A number of metal screens populate the various panels to provide ventilation while helping to keep dust out. Additionally, the entire front bezel has been designed for easy removal to allow for the installation of a 140mm front fan (not included).
The absence of the front fan shouldn't affect most builds and probably helps keep the cost down a bit. Instead, two 120mm fans attached to the front portion of the side panel take on the task of pushing fresh air into the case. Turning our attention to the side of the case, we can see these fans in a bit more detail.
In addition to the two 120mm fans built into the side panel, NZXT provides Phantom users with the option of mounting a 200mm or 230mm fan on the side of the case. It's positioned to provide fresh air directly to the graphics card(s). As you'll see a bit later on when we open the case up, wiring for this side fan is already included and routed to the fan controller.
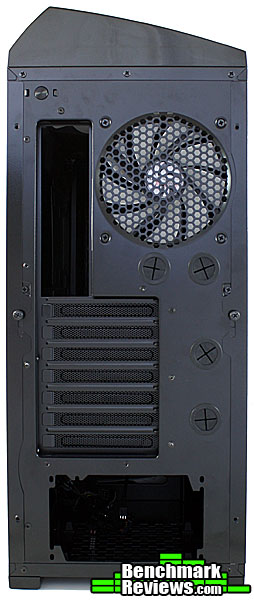
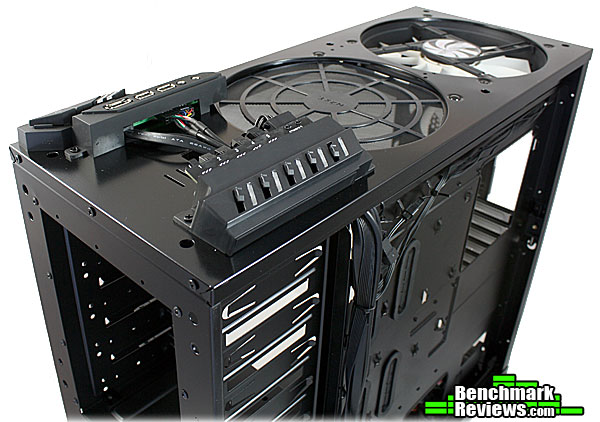
The rear view of the Phantom reveals yet another fan. The 120mm rear fan, like all of the others, comes prewired to the integrated fan controller. Also worth pointing out here are the four watercooling pass-throughs built into the back panel. Watercooling appears to have been top priority for NZXT, not just here on the outside, but also on the inside, where it counts--more on this later. Detailed Exterior FeaturesHaving taken a broad tour around the outside of the NZXT Phantom, let's narrow in on some of the standout exterior features. Most of these features reside on the top panel, which I have not covered much up to this point. Among these are the front panel I/O, integrated fan controller, and top fan. We'll also take a look behind the front door of the 5.25" drive bays.
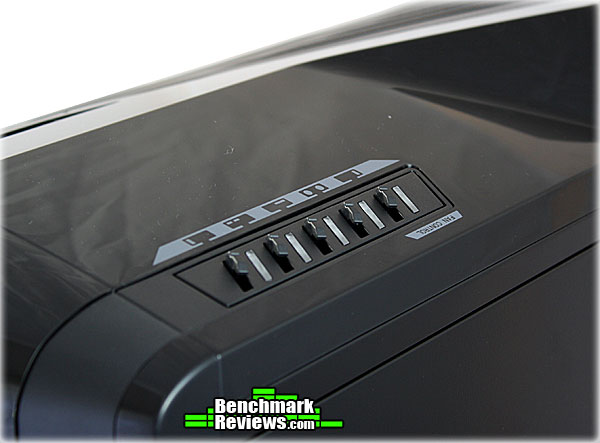
The front panel I/O ports don't bring much surprise in terms of functionality for a case in this category, but they don't disappoint either. The standard audio, mic, and USB ports are present and, as expected for an enthusiast case, eSATA is included as well. I used to give extra points for eSATA ports, but at this point, and in this case category, I think we can consider them standard equipment. Where the Phantom really differentiates itself, though, is in the design and aesthetics. They really did well in integrating the design characteristics of the rest of this case case into this typically unadored section.
That design carries over to the five-channel fan controller, which occupies the other side of the Phantom's top panel. NZXT rates each of the five channels at 20 Watts. When the case is loaded up with all seven fans, though, the two 120mm side fans and the two top fans share channels. While this isn't likely to affect most builds (and most fans), it's worth pointing out.
Those top fans are protected by the same mesh screens that we saw on the rest of the case. In the Phantom's stock configuration, only one 200mm fan is included. A mounting point and wiring for the second 120mm is built in. Also worth noting is that the included top fan comes equipped with a blue LED's. They look good, in my opinion and are fairly low in intensity, but should you need/want to disable the them, they can easily be turned off via a switch on the backside of the case.
On the front side of the Phantom, we find the 5.25" drive bays. With the door open, the five bays mentioned in the specs are visible. The bay door does not actually lock and seems to be there primarily for aesthetics. I suppose the argument could also be made that it helps keep down on dust entering the system, but in either case I have no complaints. Most case locks in this category don't do much anyway and the door does add to the overall appearance. The door aside, though, what I really wanted to point out here are the bay covers. They can be removed and reinserted quite easily by sliding the little plastic clip on right--no wrangling with sharp metal plates or difficult plastic snaps. Closer Look: InteriorWith the exterior of the case covered, it's time to pull the side panels off and take a closer look at the interior of the NZXT Phantom. One of the first things users are likely to notice is that the exterior paint job carries through to the inside. All metal surfaces in the interior are painted to match the exterior. We're looking at the black case in this review (obviously), but the Phantom will also be available in white and red, with white and red interiors to match.
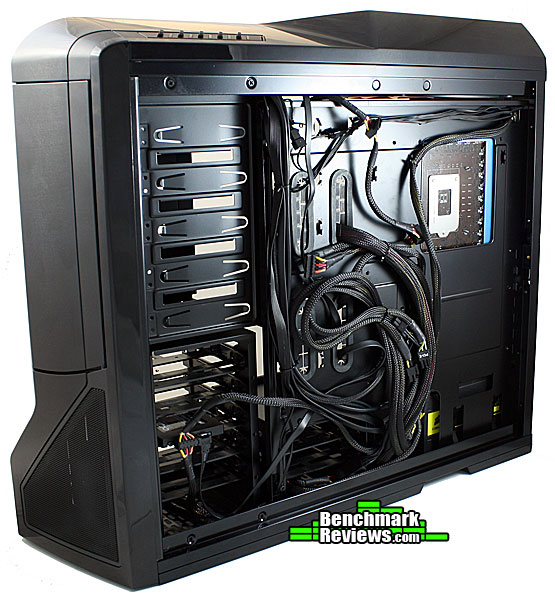
Regardless of color, all Phantoms will come with the same interior configuration. In the image above, we can see where they managed to squeeze the seven 3.5"/2.5" drive bays in. Also evident is the bottom mounting location for the power supply, as well as the multiple motherboard mounting points. The Phantom provides support for E-ATX, ATX, MICRO-ATX, BABY AT motherboards, which, taken individually may not seem like anything special. However, it's nice to see all of these form factors accommodated for in one case. It's also nice to see a cut-out for heatsink mounting/swapping--a must in any enthusiast case.
Moving on to the other side of the Phantom, the heatsink cut-out is a bit more visible. We also get a better look at some of the wire-management features. NZXT built four rubber-lined pass-throughs into the motherboard tray and created a bit more space between the tray and the side panels to allow cables to be run along the backside of the case. Additionally, there's a large opening near the power supply mounting point and several tie-down locations to assist with wire management. Fortunately, all of the front panel and fan connections come neatly bundled by NZXT. I pulled the top and front panels off to get a better look.
The plastic panels came off surprisingly well, revealing the solid steel frame underneath. As you can see, everything has been prewired and routed through the built-in pathways. That's one thing I really appreciate about the Phantom: wire management wasn't just an afterthought, it's integral to the entire design. Not only does a properly wired build look much better, it can actually help keep temperatures down by removing obstructions from the path of airflow.
Providing that airflow are the four included fans, two of which you see above. Depending on the fan controller settings, the combination of 120mm and 230mm exhaust fans here will outpace the two 120mm intake fans on the side panel (below), for an overall negative pressure. If you need more airflow, additional fans can be added to the other three mounting points: top (200mm), side (200mm/230mm), and front (140mm). Given this flexibility and the integrated fan controller, you could configure the Phantom for positive pressure if that's your preference. The Phantom includes ample support for watercooling as well. The top fans can be removed to provide room for a dual radiator and, as we saw earlier, four pass-throughs are built into the back panel to run tubing.
Even with watercooling, you'd probably want to keep the side fans in place. They line up nicely with the 3.5" drive bays and will help keep your drives cool. As I mentioned earlier, a 200mm or 230mm fan can be attached to the side as well and should line up with any installed graphics cards. The only drawback, in my mind, to these side panel fans is the wiring. NZXT takes care of routing all the wiring, but you'll want to be careful not pinch a fan wire when putting the panel back on. Fortunately, it rests nicely on the bottom of the case and swings into place without too much hassle, giving you a chance to adjust the wires as necessary. Detailed Interior FeaturesNow that we've had a peak at the interior of the NZXT Phantom, we'll examine some of the features in a bit more detail as we walk through the installation process. I completed a full installation and did some wire management to see just how user friendly the Phantom is. While many people will only spend a couple hours out of a case's life installing and removing components, a good design can make this process all the more gratifying and ultimately lead to higher satisfaction. That said, I did hit a few snags which I will discuss below, but for the most part, the installation went very well.
Besides the motherboard and processor, one of the first components you are likely to install is the power supply. As we've seen, the Phantom has a bottom mounting point for the PSU and in the photo above you can see the rubber standoffs it's supposed to rest on. Here's where I hit snag one: depending on your power supply, these standoffs may make contact with the fan grill. In my case, the two rear standoffs made contact with the PSU right on the edge of the fan housing where there were two dips in the metal casing. That caused the alignment to be slightly off when I went to secure the screws in the back of the PSU. It's not a major issue, and was easily corrected by shifting the PSU a bit, but it's something to keep in mind should you buy this case.
Next up are the Phantom's 3.5" drive bays. As you can see above, NZXT went with a tray design. The trays have prepositioned pins to allow for screwless installation of hard drives. I used a 2.5" SSD for this build, though, which required a couple extra steps--and screws. I first had to remove the pins on one side, which was easily done in a few seconds. Then the SSD could then be secured to the tray via four screws on the bottom. After that, it slid in just like a hard drive would have. While it didn't take much for NZXY to put a couple holes in the bottom of the tray, I'm glad they did as it made the SSD installation a bit quicker than having to deal with adapters.
What NZXT lacked in innovation with respect to the SSD installation, it certainly made up for in the 5.25" drive installation. In my opinion, this is one of the better tool-less 5.25" bays outs there. You simply slide the lock located on the latch, seen above, and pop it open. Then, slide the drive in, align the pins to the holes, and pop the latch and lock back into place. The pins hold the drive in place pretty well, but if you prefer a little extra security, screws (provided) can be used in tandem with the latch system.
Up to this point, I haven't talked much about the motherboard/CPU installation, mostly because the process was fairly straightforward--no gimmicks, no tricks, just motherboard standoffs and screws. The installation of the graphics card was straightforward as well. Their tool-less solution here was simply good old thumbscrews. I'm fairly skeptical of most tool-less expansion card systems, which is why I'm glad to see that NZXT went this route. I just can't see myself trusting a $300+ video card to a flimsy piece of plastic, particularly with how often I move my system around. Once tightened down, the thumbscrews hold everything securely in place. One of the other things you may have noticed in the photo above is how much room there is around the video card. The Phantom should easily be able to handle the larger videos cards on the market. The same goes for the heatsink.
Although I went with the stock heatsink with this build, it could easily be swapped out thanks to the heatsink cutout seen above. Also in this photo, you can see some of the wire management I did. This is where I hit snags 2 and 3. Routing the cables was fairly easy with all the built-in pathways and tie-down locations, but when it came to the rubber lined pass-throughs on the motherboard tray, things weren't so user friendly. The rubber isn't secured in anyway, so I every time I passed a larger cable through, it started coming off. At one point, one piece came off completely and it took a few minutes to get it back on. The other issue was with the cutout at the top of the motherboard tray, intended, I assume, for the 12v motherboard power cable. With the motherboard in place, there just wasn't enough clearance to get the connector through. After removing a couple motherboard screws, though I got the 1mm of clearance I needed. Needless to say, I recommend routing the cable before installing the motherboard. I should also mention that with the cables routed as shown in the photo above, the side panel didn't close as nicely as I would have liked. It took rearranging things a bit and passing some cables further into the other side of the case, to get everything closed up nicely. It's not really a con as far as the case is concerned, but worth mentioning for those of you who like to hide the bulk the excess cables behind the motherboard. There's actually a decent amount of space back there if you're diligent about it. NZXT Phantom Final ThoughtsOverall, the Phantom was pleasure to work with. I did run into a few issues during installation, as mentioned on the previous page, but all-in-all they were relatively minor. What I really appreciate about this case is the amount of thought that went into it. Anyone can toss a bunch of fans into a case, but to do so thoughtfully, yielding a functional and attractive case, requires a lot of extra effort. The pre-routed wiring is just one example of that extra effort. Sure I could have done it myself, but it was certainly nice to see that it was already taken care of. Adding a fan to any one of the three vacant mounting points should also be fairly painless given that the leads to the fan controller are within easy reach. The extra effort also extends to the aesthetic aspects of the case. The front I/O ports and fan controller were seamlessly integrated into the look and feel of the case. While appearance is somewhat subjective, the Phantom gets my vote for one of the best looking cases on the market. The paint job was very well executed and I was happy to see that it continued to the interior of the case as well. The wire management features previously mentioned also helped contribute to a very clean installation, and, as you can see below and with the system powered on, blue LED's I talked about a few pages back helps complete the look. I'm not a big fan of flashy cases, but the light is subtle enough that I could actually see myself keeping it on.
As I finished my analysis of the case, I was hard-pressed to find many cons with Phantom. The bulk of the issues I encountered were during installation: the proximity of the PSU standoffs to the fan guard, the narrow opening for the 12v motherboard power connector, and the rubber edging coming loose from the wire pass-throughs on the motherboard tray. All of these have relatively simple fixes, but those of you who pick up this case, may want to keep them mind for your install. Phantom Full Tower Case ConclusionThe NZXT Phantom is an excellent example of form and function working together. With four fans included in the stock configuration and room for three more, you can expect plenty of cooling performance. The integrated, and prewired, five-channel fan controller makes adjusting these fans a relatively easy process. The Phantom also has support for a dual-radiator if your system needs a little extra cooling and you'd like to go the water route. When it comes to appearance, the Phantom also does very well. As I mentioned above, this is a fairly subjective category, but I think a good portion of the community will find the design appealing. NZXT cases tend to vary between flashy and subtle, and with the Phantom, I think they struck a good compromise. The clean lines, quality paint job, and black mesh vents, help contribue to a professional, attractive appearance. For a really unique look, I could see a lot of users opting for the red or white cases as the paint color extends to the exterior as well. I have to admit, though, the black has definitely grown on me. The same attention to detail paid to the appearance, extends to the construction quality as well. The amount of plastic used on the exterior may cause some to hesitate, but as we saw when the panels were removed, all of the important structural elements are made out of steel. I was equally happy to see the absence of plastic in the motherboard and graphics card mounting hardware. There's a lot to be said for traditional screws when it comes to securing expensive, high-end, hardware. Of course, by using thumbscrews for the graphics card, NZXT can sneak in the tool-less claim there. The tool-less aspects of the case also help earn it some points in terms of functionality. While the tray system used for the 3.5" drives has been seen before, and the 2.5" drive installation required a screwdriver (not really a con in my book), the latch system used for the 5.25" drives is definitely innovative. The Phantom also picks up points for compatibility and flexibility given it's support for E-ATX motherboards, larger graphics cards and heatsinks, watercooling, seven fans, and multiple drives. I hit a few snags during installation as discussed above, but for the most part the process went smoothly and the built-in wire management features helped keep things tidy. The Phantom isn't available yet, but when it is, you can expect an MSRP of $139.99. It's an enthusiast price for an enthusiast case, but I don't think you'll be disappointed. The four included fans and built in fan controller will offset the cost somewhat, and for me, the thoughtful design and construction quality help make the case truly worth the price. Pros:
|
|||||||||||||||||||||||


Comments
PC-7FNWX
PC-P50WB
PC-60FNWX
PC-8FIB
PC-B25FWB
Just some suggestions...
#amazon.com/Cooler-Master-RC-830-KKN2-GP-Stacker-Black/dp/B000P4WH98/ref=sr_1_1?s=electronics&ie=UTF8&qid=1281690805&sr=1-1
803SE Stacker case. I wish it had the new mounting systems the newer cases have, but it's still very good in that respect and has a cable hiding side also. Mounts 7 120mm or 200mm in the side and three 120mm, back, top, front.
Guys, quick question - NZXT says they only guarrantee fitment of a 200 mm fan if you use the above one linked.
However on their website they say it is 37.25 dBA!!! Doesn't that seem awfully loud to you?
I just helped a friend install some new fans...(1) 200mm on the top and when I went to install the second one on the side panel the fan is hitting the liquid cooler. Has anyone else had this problem??? If so are there any ideas on how go work around it besides pulling off the 120mm attached to the rad. Any help would be great!!!
Thanks,
Skeeter