| Apple Hackintosh: Moving to Intel Sandy Bridge |
| Articles - Featured Guides | |
| Written by David Ramsey | |
| Monday, 08 August 2011 | |
Apple Hackintosh: Moving to Intel Sandy BridgeBenchmark Reviews has previously detailed our experience in creating an Apple Macintosh into Hackintosh: a computer built of PC components, running Apple's OS X operating system and applications. Apple doesn't make this easy to do, since they'd prefer you to buy a real Macintosh, but years of work by the enthusiast community has resulted in a support system of software, guides, and online forums that provide enough information for the dedicated Hackintosher to succeed. In this article I'll describe my experience moving my Hackintosh from its X58 hardware to a new Intel Sandy Bridge platform. EDITORS NOTE: Benchmark Reviews has also published an updated Budget Hackintosh PC Build Project, Hackintosh OS X Software Installation, and Hackintosh Performance Hardware Options. How It WorksBringing up a Hackintosh used to be the province of only the geekiest hackers, but due to the efforts of the growing Hackintosh community, it's gotten a lot simpler. It's not plug-and-play quite yet: depending on the hardware you have (and the up-front research you do), the experience can range from easy to impossible. I detailed my first experience building a Hacktosh in this article. Although several months have passed, the basic technique remains the same:
The above is a very simplified description of the process by which you bring up a Hackintosh. As always the devil's in the details. First, of course, it's important to realize that Apple's end user licensing agreements for OS X specifically restrict its installation to Apple branded hardware, so technically it's illegal to create a Hackintosh. That said, while Apple's shut down several Macintosh clone companies, they've never seemed interested in pursuing individuals or non-profit entities like the various Hackintosh-themed web sites. After several months of stable use of my original Hackintosh, I was itching to upgrade it from its X58-based Core i7 920 processor to the latest Sandy Bridge architecture. Flush with confidence from my previous Hackintosh experience, I began... Testbed FirstSince my Hackintosh is my primary system, I couldn't just rip it apart and start over. Instead, I set up the Sandy Bridge Hacktinosh on a test bed chassis. I used an ASUS P8P67 motherboard with a Core i7 2600K processor. This is not my favorite motherboard since it doesn't support NVIDIA SLI or external video from the Sandy Bridge iGPU, but it's a perfect platform for a Hackintosh. 
As before, I found the information I needed in the Insanely Mac forums, but it took a little more work than I thought it would. The forums are peppered with threads marked "GUIDE", which are instructions on how to bring up a Hackintosh on specific motherboards. I found one guide on how to bring up OS X Snow Leopard on an ASU P8P67 Deluxe (I have the non-Deluxe board), and another guide on how to install OS X Lion on several different ASUS P8P67 motherboards, with specific configurations for the P8P67, P8P67 Pro, and Sabertooth P8P67. I didn't want to install Lion just yet, since it breaks some software I still use daily (like Quicken...thanks for all your support, Intuit!), but the Snow Leopard guide was for a motherboard I didn't have. What to do? I wound up using the regae Boot CD from the first guide, and the "updater" for the standard P8P67 board from the second guide. The combination enabled me to get everything working perfectly. Well, almost everything... Installation FunHistorically, Macs have always come with installation DVDs for their OS; the previous generation MacBook Airs came with Snow Leopard on a read-only USB key. Apple's moving away from physical media, with the latest generation MacBook Air computers supplied with no installation media at all, but rather a recovery partition on their SSDs, much like consumer Windows machines. However, unlike Windows machines, the new Airs can restore their OS via a WiFi connection even if their SSDs are completely erased. None of this matters to a Hackintosher, of course, since you'll need a physical copy of an OS X installation disk or USB key to bring your machine up. As of this writing Apple still sells Snow Leopard 10.6.3 for $29.99, while OS X 10.7 Lion is available only as a download from Apple's App Store at $29.99 (although it's easy to extract a disk image file from the download and use it to create a bootable installation DVD). Apple plans to offer Lion on a USB key in a month or so. The regae boot CD has a pre-configured Chameleon boot loader and some utility software. After assembling the hardware for my Hackintosh, I booted from this disk, swapped it for the standard Snow Leopard installation DVD, and formatted the hard disk and installed Snow Leopard. At this point I could boot Snow Leopard 10.6.3 (after booting from the regae boot CD first), but video resolution was fixed at 1024x768, and audio and networking were nonfunctional. My next step was to apply the 10.6.8 combo update. This 1gb update file can be downloaded for free directly from Apple, but make sure you get the combo update, and not just the smaller 10.6.8 update, which is only good if you have 10.6.7 installed. The combo updater will update any previous version of the OS. Before you can run the update, though, you must dig deep within the OS X library and remove a specific kernel extension to avoid a crash in the update process. The regae boot CD comes with a nice Mac OS X 10.6.8 Helper utility that will do this for you. You'll need to reboot afterwards, then run the 10.6.8 update, then run the Mac OS X 10.6.8 Helper again to restore the kernel extension you removed previously. Remember that operating system updates that cause OS X to crash are just part of the Hackintosh experience. Booting to a black screenOne nice thing about the 10.6.8 update is that it includes native drivers for the Radeon 5xxx series of video cards, like the Radeon 5870 I'm using. However, after installing the update and rebooting, I was presented with a black screen after the initial gray Apple screen. Fortunately, I'd run into this before as I described in my previous Hackintosh article: the solution is to edit a few strings in the com.apple.Boot.plist file to explicitly set the OS X desktop to the native resolution of my monitor. After that, I could boot into 10.6.8 (after booting from the regae boot CD) with the full 1920x1200 resolution of my Dell 27" monitor, with full video acceleration. However, I still had to boot in two stages, and had no networking or sound. The next step is to install the Chameleon boot loader as well as the various kernel extensions that enable these features. Included on the regae boot CD is a "regaePackage v3.0" installer that allows you to configure and install a number of kernel extensions (kexts) that should enable these functions, as well as writing a copy of the Chameleon boot loader so you can boot directly from your hard disk. However, picking and choosing the kernel extensions required (and DSDT and other stuff) isn't straightforward, and since only the kexts for the ASUS P8P67 Deluxe motherboard are included, this wasn't a good solution for me since I had a different motherboard. The solution was to use an installer package from the second guide on InsanelyMac.com. Note that three installers are provided: one each for the vanilla P8P67, one for the P8P67 Pro, and one for the Sabertooth P8P67. I downloaded the first package, ran it, selected my hard disk and...success! With Chameleon and the proper kernel extensions automatically installed, I booted directly into OS X 10.6.8 Snow Leopard and had full network and audio. The package even enabled the Bluetooth module on the P8P67 and I was able to connect and use my Magic Trackpad. Moving the HardwareNow that my Sandy Bridge Hackintosh was working, it was time to move the hardware into my HP Blackbird case. The only problem was the water cooling: the Blackbird came with an integrated Asetek LCLC cooler (the basis for most of the all-in-one water cooler kits introduced since then) with a 120x240mm radiator built into the top of the case. The original pump/water block mounting system was for Intel Socket 775, and I was able to buy a Socket 1366 mounting system when I upgraded the system later. However, as far as I can tell, Asetek has never provided a Socket 1155/56 mount as a separate item, so I wound up using the Intel mount from an Antec Kühler H2O 920 Liquid Cooler. Since even the Antec cooler is based on the Asetek design, this worked perfectly:
UPDATE: Asetek contacted me to let me know that they sell a universal Intel/AMD mounting kit, and will have new kits available for motherboards based on Intel's upcoming LGA2011 socket, too. You can get the current mounting kit, which accomodates Inel socket 775, 1155/56, and 1366 as well as AMD sockets here for $10. With all the hardware installed, there was only one last step: restoring all my user applications and data from a Time Machine backup of my previous Hackintosh. This took several hours but when it finished I booted to a clone of my original system. Really, Time Machine rocks. The only extra thing I had to do was re-install a printer driver.
How did it perform? Join me in the next section to see. Hackintosh PerformanceThe extensive array of benchmarking software we take for granted in the Windows world doesn't really exist in the Mac world, so I'll be using the same three programs I used in my original Hackintosh article. This time I'll be comparing four systems:
Geekbench ResultsPrimate Labs' GeekBench is a "one-click" benchmark utility that performs a number of processor and memory tests; it does not test video cards or disk I/O. There are 12 integer CPU tests, 14 floating-point CPU tests, 5 basic memory tests, and 8 memory bandwidth tests. All tests comprise a mixture of single-threaded and multi-threaded versions. It produces a weighted composite score based on the individual scores. 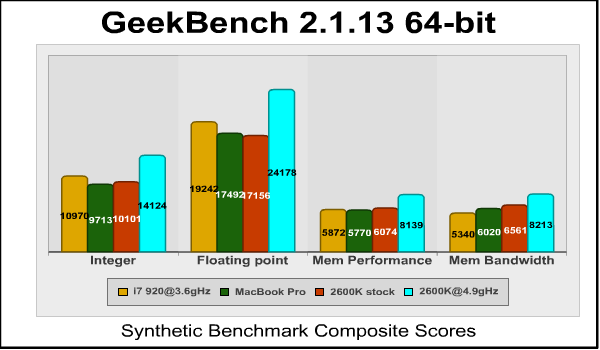
Interestingly, the original 920-based system produces better scores in the integer and floating point benchmarks than does the stock Sandy Bridge system. The overclocked Sandy Bridge system returns 28% better integer and 26% better floating point scores than the 920. Althought the Sandy Bridge memory system is dual- rather than triple-channel, it's running its memory at 1600mHz while the 920 was running at just over 1400mHz. The overclocked configuration has 39% better memory performance and 54% better bandwidth than the 920 system. These memory differences are much higher than I'd expect and I have no real explanation for them. Latencies were 9-9-9-24 in both cases. It's interesting to see how close the scores of the MacBook Pro are to the overclocked 920. The 2820QM mobile processor is virtually even with the stock-clocked 2600K in these tests. CINEBENCH 11.5Maxon Cinebench is a real-world test suite that assesses the computer's performance capabilities. Cinebench is based on Maxon's award-winning animation software, Cinema 4D, which is used extensively by studios and production houses worldwide for 3D content creation. Maxon software has been used in blockbuster movies such as Spider-Man, Star Wars, The Chronicles of Narnia and many more. Cinebench Release 11.5 includes the ability to more accurately test the industry's latest hardware, including systems with up to 64 processor threads and the testing environment better reflects the expectations of today's production demands. A more streamlined interface makes testing systems and reading results incredibly straightforward. The Cinebench R11.5 test scenario uses all of a system's processing power to render a photorealistic 3D scene, "No Keyframes", the viral animation by AixSponza. This scene makes use of various algorithms to stress all available processor cores.
The stock-clocked 2600K is just over 7% faster than the overclocked 920 in the single-core rendering test, but 53% faster when overclocked. In multi-core rendering, there's only a 5% advantage to the 2600K running stock, but the difference widens to 36% when overclocked. Again, the MacBook Pro is turning in scores that would have been unthinkable for a laptop computer even a year ago. Intel's mobile Sandy Bridge parts are quite impressive. Handbrake 0.95Few consumer applications will make good use of a six-core processor, or even a four-core processor. Extra cores can give you a system that remains responsive when performing a computationally-intensive background task, but will rarely accelerate the execution of an individual program. There are several reasons for this:
All that said, media transcoding (converting to a different format) is something that does scale well with the number of available cores, and the free and open-source Handbrake 0.95 video transcoder is an example of a program that makes full use of the computational resources available. For this test I used Handbrake 0.95 to transcode a standard-definition episode of Family Guy to the "iPhone & iPod Touch" presets. The encoding times are in seconds; lower is better.
The stock Sandy Bridge system is only about 4% faster than the overclocked 920, but the overclocked 2600K is 24% faster. The MacBook Pro trails here, but still turns in a credible performance for a laptop. I'll discuss my thoughts and present my conclusion in the next section. Final Thoughts and ConclusionThere were a few hiccups in bringing up my Sandy Bridge Hackintosh, and there are a few things that still don't work. The computer will not wake from sleep (so I disabled sleep), and if SpeedStep is turned on in the UEFI BIOS, then Turbo Boost doesn't seem to work. But neither of these items is critical, and both will likely be solved in the near future. The overclocked Core i7 920 CPU in my original Hackintosh turned in a very good performance, virtually equal to or better than the stock clocked 2600K in every test. This is why enthusiasts overclock: the 920 was launched almost three years ago, in Q4 2008, yet still, when overclocked, equals the performance of Intel's latest and fastest Sandy Bridge processor in most tasks. Of course, Sandy Bridge can overclock too, and that's where the performance benefits really come in. It's a lot easier to overclock these new CPUs; I didn't even need to bump the voltage to run reliably at 4.9gHz under load. Performance in this admittedly limited set of benchmarks was from 24% to 53% better than my original system, and I can certainly "feel" the speed in applications such as Photoshop CS5 and Windows 7 running under the Parallels virtual machine environment. The CPU performance of my Hackintosh is currently superior to any Mac you can actually buy from Apple except possibly the 8 and 12-core Mac Pro computers, which start at $3,500 and $4,999, respectively...and which would win only on heavily threaded applications since their Xeon processors are running at much lower clock speeds than my machine. But it's not all about performance: Apple's warranty, support, and walk-in-the-store service are things that Hackintosh owners will have to do without. The staff at Apple's Genius Bars don't come in for the opprobrium that Best Buy's Geek Squad does, and there's a reason for that: they (generally) actually know what they're talking about, but they're another resource you won't be able to make use if. Also, remember that any system software update has the potential to break your Hackintosh in several ways, ranging from losing sound to not being able to boot, so it's often best to hold off on updates for a few days until you can make sure that others have applied it successfully (or not). That said, I've never had any third party drivers or hardware fail to work: printers, scanners, Mac-specific keyboards and the like all installed and worked just as they would on a "real" Mac. The kexts installed on my machine even enable the USB 3.0 ports on my ASUS motherboard, which no Mac has and probably never will. How much trouble you'll have bringing up a Hackintosh depends on your hardware: Gigabyte motherboards are by far the best supported, with ASUS motherboards coming in second. If your existing PC is based on hardware that other people have used successfully to create a Hackintosh, all you really need to start is a separate hard disk to boot from. If you're planning to buy new hardware, make sure you do a lot of up-front research first, as the time you spend bringing your system up is inversely proportional to the work you do beforehand. Also: take notes. Keep track of precisely what you did to get your system working, and make sure you have boot CDs/USB keys and all the files and whatnot you need to bring your system back from scratch should it crash horribly. Keeping a dedicated hard disk disk for Time Machine (which makes automatic backups of any changed files in your system every hour) isn't a bad idea, either. All in all, I'm quite happy with my Sandy Bridge Hackintosh. EDITORS NOTE: Benchmark Reviews has also published an updated Budget Hackintosh PC Build Project, Hackintosh OS X Software Installation, and Hackintosh Performance Hardware Options.
Related Articles:
|
|


Comments
That's the kind of case I am looking for, What model is that?
The case the finished computer is in is an HP Blackbird case. It was never really available for retail sale-- you got it by purchasing an HP Blackbird computer. When HP shut down that division they did have a few cases for sale, but they were $1,000 each.
I would like to see more about this subject if I might suggest.
1. The cheapest full functioning build possible. How cheap can one build a workable Hackintosh where everything works including sleep. Will it be cheaper than a Mini?
2. And inexpensive notebook build. Can you find a sub $350 notebook.
3. A MacPro. Xeons and everything.
4. An i5 and i3 build. Nice middle ground systems.
Again thanks for your efforts.
I'd suggest you check out the big Hackintosh sites like Insanelymac.com and tonymacx86.com. You'll find tons of information there, and folks are building Hackintoshes out of damn near everything.
# RE: RE: Apple Hackintosh: Moving to Intel Sandy Bridge ? David Ramsey 2011-08-17 21:29
As far as I know, nobody has ever successfully run OS X inside a VM except on a real Macintosh. That's why."
Reply
I have. Inside Virtualbox. You just install OSX the same way with a chameleon bootloader inside the Virtualbox VM bubble. There are guides out there that explain how and its fairly easy. Though its more stable as a stand alone install with Chameleon..
I built my own $4k pc last year but this seams more challenging.
Also, does a hakintosh support the latest ssds like the m4?
Nothing is guaranteed with a Hackintosh, but with the resources available it's easier than ever to get one going.