| ASUS P8Z77-I Deluxe/WD mini-ITX Motherboard |
| Reviews - Featured Reviews: Motherboards | ||||||||||||||||||||||||||||||||||||
| Written by David Ramsey | ||||||||||||||||||||||||||||||||||||
| Wednesday, 14 November 2012 | ||||||||||||||||||||||||||||||||||||
ASUS P8Z77-I Deluxe/WD Mini-ITX Motherboard Review
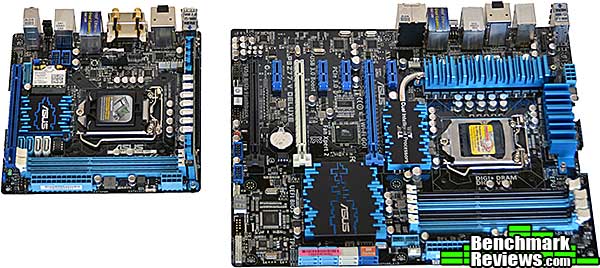
Manufacturer: ASUSTeK Computer Inc. Full Disclosure: ASUS provided the product sample used in this article. Small form factor (SFF) systems seem to have reached critical mass. Although they've been available for years from companies like Shuttle making custom motherboards, they've crossed into the mainstream. Enthusiast level micro ATX motherboards are available from a number of vendors, and we're now seeing the first of a new crop of enthusiast level mini ITX motherboards. ASUS has stepped up to the plate with their P8Z77-I Deluxe/WD motherboard, which I first saw months ago at an ASUS technology conference in Dallas. Micro ATX motherboards are the same front-to-back depth (244mm) as standard ATX motherboards, but their reduced width means there's only room for four slots. Mini ITX motherboards, on the other hand, are much smaller, at a mere 170x170mm. How small is that? Take a look at the P8Z77-I WD/Deluxe next to ASUS' own P8Z77 Deluxe:
You're down to one PCI-E slot, which for most users is fine, since the only card they'll have is a video card. Memory slots drop from four to two, but 8G DIMMs are affordable now. The real problem comes with everything else you need to fit on the motherboard, including a power supply capable of handling serious overclocking. Power supply components take room, and yet there's no room to be had...which led ASUS to make an innovative leap in mini ITX motherboard design. Closer Look: P8Z77-I Deluxe/WDThe tiny box lets us know that this motherboard is "Windows 8 Ready", "PCIe 3.0 Ready", and I suppose is good for something called "MiniMax Home Entertainment Center." But honestly, this board is overkill for an HTPC. ASUS has two versions of the P8Z77-I mini ITX motherboard: the P8Z77-I Deluxe and the P8Z77-I Deluxe/WD, the version we received for review. This version supports Intel's "WiDi" Wireless Display Technology, meaning that if you have a television, projector, or monitor equipped to receive WiDi, you can easily transmit your display to the receiver without using a cable. Sadly we had no WiDi devices available for this review.
ASUS includes a manual, WiFi and Bluetooth antennas, SATA cables, a driver CD, some mysterious extra screws, a "Q Cable" front panel connector cable conceptually similar to the "Q Connectors" on other ASUS motherboards, and an I/O plate.
The mini ITX form factor places severe constraints on space, and the crowded layout of the P8Z77-I Deluxe/WD is a consequence of this. There's simply no room for right-angled SATA connectors, or even another SATA controller, so instead of six or eight connectors at the edge of the board, you get four vertical connectors near the front. Near the back of the board you can see the USB 3.0 header, two USB 2.0 headers, and the front panel audio connector just at the rear of the single PCI-E slot. The 24- and 8-pin ATX connectors just fit on the front of the board.
The back panel of a mini ITX is the same size as the back panel on a standard ATX board, so there's plenty of room for the connections. Starting at the left, we have four USB 2.0 ports, a S/PDIF port on top of the HDMI and DisplayPort video outputs, the Bluetooth and WiFi antenna connectors above the DVI video output, Ethernet, four USB 3.0 connectors, two (red) eSata ports, a Clear CMOS and USB BIOS Flashback button, and three analog audio ports.
Here's where ASUS got kinky: there's not enough room on a mini ITX motherboard for the kind of robust power supply that's needed to support serious overclocking...so ASUS went vertical. Their "DIGI+ VRM for ITX" board stands vertically at the upper edge of the board. At the left of this image you can see the board's two four-pin PWM fan headers, one for the CPU fan and one for a chassis fan.
With so little space on the board, you're going to have to be satisfied with four SATA ports. The white ports are the two SATA 6G ports courtesy of the Z77 chipset. Just to the right of the SATA ports you can see the removable BIOS chip. 
You might be getting the feeling that this isn't just another mini ITX motherboard. Let's take a look at ASUS' added features. P8Z77-I Deluxe/WD Proprietary FeaturesThe vertical "DIGI+ VRM for ITX" board is the first thing that catches your eye. For overclocking, you need robust, multi-phase power, and ASUS' DIGI+ digital power supplies have brightened overclocker's days for some years now. There's no space for the components such a power supply needs on a mini ITX board, so ASUS went vertical, moving the extra power supply circuitry to a riser board. This board gives you a full 10-phase power supply (8 phases for the CPU cores and 2 phases for the integrated Intel HD4000 GPU), which should be enough for anyone short of the LN2 crowd. One downside of this board is that it restricts the CPU coolers you can use: in some cases the cooler will physically interfere with the board, while in other cases the board blocks access to the two closest cooler mounting points. This P8Z77-I is an idea candidate for a 120mm sealed water cooling system...of course this will depend on which case you use.
The wonders of miniaturization allows ASUS to cram both Bluetooth 4.0 and dual-band 802.11n WiFi radios onto a mini-PCIE card. The USB 2.0 and 3.0 headers cluster around it. If you're an overclocker, you'll be glad to know that ASUS supports up to DDR3-2400 memory on this board. Of course pushing your memory beyond the speed it can handle can result in a non-booting system, but ASUS has you covered: pressing this "MemOK!" button visible at the upper right of this image will reset the memory configuration in your BIOS to a bootable state so you can get going again.
The TPU switch is at the front edge of the board, just to the left of the 8-pin power connector. Flipping this switch enables a small automatic overclock, but you can do a lot better in the BIOS or using ASUS' own Turbo V Evo software, which is included with the board. The TPU chip also handles ASUS' USB BIOS Flashback feature, which allows you to reflash the onboard BIOS at any time, even without a GPU, processor or memory installed.
There's not much room to cram custom chips onto this board, but there's a Nuvotron voltage/monitor chip, ASUS' own TPU chip, and an ASMedia ASM 1042 USB 3.0 controller visible in this image. Just off the side of this image is an ASM 1442 video controller to support the various video outputs, and an Intel 82579V Ethernet controller. 
Then there are the features that you can't easily see, like the 8-layer PCB, which (among other things) allows for optimizing the traces to the DIMM slots, or the "5K" capacitors (visible at the right of the above image), rated to run at 105 degrees Celsius. Most other mini ITX board use lower-rated 2K capacitors; ASUS claims that 5K caps will provide better life and reliability in the typically tighter, hotter environment of a mini ITX case. Let's check out the UEFI BIOS in the next section. P8Z77-I Deluxe/WD UEFIThe P8Z77-I Deluxe/WD comes with the latest version of ASUS' UEFI (Unified Extensible Firmware Interface) BIOS. UEFI has freed motherboard vendors to provide much more graphically rich and capable BIOSes, and ASUS' is one of the better ones out there. The BIOS defaults to "EZ Mode", which gathers most of the important items you'd want to see or alter in a single interface as shown below.
Most Benchmark Reviews readers, of course, will want to switch to "Advanced Mode" (and you can configure this as the default if you wish). In Advanced Mode, you click on one of a series of tabs across the top of the screen to select the area you're interested in. This shot shows the Onboard Devices Configuration screen.
The SATA Configuration subscreen is where you'd set IDE or AHCI mode, enable or disable S.M.A.R.T., and turn on hot pluggability. You can also see which devices are plugged into which SATA port.
You kids these days, you don't know how good you've got it. When I was your age, you had to create and boot from a specially configured floppy to update your BIOS, and if you screwed it up, you turned your motherboard into an expensive place mat. Now it's easily done from a USB key inside the BIOS as shown below, and even if you totally screw it up, ASUS' USB BIOS Flashback feature can flash a good BIOS onto a munged BIOS chip even if the motherboard has no processor or memory installed. By the way, you can see in this shot that ASUS has switched to using the ".CAP" format for their BIOS updates. According to ASUS, this is a more advanced and secure format that allows some optimizations (such as choosing not to initialize onboard controllers as opposed to disabling them) that can improve POST and boot times.
The Monitor tab collects voltage and temperature information on the components of your system. This is also where you can set the way the fans work, although with only two fan headers on the motherboard, there's not a lot going on here. Just turn on Q-Fan control and be done with it. You can make more detailed fan settings using AI Suite II from within Windows.
There are quite a few sections in this BIOS-- modern UEFI systems allow for much more than was possible with the old BIOS system-- but a quick press of F3 invokes a popup you can use to jump directly to a specific place:
ASUS philosophy is to give you every setting in the UEFI, but more elaborate control from within their Windows utilities. It's good to have this stuff in the UEFI since changes made here will work with any OS. For example, take the EPU setting shown below. This applies simple undervolts to the CPU when possible, reducing power without affecting performance. However, this is distinct from the EPU settings in AI Suite in Windows, which offers more options. 
Let's take a look at the AI Tweaker part of the UEFI BIOS in the next section. P8Z77-I UEFI: AI TweakerThe most interesting section in the Advanced Mode of the P8Z77-I UEFI BIOS is the AI Tweaker. It's similar to what we've seen in previous ASUS motherboards, and its presence here reinforces the fact that ASUS sees this as an enthusiast level board rather than something to simply be stuffed into an HTPC box and forgotten about. AI Tweaker offers very detailed control of clock speeds, timings, and voltages. This is the screen most overclockers will start with. Here you can control the turbo ratio, which is the main overclocking mechanism for Sandy Bridge and Ivy Bridge processors. You can select different ratios depending on the number of cores in use, or force all cores to run at the same ratio. ASUS Multicore Enhancement will, when enabled, force all cores to run at the maximum boost speed under load, rather than ramping up more gradually.
Of course, simply cranking clock speeds and voltages won't guarantee a stable overclock, so ASUS gives you the ability to adjust a number of power supply parameters. Scrolling down the settings in the main AI Tweaker screen, we come to the power controls. This is where some of the real magic occurs, especially in the CPU Power Management and DIGI+ VRM sections.
Generally speaking, cranking these settings up trades off power efficiency for performance. Some settings, like CPU Current Capability, really let you push the boundaries of what's safe. It's fairly hard to smoke a modern CPU just with overclocking, as built-in thermal limits will drop (throttle) the clock speed or even shut down the CPU entirely if necessary. But pushing the current capability, while it doesn't change anything in and of itself, disables some of the protections Intel builds into its CPUs and lets you run more power through it than you'd normally be able to do, so tread carefully.
Serious overclockers will want to adjust memory timings as well, and ASUS gives you more ways to do this than most of us will ever use, or even understand.
This is only a sample of the screens and capabilities built into this BIOS; there's a lot more than what you see here. Having all these capabilities in the BIOS is especially useful if you're using a non-Windows OS like Linux or Mac OS X since changes here apply regardless of the OS you're using. However, if you are using Windows, there's even more control available through ASUS' suite of utility software, which I'll cover in the next section. Mini ITX Bundled SoftwarePoring over hardware details is fun and all, but much of the functionality of a modern motherboard depends on its software, whether it's intrinsic like a fancy BIOS or Windows-based applications and utilities. ASUS efforts in this regard have been evolving over the years and the current version of their AI Suite II software merits a multi-page review in its own right. AI Suite II is actually a collection of separate utilities controlled by a common GUI. You select the utility you're interested in via a popup menu from the main utility window, and you can select which items appear in the menu from this screen. Briefly, they are: 
TurboV Evo is an automatic performance and overclocking tool comprising detailed controls for CPU, memory, and power circuitry. I used this feature to create my overclocking profile as I'll explain in a later section. EPU is a power-saving feature. You can select various tradeoffs between performance and power-saving, and the utility even purports to show the milligrams of CO2 emissions you've saved. As a side note, it's interesting to watch the real-time readout of "Current CPU Power" at the lower right of this screen. When overclocked, I saw CPU power readings as low as 4.31 watts idling at the Windows desktop and as high as 99.99 watts running a stress test. Bear in mind that the AI Suite II implementation of this feature goes beyond what the EPU setting in the BIOS can do. 
The Probe II panel shows the voltage and temperature of various components, as well as fan speeds. You can set alert thresholds for all of these and the utility will warn you if an alert threshold is triggered. 
You can set the WiFi Engine to either "Client Mode", where it simply operates to connect your system to the internet, or "AP Mode", in which you can share a hardwired internet connection with WiFi, making your system a WiFi router. 
USB Charger+ and AI Charger+ are intelligent USB charging utilities; extensions to ASUS' original AI Charger, which only worked with Apple devices. Which devices these features work with and which ports they use vary. It's a little complex but ASUS provided a handy chart:
*Charging must begin before the board enters the S5 state. AI Charger+ implements the USB consortium's Battery Charging 1.1 standard. Previously the official current limit for a USB port was 500 milliamps, and various motherboard vendors came up with their own 1500ma schemes. BC 1.1 formalizes this so that up to 1800 ma can be drawn from a dedicated port (with no data flow), 1500ma in low speed mode, and 900ma in high speed mode. USB Charger Plus is a USB charging solution you can configure for ASUS, Apple, Kindle, or "other" tablets and devices. You can configure this feature to charge connected devices even when the computer is asleep or turned off. 
Network iControl lets you prioritize packets and save specific configurations. You can arrange a list of running, network-accessing programs to assign the priority each one has on your network bandwidth. For example, online gamers can give higher priority to packets for a game; alternatively, if you're streaming video content, you'd want to give higher priority to your player application. 
There are still a few more AI Suit II items to cover in the next section. Bundled Software ContinuedThe Digi+ VRM panel allows very detailed control of ASUS' advanced digital power regulation circuitry. Settings here are critical for serious overclockers, and some time spent with these settings can make the difference between a flakey system that can't make it through a benchmark run and a stable system that runs under full load all day. 
Fan Expert is the same software ASUS has been propagating across its motherboard line of late. The latest version can automatically determine the RPM range of your fans and slave the fan response to temperature sensors using either predefined or user defined profiles. It pretty much obsoletes separate fan controllers, but since the P8Z77-I Deluxe/WD is limited to two fan headers (one of which is for the CPU), high performance builds may have more fans than you can connect here. 
There's also USB 3.0 Boost, which is actually two strategies for dramatically increasing the speed of USB 3.0 transfers. The first is UASP, or USB Attached SCSI Protocol (UASP must be supported by the controller in the attached device). The fallback is ASUS' optimized bulk-only transfer, which can provide a dramatic increase in USB 3.0 read speeds. In the screen shot below, notice that UASP is not offered as an option since the attached device-- a SanDisk Cruzer USB key-- does not support it. Benchmark Reviews has previously tested the performance improvements provided by these enhanced USB 3.0 protocols here. 
Sensory Recorder can monitor voltage, temperature, and fan speeds in real time, and graph the results. This is very handy for overclockers who want to keep tabs on system stability. However, on my review sample, the CPU temperature under load was over 50 degrees Celsius cooler than the temperature reported by other utilities such as AIDA64 and Core Temp. In this particular example, taken a minute or so after starting a stress test, the ASUS utility reports the CPU temperature as 41 degrees, while other utilities reported mid-to-high 90s. Since all the utilities merely report the temperature returned by the CPU's internal sensors, I'm not sure what to make of this. I've asked ASUS about it and will update this part of the review when they get back to me. Update: ASUS says that their Probe software is reporting the temperature of a thermistor in the center of the CPU socket, rather than reading the temperature reported by the CPU itself. ASUS says this is "one of the most accurate reporting methods" of measuring the CPU temperature with the obvious limitation of needing more time for the temperature reading to increase under high CPU loads. 
In the meantime, let's start with the actual testing in the next section. Motherboard Testing MethodologyAfter a few years of testing motherboards, I've noticed that motherboards based on the same chipset tend to have very similar performance. This wasn't always the case, but now that the memory controller's in the processor, and the PCI-E lanes are in the chipset, it's not surprising that everyone's "Y22" chipset motherboard performs pretty much alike...at stock settings, anyway. So testing motherboards, unlike testing CPUs or video cards, is more about examining the proprietary features that make one different from another, as well as testing a board's overclocking ability, especially if it's marketed to the enthusiast community. Now, the P8Z77-I Deluxe/WD isn't really marketed as an overclocker's board, certainly not like ASUS' Maximus or Rampage series. On the other hand, there's little reason to even build a Z77-base mini ITX board unless that's one of your goals, especially given this board's extended power circuitry. I tested this board with a Core i7-3770K CPU at both stock and overclocked speeds. For the overclock, I used the TurboV Evo automatic overclocking utility from AI Suite II, which has two buttons: Fast and Extreme. I ran these benchmarks with overclocks achieved with both settings. Test System
Benchmark Applications
I'll start with synthetic benchmarks in the next section. AIDA64 Benchmark ResultsAIDA64 is a full 64-bit benchmark and test suite utilizing MMX, 3DNow! and SSE instruction set extensions, and will scale up to 32 processor cores. An enhanced 64-bit System Stability Test module is also available to stress the whole system to its limits. For legacy processors all benchmarks and the System Stability Test are available in 32-bit versions as well. Additionally, AIDA64 adds new hardware to its database, including 300 solid-state drives. On top of the usual ATA auto-detect information the new SSD database enables AIDA64 to display flash memory type, controller model, physical dimensions, and data transfer performance data. AIDA64 v1.00 also implements SSD-specific SMART disk health information for Indilinx, Intel, JMicron, Samsung, and SandForce controllers. All of the benchmarks used in this test- Queen, Photoworxx, ZLib, and hash- rely on basic x86 instructions, and consume very little system memory while also being aware of Hyper-Threading, multi-processors, and multi-core processors. Of all the tests in this review, AIDA64 is the one that best isolates the processor's performance from the rest of the system. While this is useful in that it more directly compares processor performance, readers should remember that virtually no "real world" programs will mirror these results.
The Queen and Photoworxx tests are synthetic benchmarks that iterate the function many times and over-exaggerate what the real-world performance would be like. The Queen benchmark focuses on the branch prediction capabilities and misprediction penalties of the CPU. It does this by finding possible solutions to the classic queen problem on a chessboard. At the same clock speed theoretically the processor with the shorter pipeline and smaller misprediction penalties will attain higher benchmark scores. Like the Queen benchmark, the Photoworxx tests for penalties against pipeline architecture. The synthetic Photoworxx benchmark stresses the integer arithmetic and multiplication execution units of the CPU and also the memory subsystem. Due to the fact that this test performs high memory read/write traffic, it cannot effectively scale in situations where more than two processing threads are used, so quad-core processors with Hyper-Threading have no real advantage. The AIDIA64 Photoworxx benchmark performs the following tasks on a very large RGB image:
The TurboV Evo overclocks at standard and extreme levels add 8.3% and 24.1% to the Queen scores. Oddly, the PhotoWorxx scores go down very slightly, probably because this memory-intensive benchmark was affected by the fact that Evo dropped the memory clock from 2133MHz to 1923MHz.
The ZLIB improvements might look minimal, but that's just an effect of scaling. The overclocks added 8.4% and 24.7% to the ZLIB scores, and 8.3% and 24.2% to the Hash scores. SPECviewperf 11 Tests ResultsThe Standard Performance Evaluation Corporation is "...a non-profit corporation formed to establish, maintain and endorse a standardized set of relevant benchmarks that can be applied to the newest generation of high-performance computers." Their free SPECviewperf benchmark incorporates code and tests contributed by several other companies and is designed to stress computers in a reproducible way. SPECviewperf 11 was released in June 2010 and incorporates an expanded range of capabilities and tests. Note that results from previous versions of SPECviewperf cannot be compared with results from the latest version, as even benchmarks with the same name have been updated with new code and models. SPECviewperf comprises test code from several vendors of professional graphics modeling, rendering, and visualization software. Most of the tests emphasize the CPU over the graphics card, and have between 5 and 13 sub-sections. For this review I ran the Lightwave, Maya, and Seimens Teamcenter Visualization tests. Results are reported as abstract scores, with higher being better. LightwaveThe lightwave-01 viewset was created from traces of the graphics workloads generated by the SPECapc for Lightwave 9.6 benchmark. The models for this viewset range in size from 2.5 to 6 million vertices, with heavy use of vertex buffer objects (VBOs) mixed with immediate mode. GLSL shaders are used throughout the tests. Applications represented by the viewset include 3D character animation, architectural review, and industrial design. MayaThe maya-03 viewset was created from traces of the graphics workload generated by the SPECapc for Maya 2009 benchmark. The models used in the tests range in size from 6 to 66 million vertices, and are tested with and without vertex and fragment shaders. State changes such as those executed by the application- including matrix, material, light and line-stipple changes- are included throughout the rendering of the models. All state changes are derived from a trace of the running application. Siemens Teamcenter Visualization MockupThe tcvis-02 viewset is based on traces of the Siemens Teamcenter Visualization Mockup application (also known as VisMockup) used for visual simulation. Models range from 10 to 22 million vertices and incorporate vertex arrays and fixed-function lighting. State changes such as those executed by the application- including matrix, material, light and line-stipple changes- are included throughout the rendering of the model. All state changes are derived from a trace of the running application.
SPECviewperf tests actually comprise code from real-world applications, so their results are more indicative on total system performance than the pure CPU performance we see from synthetic tests like AIDA64. Still, overclocking produces some noticeable performance improvements, especially in the Lightwave and Maya tests, where the Extreme overclock bumps scores by 8.5% and 19%, respectively. Power Efficiency TestsThe first PC I built for myself, back sometime in the 80s, used a 250 watt power supply, and frankly at the time that was overkill. Overclocked multi-GPU enthusiast systems can easly exceed 700 or 800 watts under load, and can go even higher with extreme cooling and high voltages. My test bed uses an 850 watt power supply. Perhaps this is why all CPU and GPU vendors are imbuing their products with power-saving features, and why motherboard vendors try to add even more. And the use of these features can make a significant difference in the power use of your system. To test the power-saving features of the ASUS P8Z77-I Deluxe/WD motherboard, I measured the power draw of the system (with no video card, and the monitor connected to the iGPU) with all the power-saving features in the EPU section of the BIOS enabled, and with all the power-saving features disabled.
The only difference I saw in power usage was under load, where turning on all EPU features including "vCore Voltage Downgrade" dropped load power from 124 watts to 87 watts. However, the vCore drop meant that all turbo features on the CPU were disabled, and it ran at 1.6GHz all the time, even under load. Obviously this had a dramatic effect on performance! This is the opposite of what I saw when testing the power saving features of the MSI MPOWER motherboard, where turning on all the power saving features reduced idle power usage and had no effect on load power usage. ASUS offers more fine-grained control of various power feature both in the BIOS and through AI Suite II, so it's possible with more fiddling around I could have achieved different results. As it is I don't see why anyone would buy a high performance motherboard like this and cripple its performance by fully enabling this feature. Mini ITX OverclockingASUS does not specifically market this motherboard to overclockers, but it's hard to see why else they'd have such elaborate power circuitry on it. And like many ASUS motherboards, there are a variety of overclocking mechanisms available: you can flip the TPU switch on the motherboard; choose manual or automatic overclocking directly in the BIOS, or choose manual or automatic on-the-fly overclocking inside Windows using TurboV Evo. This last method is both convenient (you don't have to reboot) and easier to do than BIOS overclocking. Normally, I prefer to overclock manually, but I've used this Core i7-3770K on several motherboards now, and I know that with the air coolers I have available, it's maxed out at 4.7GHz on all cores, running just at the hairy edge of throttling under extended load. So I decided to see what TurboV Evo could do on its own. I fired up the utility and clicked the "Extreme" button. TurboV Evo works by increasing clocks and voltages in steps, running a short stress test, then bumping the settings up again. It continues this cycle until the system freezes or crashes, and upon the next reboot restores the last good settings. I have always though that I could do better than any automated overclocker, so I set it to work and did other stuff until the system crashed. Imagine my surprise when after a reboot I saw this: 
That's right: 4.842GHz at 1.3V, achieved with a base clock of 103MHz and a multiplier of 47. Pretty impressive! There's just one problem: it turns out that my previous assumed maximum of 4.7GHz was in fact correct for this CPU, since stress tests at these settings revealed some significant throttling, with CPU temperature spiking to over 100 degrees Celsius, causing clocks to drop by several hundred MHz until the CPU could cool down. A second overclocking run with the "Fast" button (rather than "Extreme") resulted in a more modest result with the same base clock of 103MHz and a multiplier of 41, for 4.223GHz. CPU temps and throttling were not a problem with these settings. TurboV Evo adjusts memory settings up from the SPD defaults (generally 1333 or 1600MHz), rather than from the XMP profile, so my 2133MHz memory was clocked at 1923MHz. This is indeed a nice step up from 1600MHz but if you have high performance memory with an XMP profile, you'll need to enable that manually; but be aware that since TurboV Evo may also raise the bus clock (as it did in this case), you'll be running your memory beyond spec, too. In both cases TurboV Evo set the memory frequency down slightly from the XMP spec of 2133MHz to 1923MHz. ASUS explained that TurboV Evo starts working up from the SPD settings (the memory's default) rather than using the XMP settings if they exist. So while the "Extreme" setting produces impressive results, you should check to make sure that it's not pushing things just a little too far. Still, look at the benchmark results: the CPU may have been throttling some, but the scores are still much better than those produced by the "Fast" overclock. I'll give my final thoughts and conclusion on this motherboard in the next section. ASUS P8Z77-I Deluxe/WD Final ThoughtsI have to admire ASUS for producing this board. Although we've seen a lot of action in the micro ATX and mini ITX form factors of late, with innovative new motherboards and cases, the fact is that the vast majority of motherboard sales are full sized ATX boards. And (especially in the mini ITX world) the people that buy these motherboards almost always have HTPC or small home server use in mind. And if that's what you're looking for, there are much less expensive mini ITX motherboards available. The feature set of this board is amazing: aside from the hardware expandability limitations imposed by the mini ITX form factor, you're giving up almost nothing in comparison with ASUS' own micro ATX and full ATX motherboards. The feature set is so extensive it would require a much longer review to cover them all in details; you can see the complete feature list on ASUS' web site. If youv'e never built a mini ITX system before, keep this in mind: with a single PCI-E x16 slot, only four SATA ports, and two memory slots, your options are very limited compared to an ATX or even a micro ATX board. Still, few enthusiasts need more than a single video card if they're not running multiple monitors, and 2x8GB memory kits are actually slightly cheaper than 4x4GB kits at Newegg just now (of course memory prices are very volatile, so your mileage may vary).
The board's value is enhanced by ASUS' robust suite of utility software and premium features like DTS Ultra PC II sound via an ALC898 chip. If you're interested in this board, you want to build a small system (otherwise you'd be looking at micro ATX or larger motherboards) and you want it to be high performance (otherwise you'd be looking at less expensive motherboards). That said, you'll want to choose your case and power supply carefully: most mini ITX enclosures won't accommodate enthusiast level CPU coolers, for example. I have only two real criticisms of this board. The first, paradoxically, is one of its strongest features: the Digi+ VRM for ITX riser board that extends vertically from the edge of the motherboard. If your CPU cooler requires screwing fasteners down from the component side of the board, you may not be able to reach the two screws nearest this board. For example, it's impossible to install a SilverStone SST-NT06-E cooler because of this. Even the Prolimatech Super Mega cooler I used here has less than a millimeter of cleareance. ASUS says that their board layout places the CPU socket further from the PCI-E slot than competing mini ITX boards, which actually allows larger coolers, but in any case you'll still want to check whatever cooler you use before getting too far into your build. My second criticism is the price. At an MSRP of $200, this board is $40-$60 more expensive than many of ASUS' own similarly featured micro ATX and full ATX Z77 motherboards. Of course, there are reasons for this, such as the 8-layer PCB that forms the basis of the product (most motherboards are 6-layer). Making things smaller costs money; that's just the way it is. You can save $15 by getting the non-WD version for $185.00. Still, you really have to want to build a small system to justify the cost of this board. P8Z77-I ConclusionIf you want to build a high performance mini ITX system, this is definitely the board for you. ASUS has squeezed more features and functionality into this board than I would have believed possible, and the performance of the board showed that nothing was sacrificed (performance-wise) to do so. The performance of this board is exceptional, fully the equal of ASUS' larger Z77 motherboards. But there's more than just CPU performance, and the USB 3.0 Boost feature makes the most of your USB 3.0 devices, especially if you have those that support UASP. The color scheme is ASUS standard black and blue (black and red being reserved for the Republic of Gamers series). There's not as much branding and logos on this board simply because there's almost no space for it, but since a cooler and video card will cover most of the board anyway, its appearance is irrelevant. The construction quality is up to ASUS' usual high standards. The use of an 8-layer PCB is unusual in the mini ITX world, and ASUS claims that this enabled them to optimize trace routing (especially to the DIMM slots) for the best performance. It's one of those things you don't see, but it's there. Functionality is the board's strongest point. Most LGA1155 mini ITX boards are based on the less capable H77 chipset; ASUS' choice of the top-end Z77 chipset enables them to provide most of the features you'll find on a full sized ATX motherboard, with the obvious exception of PCI-E and DIMM slots. AI Suite II remains as versatile and capable as it is on ASUS' larger offerings. As for value... well, that's kind of an either/or proposition. For the Deluxe/WD model it's $200 (Newegg/Amazon), or Deluxe non-WD version is $185 (Newegg/Amazon), which makes this board is significantly more expensive than equally capable, if larger, Z77 boards from ASUS and other vendors. You're paying for small size, and you either really need it (in which case it's worth it), or you don't (in which case it's not). Pros:
|
||||||||||||||||||||||||||||||||||||


Comments
I'd like to build one of these just like yours, except for using a spare GTX 690.
Any idea what case to use to house this system? I've never even seen these small boards in person so I have no idea where to start in choosing a case. I guess I could just use a test stand, but it's dusty here at the beach and I really need an enclosure that can handle the Super-Mega cpu cooler. Probably be best to go with an external water system but they're not very portable.
Very good review. It's really got me jazzed!
My computer room looks like a small graveyard full of black obelisks.
This is the 21st century, there's really no need for these giant OC & gaming rigs any longer. Not if these tiny mobo's are as good as reported.
I just hope Intel gets nowhere, fast, with their new mobo's with the soldered on cpu's.
They could end up being the death of overclocking just to save some electricity.