| Thermaltake Spedo Advance Package VI90001W2Z |
| Reviews - Featured Reviews: Cases | |
| Written by Tim White - Edited by Olin Coles | |
| Monday, 01 June 2009 | |
Spedo Advance PackageThink excitement - Think Spedo! At least that's Thermaltakes' spin on it. But what's in a name anyway? Well, a lot less than what's packed inside this Spedo... Spedo Advance Package gaming chassis that is. Name aside this case at first glance appears to have a lot going for it. It has a laundry list that would rival St. Nicks naughty/nice list in length, items such as Advanced Thermal Chambers (A.T.C. 3) and Cable Routing Management (C.R.M. 3). Is all this stuff needed or is this a gimmick? Benchmark Reviews will take a closer look at the outwardly impressive Spedo Advanced Package full tower case (model VI90001W2Z) and see if this is eye candy or the real deal. My hopes are high as this is really the first case that I've reviewed that has many of missing elements on my cons list of previous chassis reviews. The Spedo Advance is Thermaltakes attempt at improved thermal management through better airflow direction while also separating each heat source from one another with strategically placed plastic inserts. In theory this should allow each heat source to cool itself better by not introducing additional heat from the other sources. These air chambers are combined with an excellent cable management system to offer a unique spin on component cooling. On top of all of that, throw in six included fans (3 x 120mm, 1 x 140mm and 2 x 230mm) with two optional locations for fans and you can see the Spedo Advance chassis takes cooling seriously.
As you can see in the image above there are many vents, channels, intakes and exhausts. This is a huge departure from the typical tried and true in lower front out upper rear approach. Think Spedo, think excitement. Well I truly am excited to try this chassis out. As stated above it has many features I've felt have been missing in so many chassis designs. Let's move on and see how all this pans out. Spedo Advance Package Features
VI90001W2Z Specifications
About ThermaltakeWe live in a world where most things seem to move at the speed of light. At Thermaltake, we feel the same way and that is exactly how Thermaltake conducts itself to deliver innovative, reliable and customer-centric solutions to the worldwide market. Since the beginning of Thermaltake in 1999, it has been at the forefront of creating new and exciting products at a time where most computer users were provided little to no choices for components that may seem irrelevant, but in reality crucial to the performance of a PC. Thermaltake Server Series solutions, with years of thermal experience and industry leadership, sets its goal on reforming total thermal management in server segment by formulating the perfect mixture of versatility, efficiency and thermal management with each respective server product category: Rackmount Chassis, Server Fixed & Redundant Power Supply and Server CPU Cooling Management Solutions. With its comprehensive line of products available, it enables Thermaltake's core customers to enjoy a one-stop-shop experience, reduce product design-in evaluation period and most important of all, flawless integration process. Each of Thermaltake's strengths enables its customer to focus on their core business while taking advantage of the skills and efficiency of a single thermal management solution partner. Closer Look: Spedo ExteriorI almost hate to say this but this chassis arrived to me with minor damage. The chassis is boxed with the rear of the case at the bottom of the box and the front at the top. The top and bottom of the chassis are encased in foam. Nothing covers the front drive bays. If anything is stacked on the box off center it only needs to push enough to bend the cardboard flaps and you now have dented drive bay covers. I blame this both on the shipping company and Thermaltake. I can't believe this would be the first time this has happened with this packaging design. I do think they should look at their packaging process for this case. I didn't mention this to Thermaltake but I know they would have taken care of me if I had. This was not a huge deal for me or most I'm sure as I usually remove at least two bay covers for DVD drives anyway but worth mentioning all the same. If a small packaging change can save many RMAs let's do it.
Tall dark and handsome. This case is BIG! The front view is very clean with no cumbersome buttons or knobs save the power and reset buttons which are flush with the front bezel. Looks are very subjective but I think most will agree the Spedo Advance is aesthetically pleasing. The entire face bezel is black mesh, with plastic trim on either side. The bezel removes very easily for cleaning as you'll see in the details section. At this price range I think it would be nice to have optional front external inputs like USB, eSATA, mic and headphone. Not a deal breaker you can buy them online for about $20 but it would be nice all the same.
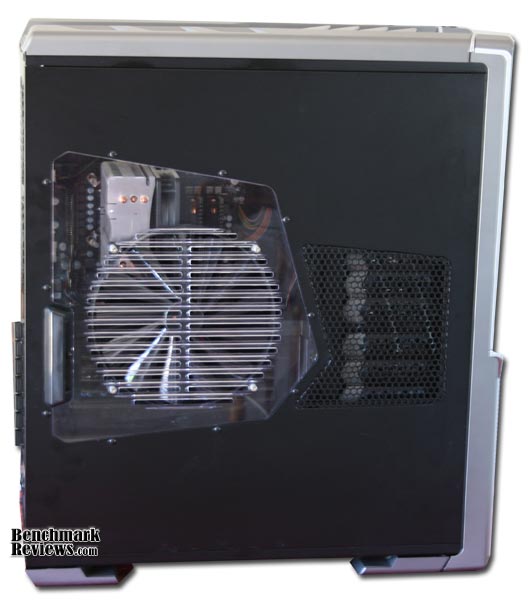
On the left side panel you can see an acrylic window, with slits in it. The slits feed a 230mm intake fan. The fan is huge covering most of the window. The fan is big enough to blow cool air on pretty much the entire motherboard. With the Advanced Thermal Chambers (A.T.C. 3) I'm left wondering really how effective this fan might or might not be. Will this help cool or will it create turbulence which equals noise? We'll have to wait and see.
On to the rear and starting at the bottom you can see this chassis has a bottom mounted PSU. This is the norm lately for full tower cases. What I like about this specific example is the ability to mount bottom mount fans like my Corsair TX750 correctly with the fan facing down. More about that in the details. Moving up you can see eight vented expansion covers. At first glance they appear to be held in place with the tooless design. However upon closer inspection they are actually non re-usable knock outs. That's bad enough but Thermaltake did not include any of the standard expansion covers to replace any no longer needed open bays etc. Above those are two 120mm exhaust fans. It's worth mentioning these fans are standard 4 pin molex plug designs so no option of monitoring them with the 3 pin motherboard connections. To the left of the fans are two grommets for water cooling options. The rear of this case is very reminiscent of the Antec 1200.
Around to the right side you'll notice what is very rare but what I hope will become standard on most "gamer" cases. The case door has vents in it that allow cool air to be brought into the case underneath the motherboard. Inside the door this chassis has a mount for one 120mm fan which can blow cool outside air to the underside of the CPU. I can see other uses for this as well including in lieu of the fan, with minor modification you could mount CPU coolers without removing the motherboard. Very nice. Near the front is more mesh venting that allows air to pass horizontally through the case across the hard drives which mount horizontally and left to right. The height of the feet is key when having a bottom fan PSU mounted correctly. That clearance equals life giving air flow to your expensive PSU.
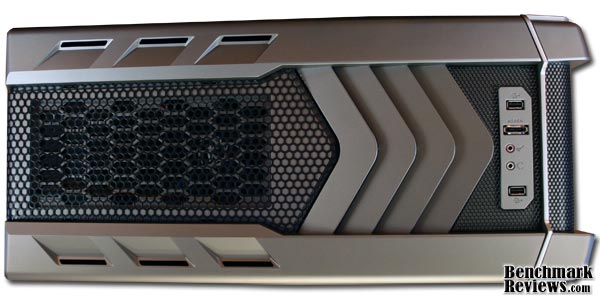
On to the top. The rear half is covered in large honeycomb mesh which offers all but unrestricted airflow out of the case from the top 230mm exhaust fan. The triangular vents on the front half allow cool air to be brought into the chassis. The front most contains two USB ports on either side, headphone, mic and eSATA in the middle. Gone is firewire, which is slowly becoming the norm on the modern gamer chassis.
The bottom of this chassis has two vented areas. One for the bottom mounted PSU and one for a 120mm fan. This 120mm fan mount may help those that have a front to rear cooling PSU such as PC Power and Cooling Silencer but will do very little for bottom fan PSU's such as the Corsair units. The feet on this case are very large and can be oreinted in two ways. Front to back as pictured above or the can swivel out. Detailed Exterior FeaturesThe chassis exterior is made up mostly of black painted steel, black steel mesh and plastic trim on the front, top and feet. The molded plastic pieces blend very well into the steel parts. The fit and finish are all very nice, no gaps, no sharp edges. This case is very large and weighed in around 32 pounds.
Above you can see what is quickly becoming standard with front external inputs. Left to right is USB, 3.5mm headphone jack, 3.5mm mic jack, eSata, and another USB. Missing is the firewire port. Firewire seems to be losing ground to eSata very rapidly. This sits ok with me as nowadays the newest electronics; specifically digital camcorders aren't requiring firewire anymore.
To the side is the monster 230mm intake fan centered in an acrylic window. The fan is a wireless design of sorts, not that it gets power through the air but when you remove the door there are no wires to tug and pull out. It uses a simple contact system to power the fan when the door is attached. Notice the fan wire making its way to the bottom of the door to a very small contact. The door is held on with a rear latching system. This will be handy for those of us that constantly tinker. Simple but it works well. There are also thumb screws to fasten the door more securely.
Here's a closer look at the contact area for the door fan. This contact is on the bottom of the chassis side. These small contacts mate up with the contact plate mounted to the door. This system works great so far. In the small amount of time I've had with this case I've had zero issues.
Finally! I got my backside CPU vent. This can benefit users in two possible ways. One, you install the included fan and either direct cool air in directly on the back side of the CPU and motherboard or pump hot air out, or two, don't install the fan and remove the fan grill (granted some easy mod work, cutting etc.) to allow easy access to your screws on heat sink/fan without removing the motherboard. I like this a lot! ***follow up, since writing this article I've used the case a bit more. When used as an exhaust, this fan creates a good bit of noise. Enough that I have since unplugged it. I will follow up down the road, given the chance and try the fan bringing cool air in to see if it makes a difference in noise levels.
Rounding out the exterior features are the positional feet. These feet swivel outward to allow more stability. The case weighs enough in my experience that this would be unnecessary. Although if for some reason it was freestanding somewhere for example in the middle of the floor and not against a wall or desk it's tall enough that it could get pushed over if bumped so this could be a case of better safe than sorry? These feet swivel in and out and are held in place by friction and eight small offsets around the swivel point. Once the feet are positioned they stay in place very well. Closer Look: Spedo InteriorThe interior of the Spedo Advance is all done in satin black paint which matches the external color perfectly. It is very smooth with no sharp edges that I noticed and the black color gives any case that clean finished look. 
With the front bezel removed you can see mounting room for four 5.25" external drives at the top and three 5.25" drives at the bottom. In the center, directly over the HDD bays is a single red LED 140mm intake fan. This fan as well is uses the standard 4 pin molex plug. To the right of the top external bays are the power and reset momentary switches, the HDD activity LED and the power LED. Although fans usually equal cooling, I'm starting to notice there are many fans which may contradict each other. Blowing front to back and left to right and out the top. Let's hope this does not create too much noise.
Here's a good view of the A.T.C 3 (Advance Thermal Chamber 3) design. In theory this should keep each heat source separate from the others and allow each cooling system to do its job better without interference. The quick release system for the 5.25" and hard drive caddies work extremely well and are well thought out. An easy push on the grey tabs and the black bar swings out releasing the drives. The hard drive caddies can be removed singly or in two groups of three. If you are wondering why there is a slot in the metal with a locking tab, read on, this is the optional positional fan mount.
The first thing I noticed with the right door off was these three large squares. These are part of the C.R.M. 3 (Cable Routing Management 3) design. The top right quarter of these squares offers a mount for a single 120mm fan. This in my mind is another must have in this type of case. Again, even if you do not mount a fan there, it would not take much to remove the fan grill and use the opening to change HSF on the fly without removing the motherboard. At this price range and level there is no reason not to have this hole there from the factory. This to me is one more leg up the Spedo has on its competition. To the left you can see the hard drive mounting system which gives very easy access to power and data connections to your drives. At the very inside top is the 230mm exhaust fan. Very similar design and function to the Antec 900, 1200 series.
Here's a good example of how clean this case can be. The cable management is excellent. There are strategically placed holes in the motherboard tray which allow all wiring easy access from front to rear of this tray. The big squares although not more than just covers for the wires do add a nice touch. Under these squares are cable ties and the bulk of the unsightly cables. This was certainly the easiest case to keep wires neat and tidy with. There is plenty of room on the back side of the motherboard tray. I've seen so many cases with hardly any room between the motherboard try and the side panel which makes it near impossible to do a nice clean wiring job.
When you first open the case and remove the left door there is an accessory box in the lower 5.25" drive bay mounts. The included accessories are one 120mm fan, several screw bags, a PSU connection extension, an 8 pin CPU power extension, a single 5.25" to 3.5" external mounting bracket and bezel and 5.25" to 3.5" internal mounting brackets. Not an overwhelming group of accessories but certainly a decent amount of included value vs. having to purchase these items and possibly holding up your build. Detailed Interior FeaturesThe front bezel is removed for cleaning and drive insertion or removal very easily. All that is needed is a sturdy tug outward from the bottom of the bezel. There are six friction pins located one in each corner and one mid way up on both sides. Seems Thermaltake took a page from one of my favorites, Lian Li with this design.
This system works very well and I would not mind one bit if all chassis manufacturers did this. Once pushed in place there is no hint that the front is not held on with screws. Very tight, tight enough that if you didn't know this type of system was in place you might think you're going to break it by pulling it off. You can also see the foam inserts behind the mesh covers. This will keep the dust out of your system but it will also lower airflow. This foam is easily removed if you desire more airflow.
Here are the hard drive caddies. You can see three individual caddies here. There are six like this in total. One easy push on the grey tabs releases the caddy and allows the removal of any single disk. To put the disk back in, just push the caddy all the way in and close the black lever until you hear it snap into place.
Behind the hard drive caddies is the optional and adjustable internal fan mount. This fan mount can slide up or down enough to cover all either the top three internal 3.5" bays and the lowest top 5.25" external bays (this would be handy if you use the 5.25" to 3.5" adapter) or the bottom three 3.5" bays and the upper most lower 5.25" bay, again would help if using the adapter. This fan mount will also tilt up or down approximately 15 degrees.
Here is a single hard drive caddy. The hard drive is held in place by those small rectangles. On the inside of those rectangles are posts that pivot into the screw holes and when slide into the chassis are held in against the drive. FYI, I have a Seagate 500GB drive installed here. Now these drives are lower height than most others but I'm unaware of any other outside dimension difference, however I did have trouble getting those pins into the mouting holes of the disk. I've looked at this some more and have found that all that is needed is a slight push down to allow the holes to line up. This is very easy once you've done it a few times. I tried a Western Digital and a Samsung drive and did not have any trouble.
This is the PSU vent on the bottom of the case. It comes with a filter installed as most intake fan mounts do. This filter probably blocks airflow by at least 50% (my best guess). If I were going to have this case sitting on say longer carpet I would definitely leave this in place. If I would have this case on a desktop or some other hard smooth surface I would probably remove this filter for increased airflow. I love this bottom mounted PSU vent. The omission of this always makes my cons list in bottom mount PSU case designs. Another leg up on the competition... This design has my Corsair TX750 running cooler than it ever has. Simply due to the fact that it does not have to recycle hot internal air from the chassis. Spedo Chassis Final ThoughtsAlthough not perfect this case has nearly everything I've ever asked for in a case. Thermaltake has put a lot of thought into this case and it shows. The Advanced Thermal Chambers are a good idea and may help some more than others. If you are going to go SLI you may want to remove the GPU chamber cover entirely to allow the side fan unrestricted access to the GPUs. Speaking of fans; all the fans in this case are non adjustable. They run full speed the entire time, given that they are a bit noisy, surprisingly the bigger fans are the loudest. As this is a gamers case a little bit of noise should be expected. It's not as quiet as my Lian Li but I have quiet scythe fans in that chassis. I really like this case. I've had other similar cases in the past but they were always missing something. Small and so simple to implement things like the backside fan mount/access hole under the motherboard, the bottom vent for bottom fan PSUs and the quick release for the HDD caddies. All items that are not too hard to put into production and yet are missing from so many, cases like the Antec 900, 900 II, and 1200... The above mentioned features put the Spedo Advance chassis above the others. Once you have a case with these features and you tinker with hardware at all you will never want to be without them.
VI90001W2Z ConclusionThe case arrived to me in a very nice magazine print quality color box. The box art shows a very clear picture of the case and the rear section of a car on one side with the features pictured on the back side. It was ok, but I think they missed the "Think Excitement...Think Spedo" mark with the box art. This of course is subjective and up to the viewer. Overall ok, but it didn't knock my socks off like some others such as the Antec 1200 box. Outside the box is another story. This chassis seems to walk a fine line between reserved and wild. It has many non standard features such as huge fans and a very large window and yet it's not too over the top. Again this is very subjective but I've seen many cases and I think this would blend in well to anyone's house or place of business and yet when really looked at would actually excite as Thermaltake claims. This case was built very well. The steel used was not as thick as some others I've tested but construction was very sturdy and high quality while saving some weight. Things like door removal and attachment was much smoother and easier than its competition. The fit and finish was second to none. It was mainly riveted together which is normal and about 90% steel construction with the rest being molded plastic. While using this case I ran a few informal tests to compare the temperatures of my previous chassis compared with this chassis. This setup did do a better job of cooling. I ran a day of F@H with the GPU client and then some Super Pi to work the CPU. Idle temps for the CPU were only 2 degrees C lower, but under load was 5 degrees C lower (which equaled only a 2 degree increase over idle). The GPU however saw the largest benefit when I removed the GPU ATC side cover. Temps went from 47 idle and 68 load to 44 idle and 61 load. These results of course would be different with different hardware. For example my GPU does not have rear exhaust. I think a rear exhaust GPU would see a larger benefit from ATC 3. Functionally it's proven itself to me. I always have trouble talking about the value of products. This is one of the most expensive cases I've every reviewed or used. How do I justify that cost? Well you could start with an average case, say about $70? Add four middle of the road 120mm fans at say $10-$12 each and two large fans at least $20 each for about $160. Add your time for modding the case, which in my life is worth A LOT and still not have all the benefits of this case. I'd say if you want a complete package out of the box with nothing more to buy this would be your chassis. As of June 2009 the VI90001W2Z SKU is available from NewEgg.com for $199.99 after rebate. I honestly think you are getting a good value for your money especially when compared to some of Thermaltakes competition selling gaming mid towers for nearly the same price with a lot less features. The Spedo Advance chassis is a large well made and very well laid out chassis. One of the biggest things going for it is the cable management. When I build systems I'm totally insane about clean wiring. This case was so far the best organized case I've ever worked with. If you are in the market for a full tower gaming case I highly recommend this case. It's worth mentioning that Thermaltake does make this case in a lower trimmed out version called simply "Spedo" sans the Advance... No black interior, not as many accessories and no thermal chambers, but it is essentially the same case and right now it's $60 less! Bargain time. Pros:
|
|