| Corsair Obsidian 700D Full-Tower Case |
| Reviews - Featured Reviews: Cases | |||||||||||||||||||||||||||||||||||||||||||||||||||
| Written by Servando Silva | |||||||||||||||||||||||||||||||||||||||||||||||||||
| Monday, 20 September 2010 | |||||||||||||||||||||||||||||||||||||||||||||||||||
Corsair Obsidian 700D Computer Case ReviewIf you're aiming for something big for your next PC case, perhaps the Obsidian 800D has been attractive to your eyes. If you almost fainted when you checked prices, you might be happy to know Corsair released the little brother: Obsidian 700D. At the moment of reviewing this case the 800D costs $254.99, while the 700D costs $239.99, bringing this product to a reachable level for many PC enthusiasts. You'll notice the main differences are the non-existent side-panel window, and the removal of hot-swappable drives in the front of the chassis. While there are some other small differences which we'll check across the review, those are the reasons to shave $15 to bring a very interesting product to a mid-high price level. Additionally, let me tell you some months ago, the difference between the 700D and 800D was bigger; going from $30 to $50 giving a bigger advantage to the 700D, but times have changed and the difference has been reduced to $15 only (newegg's prices). I'll tell you some key-features about the Obsidian series. First of all, both Obsidian cases are full-tower sized, supporting E-ATX motherboards and down to Mini-ITX motherboards. Corsair has given their Obsidian products a very simple, yet elegant design, which brings a very interesting look for those who're not aiming to "pimp" their PCs with tons of UV LEDs and LED fans. The CC700D also integrates a 3-chamber system inside of the case, which separates the motherboard/CPU/GPU space, from the PSU and internal drives. Perhaps, the most important feature is the incorporation of tons of rubber grommets to make cable management look like if it was built by a professional, and the inclusion of a completely tool-less installation (except for the expansion slots). 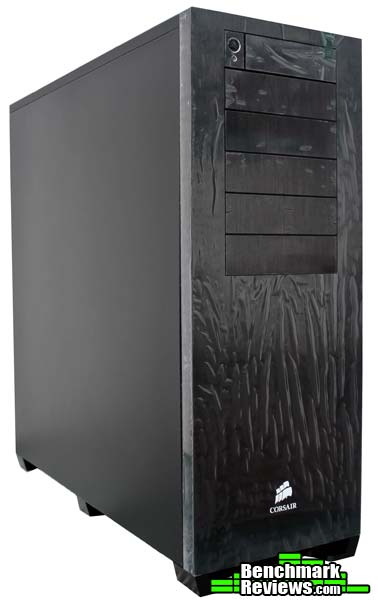
The Obsidian 700D comes in a plain black color, and you'll be surprised because you won't find any other color inside or outside of it. Personally, I think a black painted interior is a must-have feature nowadays, but perhaps, some users would prefer to have it mixed with platinum or any other color, especially in the exterior. Corsair didn't hesitate about doing a big case; this case is HUGE. Because of that, it must have tons of spaces to add fans and keep airflow within excellent conditions. It's all about thermal management, and various manufacturers have stepped up with a variety of solutions. There's the "big case with a lot of fans" design, typified by the Cooler Master HAF series and the new NZXT Phantom, as well as the "isolated thermal zones" school of thought, embraced by the Corsair Obsidian 700D and taken to its ultimate expression by the Thermaltake Level 10.
Manufacturer: Corsair Inc.
Product Name: Obsidian 700D
Model Number: CC700D
Price As Tested:$239.99
Full disclosure: The product used in this review was supplied by Corsair Inc. Obsidian 700D Features
CC700D Specifications
Features and specifications provided by Corsair Inc. Let's unbox this case and see if it lives up to the claims... Closer Look: ExteriorThe box describes all the features and some specifications as it's shown in the next picture. Other than that, it just shows some images and the product's part number is shown in big letters. Keep in mind this box is pretty big, and the case is protected with lots of styrofoam in the inside.
Once you open the package, you'll notice a small box with accessories. Considering how big this case is, I expected more accessories, but after using them all I think they just fit your necessities. Included is a quick installation guide which is NOT a full manual. To make things worse, the guide gives you a link to corsair's homepage where you can't download any other than the quick installation guide again. Many users have complained about this, and Corsair's answer is always: check the Obsidian 800D manual... Anyway, if this isn't the first time you build up a PC, you'll find the installation pretty straight-forward. Corsair includes many black-painted screws which make a good combination with your new chassis, and a small bag with zip ties. Additionally, there's an 8-pin to 8-pin/4-pin 12v+ cable extension and only one rubber for fans installation. If something lacks in this package, that must be rubbers for more fans, since this case allows you to add 4 x 120mm fans and I expected at least 3 rubbers.
Aside of accessories, the Obsidian 700D comes protected with transparent plastic at the front side to avoid scratches, but the rest of the case comes un-protected. If you haven't seen a full tower case before, this case will appear HUGE, but I'll let the installation pictures prove that in the next sections.
As you can see, the whole case is painted in black. While some people love the color, it might not fit to all kind of enthusiasts. I find it rather weird when I see everything in black color, but it doesn't make me change my opinion at all. Even the three 140mm fans included are black, with black sleeving of course.
At the top of the case, there are fan grills for 3 x 120mm fans. This makes the Obsidian 700D a great case for water cooling since you can mount a 360x120mm radiator in the inside or outside without a hassle. Actually, if you don't use the first 5 1/4" drive bay, you could even fit a 480x120mm radiator. We'll talk about other Obsidian's cooling features later.
At the bottom of the case, you'll find three feet with 2 rubbers each. This raises the chassis and helps cooling the bottom side of it while improving air-flow. Those feet are 25mm tall, so you won't have problems even if you're positioning your chassis in a carpet. There's also a dust filter included which gets removed very easy by the back side of the case. 
Let's check out this case in more detail in the next section. Detailed Exterior FeaturesTo keep the design sleek and elegant, Corsair decided to keep USB/Audio/Firewire ports behind a little door. Outside, there is a power button and a HDD activity LED. Corsair ships the Obsidian 700D with 4 x USB ports, but none of them is 3.0. I feel there should be at least a 3.0 port in this case considering the price it carries, however, I expect Corsair to update their cases in the next months, and hopefully, include USB 3.0 ports. Corsair also lacks of e-SATA ports, which nowadays are very common and useful for the masses.
Let's have a detailed look at the back of the Obsidian 700D. At the top, we have 2 push-buttons to release the side panels. That's right! Corsair needs no screws to release their panels. Just push the
Moving to the mid-section, there's a full 140mm black fan to exhaust CPU heat. There's a pair of rubber grommets for water cooling tubes and the I/O area. Notice those little holes at the left of the case? Those are ventilation holes for HDDs/SSDs. I'll try to explain how they work when we open the Obsidian 700D.
Moving to the lower part, there are 7 expansion slots and a little mesh for dual-slot GPUs installed in the lower PCI-E slots of our motherboard. At the bottom, there's space for an ATX PSU, but unfortunately, there are no holes to mount it upside up and upside down (if neccessary). Must PSUs using a large 120mm fan pushing air inside will fit so that the fan faces the bottom side of the case taking fresh air from the outside instead of taking hot air from the case.
Remember that dust-filter at the bottom of the Obsidian 700D? Well, here it is! Removing it is as easy as just pulling it off the case, but keep in mind it won't be that easy to take it off if your PC is very close to a wall/furniture because the filter is big enough to cover 2 x 120mm fans (at least).
Finally, if you're mounting 5 1/4" drives, you'll need to remove the front facade. Please refer to the manual to remove this as many users are reporting difficulties to do it. I didn't suffer to take the front panel out of the case, if you ask.
Now that we've analyzed the exterior of our Obsidian 700D, let's have a closer look at the interior. Closer Look: InteriorThe interior hides all the good stuff of this case. Have a look at the interior and tell me you don't like it, can you? Have I mentioned that the interior is also completely black? Remember this case supports up to E-ATX motherboards without a hassle, and you'll be able to install an ATI Radeon HD5970 and have lots of space to work with cable management still.
The back side of the interior shows lots of rubber grommets for proper cable management and cables for front panel connectors and fans. This is where you'll find yourself doing 70% of the work when installing your system as you'll really want to take some time to pass all of your cables behind the motherboard's tray.
Corsair includes 5 x 5.25" chambers for optical drives. All of them are completely tool-less as you can see in the next photo. It's a pleasure to know Corsair didn't hesitate to add tool-less options for every bay as the price obligates them to do so. However, the back side of those bays includes holes for screws if you want to add some security to your system.
Now let's have a look at the cooling system. Corsair has separated the whole case in 3 different chambers to exclude heat from one to another. The first chamber we're looking here is for hard drives or solid state drives. As you can see, there's space for 4 x 3.5"/2.5" drives in this chamber, and all of them are kept cold by a 140mm fan pushing air through all of them from below. This helps heat rise and it's completely enough even for 4 WD Raptors. There's a mistake on the design I'd like to notice here, as the original design (800D) was meant to push air through the drives back to the motherboard tray and finally to be exhausted at the rear of the chassis. Corsair added a fan and a "wall" to separate this chamber and keep air-flow as designed. In the Obsidian 700D, this isn't really working like that, since our 140mm fan is pushing air from below, and there's no wall to separate this chamber from the main (motherboard) chamber, so it's natural to think heat isn't really going to flow to the back of the chassis. Instead, heat will be dissipated through the back, but mostly by flowing to the main chamber and being exhausted from there. I'd really like to see Corsair adding a separation to keep up with the original design, and perhaps, that wall could completely hide hard drives if possible and enhance aesthetics. But don't get worried that much, as heat generated by 4 drives isn't that much, and the fan will do its job even if it's not working as it was meant to do it.
If you look close enough, you'll find cold air cooling our drives chamber comes from ... another drives chamber. Well, not exactly. Actually, this is the lower chamber meant to cool PSU and 2 additional hard drives. You should use this space if you have more than 4 drives but I'd recommend using the upper chamber first, as it receives cold air from the 140mm fan, while this one gets the heat extracted but doesn't receive any direct air-flow. It could be useful for SSDs though. About the space, I really think Corsair could have fitted another slot in there for a maximum of 7 internal drives, but this should be more than enough for many enthusiasts.
As I described before, the lower chamber also storages the PSU, and there's another 140mm fan exhausting hot/cold air from this chamber, directly to the GPUs. There's also a pair of rubber grommets to pass all of your cables, and you can remove the whole tray if you want to skip cable management in this section or if you have too many cables to pass them all by those holes.
In the next page, Benchmark Reviews does a detailed look to the internal features of the Corsair Obsidian 700D. Detailed Interior FeaturesAs it holds our main components, the main chamber needs to be severely revised. As you can see, there's plenty of room inside this case, and Corsair includes a whole army of rubber grommets here. Even if you want to install a Mini-ITX motherboard inside the CC700D, there will be rubber grommets specially designed for that purpose. There's a 140mm fan at the rear to exhaust hot air from the CPU, and a plastic plate can be removed to install a high-end heatsink without removing the motherboard from the chassis. There are 3 120mm fan grills at the top which allow to install a 360x120mm radiator at the inside without getting near to the motherboard, so, if you're thinking on a case for water cooling your system, the Obsidian 700D might be an interesting choice.
As it's visible, you can actually install a 4x120mm radiator inside, as the top bay is used by the front panel only, but you can't install another 120mm fan to exhaust air at the top.
There are 7 expansion slots for PCI/PCI-e cards, but they aren't tool-less designed. Corsair added a honey-comb grill below the last expansion slot thinking on you while using a 3-SLI system or similar, but they forgot to add grills on every PCI-cover, which I find more important, as not many users have a 3/4 way SLI/CF systems.
Corsair took care of almost every aspect on this case, and all cables come perfectly sleeved in black color to match with the case. Front panel cables, along with fan cables are flat sleeved, which makes them easier to manipulate and hide.
Behind the internal drives, there's a little platform to put cables on. I really don't have a lot to comment here because I don't see any useful application for this platform, but it could be useful for another person.
As you can see, there's a full-length bar at the top, with small cones on it. As you push the buttons to remove the side panel doors, this bar gets moved and so the cones release the door. It is as simply as it sounds. There's no magic behind this.
A closer look to the heatsink installation door reveals how to open it. Unluckily, this little gate is 100% plastic, and as you need some force to open it, you could end with a broken door. I've seen some sites reporting this door came broken before opening the case, but it wasn't my case.
Now that we've detailed all the internal and external features, let's build a system inside the chassis and see how it looks. Building a SystemSince Corsair doesn't ship an installation-manual, you've got to think and discover how to install everything by yourself. I found that there's no specific order needed, but I recommend starting with external drives and move to internal drives and PSU after that. Installing an optical drive was very easy, as you insert the drive until it matches with the required drive holes and from there, you only need to move the clip to the right side to lock it. I found myself fighting to install it more than 5 times to discover this lock was not long enough to keep my drive in position. In fact, I could move the drive with a single finger even with the plastic lock, so I had to remove the right panel and put a pair of screws to protect it from moving. Also, I could add a pair of screws just below the lock to make it "easier", but it shouldn't work like this. I tried with another drive but it was the same. I don't really know if this was a bad sample or every 700D is done this way, or perhaps, it could be my drives (LG, by the way), but this problem literally lefts out of the game those fancy plastic locks. I wasn't happy with this.
Fortunately, installing internal drives was a breeze and everything worked as it should. If you're installing a 3.5" drive, you just need to slide it on the plastic brackets, but if you're installing 2.5" drives (SSD for example), you'll need to screw them from below. All the brackets have 2.5" holes, so you can fit up to 6 SSDs if you want. That should be more than enough.
Just to make sure any CPU heatsink can be installed without removing the motherboard, here's a photo showing a Noctua's NH-D14 back plate. The space is more than enough for any motherboard and CPU heatsink. 
Now that I've installed my whole system, this is how it looks at the end. Pretty nice, isn't it? Actually, my mighty ASUS Maximus III Formula looks minimized in this case, and the X58 E-ATX motherboard shouldn't look that different. The HD5850 also looks very small compared to the main chamber's length, so if you want to install a pair of HD5970s you still have plenty of room to do so. Overall, you'll find this case lets you build a very clean system as 90% of the cables can be hidden behind the motherboard's tray. I find this quite useful to improve aesthetics and, of course, to improve cooling. Even if you're not an expert building cases, this might be the chance to look like it.
Now take a look at the back of the motherboard's tray; you'll find all your cables here. I've done a decent job trying to keep them ordered and rubber grommets help a lot. I recommend using a semi-modular PSU since you won't be able to hide all your cables behind this tray with a non-modular PSU. How deep is this space for cable-management? Well, there are 25mm between the motherboard tray and the side panel, so, you have plenty of space to work. 
Finally, this is how the rear looks with a system installed. I just wish my GPU had a black painted PCI-end to match with the case as it does with my I/O panel.
There are some installation details I still want to show you before moving to final thoughts and conclusions, so, please follow me to the next page... Corsair Obsidian 700D Installation Details
|
|||||||||||||||||||||||||||||||||||||||||||||||||||


Comments
But I still think I'd have to go for the HAF X. HAF X has wheels, more fans and bigger fans which I think would lead to overall more CFM and a quieter operation. Also the window with side fan is super cool on the haf x
Being of steel/aluminum construction, I suggest not dipping it in water so as to avoid cathodic corrosion.
Steed, the wheels on the Haf X are a good feature. My current rig sits on a wheeled caddy I custom built for it. But I see your point; the Obsidians should come with a wheel kit as it's a great option for a large case. Should come with all full towers IMHO.
May I ask how many PCI/PCI-E devices do you have installed on your PC? or exactly, why do you wan't more than 7 slots? (I mentioned it on the article, but I haven't heard many people asking for it).
I'd rather spend the extra money for this Corsair case on something else that makes my system RUN better.
Again, this Corsair case is a nice design.
Thank you for measuring and posting the space behind the mother board tray. Having that measurement helps us.
+Rep for you.
It's good that you're listening,......it makes a difference.
I checked at their store, and I found non-windowed panels for 800D users, but not windowed panels for 700D.
Thank you.
Idle:
GPU1 (Top): 65
GPU2 (Bottom): 50
Load (Furmark):
GPU1 (Top):86
GPU2 (Bottom): 81
I think it's modding time...
They are positioned on the first PCI-E 16X slots in the Maximus III Formula, and there's a space of 3 slots between them (where each takes 2 slots).
I wanted to get a pair of MSI HAWKs, but ended with a pair of Zotac's with reference cooler...
So I'm reading everything that I can about the video cards and seeing what they come out with in the next few months because I'm not ready to buy until November at the earliest.
It should be a nice system when done.
I'm really waiting for your OC results with MSI HAWK. Also, has anyone seen the Colorful iGame GTX460 GPU? That heatsink is a beast!
Back to the topic, this case has great airflow for CPU and drives, but lacks of airflow for GPUs, anyway, and the same applies for the 800D. Anyway, I'm willing to do the mod.
##youtube.com/watch?v=GWyojqDmUTc&sns=em
As far as multi gpu setup I'm running 2 gtx 480s sc by EVGA in slots 1 and 3 with stock coolers and my gpu temps go up to 95-100 degrees . And I have (3) extra coolermaster 2000rpm fans on top as well. So you might be right but you have to compare it to other cases to conclude that statement. (My gpu normaly run that hot so i'll just leave them till Kool kepler gpu come out in 9 months.)
Thanks for the fast reply and for your excellent reviews.
Another question, where do you think is the best place to install a H50 in this case ? I tought about the bottom conpartment ? But if you have other suggestion, they are welcome.
Now, for the H50, I think there are 3 possibilities. If you're using it as exhaust, then obviously at the top. If you're using it as intake, then the one suggested above (at the rear) would be better. I don't know if Corsair's tubing is long enough to reach the lower fan without interfering GPUs installation, but you could give it a try.
My fans are all the same thing, Scythe GentleTyphoon, @1150 RPM and 37CFM Air Flow. Expensive, but very quiet.
Note: The 140mm under the HDD is not there as decoration, without my Caviar black average 52 degree and with it 34 degree.