| nMedia HTPC 1080p Media Center Chassis |
| Reviews - Featured Reviews: Cases | |
| Written by Nate Swetland - Edited by Olin Coles | |
| Tuesday, 17 August 2010 | |
nMedia HTPC 1080p Micro ATX ChassisAs computers become more commonly included in people's home entertainment systems, it is only natural that companies like nMedia try to create custom cases to cater to those consumers' needs. As seen with other cases from nMedia that Benchmark Reviews has tested, such as the 6000B HTPC Case, nMedia is no stranger to multimedia and HTPC case design. nMedia has given Benchmark Review a chance to look at their latest in their HTPC case line, the HTPC 1080p Micro ATX Chassis. Mentioning a low-profile design, dual 80mm silent fans, all-in-one front I/O panel, and an optional LCD Panel would only begin to highlight the features of the HTPC 1080p. Please join Benchmark Reviews and read the full article as we fully explore what nMedia has to offer with the HTPC 1080p. For a person who is a media buff like myself, a Home Theater PC can be a very good finishing touch to a full entertainment system. Like the expensive stereo, speakers, and other devices you paid top dollar for, you don't want them to just perform well, you want them to look good too. nMedia tries to satisfy this need by making a HTPC enclosure like the HTPC 1080p, with its shiny front panel, black cabinet, and low profile design. The size, shape, and color of the 1080p should fit well in almost any multimedia setup whether this is one device out of many, or the only device you use.
The HTC 1080p will be evaluated using five categories of interest to those of you shopping for a HTPC style case. Those categories are Performance, Appearance, Value, Construction, and Functionality. Some of these categories may tend to be more subjective than others, but Benchmark Reviews strives to provide the best possible reviews from the most unbiased point of view as possible.
Manufacturer: nMedia System, Inc. Full Disclosure: The product sample used in this article has been provided by nMedia System. nMedia HTPC 1080p Features
HTPC 1080p Specifications
Closer Look: ExteriorAt first look, the nMedia HTPC 1080p seems very similar to a desktop style case. Many HTPC cases share this similarity. However, the style, cosmetics, and outside feature can easily set it apart. After looking it over for a very short amount of time, you can see this is not simply a desktop case with a shiny paint job, but a chassis that has both form and function. The well done combination of the dark flat paint on the majority of the case, paired with the glossy front panel made for a tricky photography session!
Shown in this image is the case from the front with the protective sticker still on the front. This was taken directly after the HTPC 1080p was removed from the packaging. You can see the glossiness of the front, even with the plastic protector still on the front.
This is an image of the right side of the 1080p. This is the side that motherboard is closest to. The silent 80mm fan provides fresh airflow to the CPU. There is also room to add an additional 80mm fan. On the rear of the 1080p, you can see air vents coming out of the top of chassis, allowing for even more ventilation.
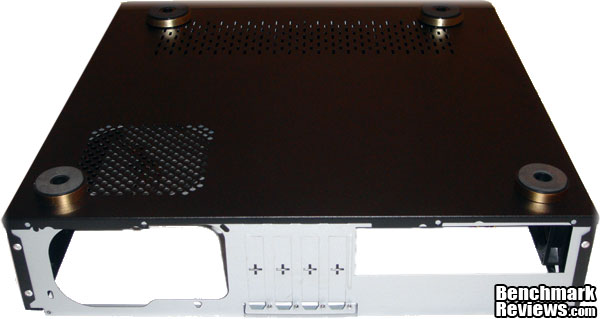
Flipping the case over reveals the rubber feet on the bottom of the 1080p. These feet serve several purposes. They allow the case to sit on delicate surfaces without worrying about scratching the case or the surface, they can help in reducing noise and vibration, and they allow the case to be slightly raised to provide better airflow to the bottom vents. Speaking of the vents, notice the vent underneath the front of the 1080p as well as under the power supply. These provide additional passive airflow to the PSU and Hard Drives.
Looking back at the front of the 1080p, here is a photo of the open front panel. The front cover has a push-lock mechanism to hold the flip down panel in place. Giving it a slight push, it folds down revealing the optical drive, front I/O panel, and the LCD module bay. This cover seems sturdy enough, but if you watch a large amount of DVDs, or plug in SD cards on a very frequent basis, you may want to go a bit easy on the door.
Here is a closer look at the power and reset buttons. They are located on the bottom left side of the front of the case below the front panel door. The power button has a very nice blue ring that lights up while it is powered on. In this photo, you can also see the shininess of the front of the 1080p, and get an idea for the care that nMedia put into making this case look good. Detailed Exterior FeaturesTaking a closer look at the exterior of the HTPC 1080p, we will look for things that will set this chassis apart from a regular old desktop case with a fancy coat of paint.
Here is an image of the Optical Drive bay. This remains hidden until the front panel is open. Opening and closing the front cover may seem like a concern to people who use their optical drive a lot, but I rarely use mine aside from installing the OS and the occasional burnt disk.
In this photo, you can see the Front I/O panel. On this panel, there are two 2.0 USB ports, a headphone and microphone jack, and a memory card reader. In the foreground of the photo, you can see the type of latch that holds the front door closed. It is a simple push-latch.
Shown here is where Power Supply resides. Despite being low profile, the HTPC 1080p supports full size ATX power supplies so you don't have to skimp on the power-hungry components in your rig.
In the above photo shows the break-out PCI slot covers. I am not a fan of these at all. You have to break the metal covers out, and they can leave very jagged edges. These also cannot be put back on once they are removed, increasing the risk of dust getting into the 1080p. Also important to point out, these are low-profile PCI slots. Those of you that have a motherboard with all you need onboard should not have to worry, but if you need an add-on card such as a TV tuner, wireless NIC, or a discreet graphics card, you are slightly limited in your choices.
A close up of the rubber feet located on the bottom of the HTPC 1080p. These can be removed if necessary, but you would then lose a great deal of airflow and also the vibration and noise reduction that they provide. These feet also help protect your case from what it is sitting on, and alternatively protect the surface it is sitting on from the case.
Shown here is the Optional LCD Panel window on the front panel. If you spring the extra cash for the optional LCD panel, information like song title, CPU temp, etc. would show here. The LCD Panel was not provided with this review sample, so I had no way to test it. Closer Look: InteriorA good looking case only goes so far. If you cannot comfortably fit your components inside of your computer case, you will soon look to alternatives. nMedia has such features as the ability to hold up to Micro ATX motherboard as well as a full size power supply. It also features a removable drive cage for convenient hard drive and optical drive configuration. Let's take a look at these and some of the other interior features of the HTPC 1080p.
In the photo above, you can see the 1080p with the top removed by two thumb screws. As you can see in the picture, there is a fan right next to where most CPU fans reside, providing fresh outside air to hot processor. On the opposite side, there is a fan that provides a crossflow to move air across the drive cage to keep your drives cool. There are also spots to add up to two more 80mm fans for even more airflow if so desired.
This image shows the HTPC 1080p from the rear. The motherboard riser hardware came pre-mounted, which may not seem worth mentioning, but I noticed it, and it was a small effort to help make the installation easier.
This is a close up of the hard drive cage. On the right side is where the optical drive goes, and up to 3 more hard drives can be installed in the other bays. Notice the rubber grommets on the bottom that act as a vibration and noise suppressor for the hard drives.
After simply removing two screws on the top of either side of the drive cage, it easily turns up so that your drives can be serviced while still in the case, or if you want to remove the drive cage entirely, you can do so. The cage will rotate a full 90 degrees allowing you plenty of room if you have clumsy hands like mine. Detailed Interior FeaturesHere we will take a closer look at some of the interior features. The interior layout can make or break the usability of a computer chassis, so it is important to ensure these details are not overlooked. Let's see what nMedia has chosen to pay attention to in their HTPC 1080p.
In the image above, we take a look at what is behind the hard drive cage. The left hand side is where the optional Programmable LCD module would go. In the middle, you have the front I/O panel which includes the USB ports, Mic/Headphone jacks, and the memory card reader. On the right side is where the optical drive sits.
Here is a closer look at the front I/O panel. Neither the manual nor the website says specifically what memory cards it supports, it seems like most all the major types are supported, as well as SDHC 2.0 SD Cards. The cables for the I/O panel and power/reset buttons seem plenty long enough to reach where they need to go. 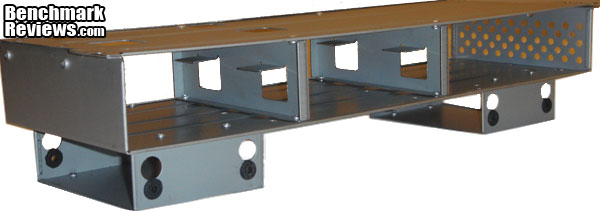
This is a picture of the drive cage fully removed. If you have a sharp eye or a good memory, you may notice that this is very similar to the drive cage from another review on Benchmark Reviews, the nMedia 6000B. Why change something that works? The only difference between the one from the 1080p and the 6000B is the addition of two more drive bays on the bottom on the 6000B.
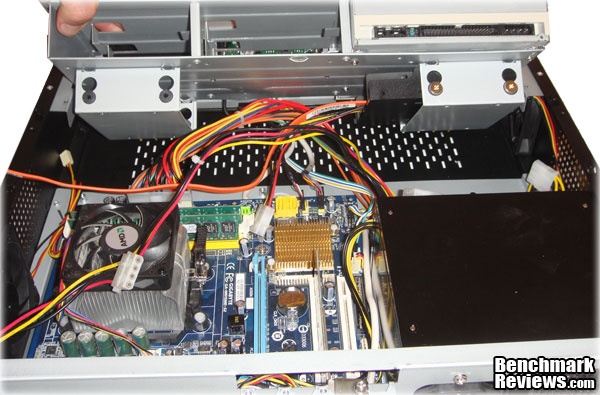
After the installation of the motherboard and the power supply, you can see that everything fits in there quit well. It is a bit snug, but nothing that was not expected from a case that is meant to be compact and hold a full size PSU at the same time.
After connecting all the components and motherboard headers, minus the hard drive and optical drive, you can stash a bit of slack from the I/O Panel and power/reset button cables in the front of the case. Now all is left is to install the drive cage and tidy up a bit.
It is essential that you install the optical and hard drives before you put the drive cage in the HTPC 1080p. It is also essential that you take a look at the instruction book before you start installing the drives. (You always read the instruction manual anyway, right?) There actually is a specific way that nMedia tells you to install the drives so that you don't run into the issue of one drive covering up the mounting holes for the other. A hint to get started: install the optical drive first. The rest, I will leave you to find out for yourself!
After you get the drive cage set into the proper grooves, it should rotate down, and then allow you to slide it to lock it into place. This also allows you to do some fine tuning of where the cables are hidden and routed on, under, and around the drive cage. Additionally, you can slide the cage into two separate mounting positions so that your optical drive meets flush with the front panel. This is not my tidyest wire management job, but it is far from my worst! HTPC Case Final ThoughtsnMedia has made plenty of media center cases in the past, so they have had a lot of practice to get things right. I think that the HTPC 1080p case fits in very nicely with their line of products. It has cosmetic appeal for those that want their entertainment center to look as good as it performs. It has the form factor to allow for a small footprint, but still allow for a full size power supply, as well as an optical drive and three hard drives. I enjoyed such features as the flip down front panel that gives it a very discreet look, and the removable drive cage to allow easy access if you like to tinker or plan to upgrade your storage capabilities in the future. The optional Programmable LCD module can come in handy for those that like to listen to music, but not keep a display on, or for those of you that simply like to have easy access to information such as temperatures, bitrates, and the like. All in all, nMedia has put together another fine product with the HTPC 1080p, and if you are in the market for a HTPC case, this is worth a look.nMedia HTPC 1080p ConclusionPerformance is perfectly acceptable. The two included 80mm silent fans provide good air flow to both the drive cage and the CPU. The addition of the vents near key components allow for worry-free performance of your components.Appearance is always an important factor for something that is potentially going to be out in plan sight. nMedia does not disappoint with the HTPC 1080p. The sleek black case is paired with a shiny front panel that will look good in any entertainment center. The flip-down front access panel allows you to hide the optical drive and I/O panel, and gives a very discreet look to the case. Construction seems of sturdy stuff. Some of the edges are a bit rough, and I highly dislike having to break out PCI slot covers. The drive cage is plenty sturdy to withstand a lot of use. The front flip-down panel seems a bit flimsy, but unless used heavily, it should last well enough. Functionality is found several places in the HTPC 1080p. The front I/O panel provides plenty of access for USB devices, sound I/O, and easy access to your digital multimedia. The hard drive cage is a very welcome functional addition that I wish more manufacturers would take note of. The Value of this case is very appealing. The nMedia HTPC 1080p case costs $59.99 from NewEgg as tested, which is very affordable for any type of media center case. The additional cost of the Programmable LCD Module may scare a few people away from that option, but omitting that from the case will have little to no effect at all on the overall value. I can say that I would recommend this case for someone in the market to either build a HTPC system or move to a smaller (or even bigger) case. It is well priced, and has many high points. Pros:
|
|


Comments
I also thought that the front fascia would be a negative, but it can be a very subjective feature. If you don't use disks or the card reader that often, you never really put much wear and tear on the front flip-down panel.
I do agree that sometimes it can be a bit frustrating when manufacturers use some kind of proprietary mount, or a kind of system where mounting standard components is not very practical, so you do have a good point there.
I am unsure what you mean by a "side mount" for the USB and card reader. Do you mean having it literally on the side of the case, or put to one side and still on the front? If you were to have those ports on the side of the case, putting it in an entertainment cabinet would make for a very cramped space to try and use the ports.
I assume the reasoning behind the glossy front is to keep in line with other home entertainment systems as many have a very similar appearances.