| MSI Z77 MPOWER LGA1155 Motherboard |
| Reviews - Featured Reviews: Motherboards | |||||||||||||||||||||||||||||||||
| Written by David Ramsey | |||||||||||||||||||||||||||||||||
| Tuesday, 02 October 2012 | |||||||||||||||||||||||||||||||||
MSI Z77 MPOWER LGA1155 Motherboard
Manufacturer: Micro Star International Full Disclosure: MSI provided the product sample used in this article. With more and more functionality being subsumed into the processor chipset, we've seen that it's becoming more difficult for vendors to distinguish their motherboard products. All motherboards based on a given chipset will typically provide very similar performance and an increasingly robust base set of features. Functions that used to require additional chips and circuitry such as SATA 6, USB 3.0, and Ethernet are now baked into the silicon and available on any motherboard. Still, there's plenty of room for vendors to innovate. They can add more features, such as additional USB and SATA controllers or PLX chips; they can produce boards with different form factors (ATX, micro ATX, mini ITX), or they can, as MSI has done with the Z77 MPOWER, "bulk up the basics". The MPOWER provides the standard set of features one would expect in any Z77-based motherboard. Instead of providing extra RAID controllers, audiophile-level sound, or other such additions, MSI has aimed this board at overclockers.
So what exactly makes a board an "overclocker's motherboard"? Let's find out in the next section. Closer Look: Z77 MPOWERThe box informs us that this motherboard is part of MSI's "Big Bang" series, and that it is "OC Certified" and will "Change the game of overclocking."
The accessories package comprises the standard multi-language manual, a separate software manual, SATA cables, an SLI bridge, voltage probe wires, quick installation guide, a quality certificate, I/O port shield, external antenna for the built-in WiFi, and a huge fold-out Overclocking Guide. The Overclocking Guide is a nice touch and caters to both beginning and experienced overclockers.
The layout of the motherboard is standard for a Z77 platform. There are three PCI-E x16 slots (the third of which is covered by a sticker informing you that you'll need an Ivy Bridge processor to make full use of it). Since PCI-E is now part of the CPU, you'll get PCI-E 3.0 performance on the x16 slots if you're running an Ivy Bridge CPU, and PCI-E 2.0 performance under Sandy Bridge CPUs. Lanes are allocated among the three slots based on the number of cards you have in them. The possible configurations are:
Although MSI doesn't promote this board as being capable of three-way SLI/CrossFireX, it would probably work well with PCI-E 3.0 video cards and an Ivy Bridge CPU, since the doubled speed of the PCI-E lanes would make the x8/x4/x4 configuration equivalent to x16/x8/x8 in PCI-E 2.0 terms. The PCI-E x1 slots are handled by the Z77 chipset and will always be PCI-E 2.0.
The rear I/O panel has a combo PS/2 port for gamers for whom USB keyboards with their limited 6 key rollover simply won't do. Under that are two USB 2.0 ports. Proceeding to the right we see the Clear CMOS button (very handy for the overclocking crowd this board is aimed at), the Bluetooth antenna, the plug for the WiFi antenna, and the Ethernet port; under these are six USB 3.0 ports. Next are the optical audio port, HDMI, and DisplayPort connectors, and last is a standard analog audio panel.
At the edge of the board we see the front panel audio connector, two four-pin PWM system fan connectors (all fan connectors on the board are four-pin PWM type), a Trusted Platform Module connector, and a "JLED3" connector for a "Voice Genie" accessory we don't get in this country...
The JFP2 and JFP1 split front panel connector MSI seems to be standardizing on is next, followed by an enhanced USB 2.0 port (with red background inside the connector) that can supply 1.5 amps for charging high-current USB devices like tablet computers. Last are two standard USB 2.0 connectors. See that little black button at the top center of the image? It's the "GO2BIOS" button. Pressing this button once will force the motherboard to drop into the BIOS the next time you boot, regardless of the current state of the system. You can be in Windows or the system can be turned off; the button will still work.
For extra chips we have an ALC898 handling the audio duties, a NEC/Renesas D720201 chip providing four extra USB 3.0 ports on the back panel, a Fintek F71889AD chip for system voltage and temperature monitoring, a P13PCIE multiplexer/switch chip to reallocate PCI-E lanes, and a Parade PS8101 to support the HDMI output. You may notice I didn't specify what the ICS 2646182 chip is for...because I couldn't find anything on this device. 
OK, so far everything we see is pretty standard. But what makes this board special? Z77 MPOWER Proprietary FeaturesAll the fancy cooling systems in the world won't help your overclocking efforts unless your motherboard has a power system that's up to the task. MSI's Z77 MPOWER ensures that you'll never be wanting for clean, stable power with its "Hybrid Digital Power" system. The area around the CPU socket is home to the Solid Ferrite Chokes (SFCs), in front of which are the Highly Conductive Polymerized Capacitors, aka "Hi-C Caps". These are next-generation solid capacitors MSI started using in 2010 and offer much longer service life than standard solid-state capacitors. The driver-MOS (DrMOS) chips are hidden under the heat sinks. All in all there are 16 power phases for the CPU and two for the memory. While not as much as the 22 phases MSI uses on their borderline-insane Big Bang XPower boards, 16 phases is still plenty! And see that "Military Class III" on the heat sink? That's not just marketing fluff: the board actually uses components that meet the MIL-STD-810G specification.
The MSI Z77 MPOWER has two separate BIOS chips; you can select the one to use with the switch below. An LED below the selected BIOS chip illuminates to show you which one is being used.
At the top edge of the board are the DrMOS alarm and phase LEDs. The former will light up when the CPU power circuitry overheats, while the phase LEDs light up in sequence, in real time, as the system's running to show how many power phases are being used. The more phases that are lit, the harder the system's working. The entire string of phase LEDs can be very bright when they're all lit, but you can disable them from the BIOS or MSI's Command Center utility.
Here's an interesting section of the board. Just below the main 24 pin ATX power connector is a 6 pin connector that provides additional power to the graphics cards. This is handy for extreme overclockers. Just to the right of that is the voltage check point array, and thankfully MSI supplies enough leads for all of them. Last are the power, reset, and OC Genie buttons. The OC Genie button applies an automatic overclock, and I'll discuss its operation in more detail later in this review.
Surprisingly, there are only the six standard SATA ports supported by the Z77 chipset. The right two are SATA 6G and MSI provides a label reminding users that this is where they should connect their SSDs. Just to the right is the internal USB 3.0 header, followed by a two digit POST code display. A nice touch: after you've booted into Windows, the POST code display shows the CPU temperature in degrees Celsius.
MSI reserves one USB 2.0 power for their "Super Charger" features, which can charge high-drain devices with 1.5 amps and +5V, triple the USB standard of 0.5 amps. The SuperCharger USB port is marked in red on the motherboard.
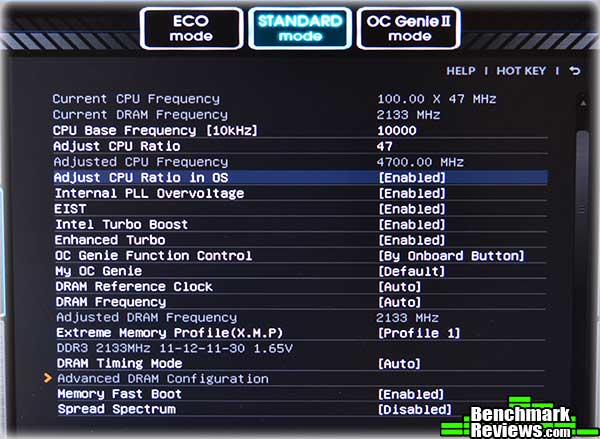
Let's check out the UEFI BIOS in the next section. Z77 MPOWER UEFIThe Z77 MPOWER comes equipped with the latest version of MSI's "ClickBIOS II" visual BIOS. It's a modern and relatively easy to use UEFI BIOS with a few rough edges. The top area of the screen shows the time, date, CPU and motherboard temperatures, as well as statistics about the system (CPU and memory specs). Below that is a "Boot Device Priority" area; simply drag the devices in the order you wish them to be considered for booting. The main "Settings" area, shown below, will contain all of the non-overclocking and non-power saving system settings you'd need to change.
The Overclocking section is complete with all the settings you'd want to change. However, from a user interface point of view, it could use a little work. For example, clicking on most of the settings will display a popup window with your choices; but clicking on the "Adjust CPU Ratio" section does nothing at all. A little experimentation (or reading the manual, but really, who does that?) reveals that you can adjust this value by pressing the "+
A foray into the "Eco" section of the BIOS reveals another minor problem: many of the "Help" sections aren't very helpful. I'd never heard of "EuP 2013", and still don't know what it means after clicking on "Help".
The Utilities section contains buttons for backing up your hard disk, doing a live BIOS update by downloading the latest BIOS from MSI's servers, or updating the BIOS from a previously-downloaded file installed to a USB key.
ClickBIOS II even has a separate "Windows 8" section with the settings shown below. This section of the BIOS isn't covered in the manual so it's not immediately obvious what these settings do. The "Help" function provides only cryptic answers. For example, for "SATA Devices Support", "Help" says "If Enabled, SATa devices will be skipped" (sic). For "PS2 Devices Support", "Help" says "If Disabled, PS2 devices will be skipped." Note that one says "Enabled" and one says "Disabled"; I suspect some editing is needed here.
Let's take a look at the bundled software in the next section. Z77 MPOWER Bundled SoftwareAs I've noted before, it's getting hard for vendors to distinguish their motherboards on hardware along (except in the very high-end segments). Thus we're seeings more and more utility and application software bundled with motherboards. MSI provides a robust suite of utilities, including:
The data recording feature is especially useful during those overclocking stress tests. In this image, the blue line is CPU utilization; the green line is CPU temperature, and the yellow line is CPU fan speed. The orange vertical line tracks the mouse cursor and shows the corresponding data for the graph in the status area at the right. You can select which parameters to watch and even set levels at which automatic warnings will occur. Control Center also supports a "gadget mode" wherein the window shrinks to a small "gadget-sized" display showing the CPU frequency and temperature, as well as the GPU frequency if you're using the iGPU of a Sandy Bridge or Ivy Bridge processor.
Network Genie is the most interesting of these "Genie" utilities. You can select pre-defined "Modes" that prioritize specific types of network traffic, or dig down and set priorities yourself. Network Genie installs a tray icon for quick access; unfortunately, hovering over the tray icon reports the network mode (i.e. "Auto Mode") rather than identifying the utility.
In addition are the standard utilities you'll see on other Z77 motherboards: Virtu MVP, Intel Rapid Start, and so forth. But now, it's time to start testing... Motherboard Testing MethodologyAfter a few years of testing motherboards, I've noticed that motherboards based on the same chipset tend to have very similar performance. This wasn't always the case, but now that the memory controller's in the processor, and the PCI-E lanes are in the chipset, it's not surprising that everyone's "Y22" chipset motherboard performs pretty much alike...at stock settings, anyway. According to MSI, this motherboard is all about overclocking. The enhanced power circuitry, extra power connectors, and burn-in test are all to support this. Here's what MSI says about their burn-in test: "OC Certified is an all-new standard for overclocking stability and a major extension of MSI's Military Class certification. OC Certified is MSI's overclocking testing procedure to guarantee stable overclocking results. The Military Class burn-in test for OC Certified is the 24-hour Prime95 burn-in test with a liquid-cooled overclocked CPU." I would be more impressed if MSI had said which CPU they used and what the overclock was. Still, a 24-hour burn in is unique in the industry as far as I know. I'll test the motherboard using the synthetic AIDA64 benchmark's CPU tests as well as a "real world" benchmark, SPECviewperf, at stock, OC Genie overclock settings, and the best "hand tuned" overclock I can reach. MSI's "OC Genie" took the 3.9GHz boost speed of the 3770K to 4.2GHz, and I was able to reach 4.7GHz with hand tweaking. Test System
Benchmark Applications
Let's start out with AIDA64 synthetic benchmarks. AIDA64 Benchmark ResultsAIDA64 is a full 64-bit benchmark and test suite utilizing MMX, 3DNow! and SSE instruction set extensions, and will scale up to 32 processor cores. An enhanced 64-bit System Stability Test module is also available to stress the whole system to its limits. For legacy processors all benchmarks and the System Stability Test are available in 32-bit versions as well. Additionally, AIDA64 adds new hardware to its database, including 300 solid-state drives. On top of the usual ATA auto-detect information the new SSD database enables AIDA64 to display flash memory type, controller model, physical dimensions, and data transfer performance data. AIDA64 v1.00 also implements SSD-specific SMART disk health information for Indilinx, Intel, JMicron, Samsung, and SandForce controllers. All of the benchmarks used in this test- Queen, Photoworxx, ZLib, and hash- rely on basic x86 instructions, and consume very little system memory while also being aware of Hyper-Threading, multi-processors, and multi-core processors. Of all the tests in this review, AIDA64 is the one that best isolates the processor's performance from the rest of the system. While this is useful in that it more directly compares processor performance, readers should remember that virtually no "real world" programs will mirror these results. The Queen and Photoworxx tests are synthetic benchmarks that iterate the function many times and over-exaggerate what the real-world performance would be like. The Queen benchmark focuses on the branch prediction capabilities and misprediction penalties of the CPU. It does this by finding possible solutions to the classic queen problem on a chessboard. At the same clock speed theoretically the processor with the shorter pipeline and smaller misprediction penalties will attain higher benchmark scores. Like the Queen benchmark, the Photoworxx tests for penalties against pipeline architecture. The synthetic Photoworxx benchmark stresses the integer arithmetic and multiplication execution units of the CPU and also the memory subsystem. Due to the fact that this test performs high memory read/write traffic, it cannot effectively scale in situations where more than two processing threads are used, so quad-core processors with Hyper-Threading have no real advantage. The AIDIA64 Photoworxx benchmark performs the following tasks on a very large RGB image:
The OC Genie automatic overclock adds 7.6% to the Queen score and 3% to the Photoworxx score, while my manual overclock increases the scores by 19.9% and 5.9%, respectively.
OC Genie scores are 8.2% and 7.7% better than the base scores, while manual overclock scores are 20.4% and 20% better. Now let's try some real-word benchmarks with SPECviewperf in the next section. SPECviewperf 11 Tests ResultsThe Standard Performance Evaluation Corporation is "...a non-profit corporation formed to establish, maintain and endorse a standardized set of relevant benchmarks that can be applied to the newest generation of high-performance computers." Their free SPECviewperf benchmark incorporates code and tests contributed by several other companies and is designed to stress computers in a reproducible way. SPECviewperf 11 was released in June 2010 and incorporates an expanded range of capabilities and tests. Note that results from previous versions of SPECviewperf cannot be compared with results from the latest version, as even benchmarks with the same name have been updated with new code and models. SPECviewperf comprises test code from several vendors of professional graphics modeling, rendering, and visualization software. Most of the tests emphasize the CPU over the graphics card, and have between 5 and 13 sub-sections. For this review I ran the Lightwave, Maya, and Seimens Teamcenter Visualization tests. Results are reported as abstract scores, with higher being better. LightwaveThe lightwave-01 viewset was created from traces of the graphics workloads generated by the SPECapc for Lightwave 9.6 benchmark. The models for this viewset range in size from 2.5 to 6 million vertices, with heavy use of vertex buffer objects (VBOs) mixed with immediate mode. GLSL shaders are used throughout the tests. Applications represented by the viewset include 3D character animation, architectural review, and industrial design. MayaThe maya-03 viewset was created from traces of the graphics workload generated by the SPECapc for Maya 2009 benchmark. The models used in the tests range in size from 6 to 66 million vertices, and are tested with and without vertex and fragment shaders. State changes such as those executed by the application- including matrix, material, light and line-stipple changes- are included throughout the rendering of the models. All state changes are derived from a trace of the running application. Siemens Teamcenter Visualization MockupThe tcvis-02 viewset is based on traces of the Siemens Teamcenter Visualization Mockup application (also known as VisMockup) used for visual simulation. Models range from 10 to 22 million vertices and incorporate vertex arrays and fixed-function lighting. State changes such as those executed by the application- including matrix, material, light and line-stipple changes- are included throughout the rendering of the model. All state changes are derived from a trace of the running application.
Since the SPECviewperf tests actually comprise code from real-world applications, their results are more indicative on total system performance than the pure CPU performance we see from synthetic tests like AIDA64. Still, overclocking produces some noticeable performance improvements, especially in the Lightwave and Maya tests. Power Efficiency TestsThe first PC I built for myself, back sometime in the 80s, used a 250 watt power supply, and frankly at the time that was overkill. Today, though, overclocked multi-GPU enthusiast systems can easly exceed 700 or 800 watts under load, and can go even higher with extreme cooling and high voltages. Perhaps this is why all CPU and GPU vendors are imbuing their products with power-saving features, and why motherboard vendors try to add even more. And the use of these features can make a significant difference in the power use of your system. To test the power-saving features of the MSI Z77 MPOWER motherboard, I measured the power draw of the system (with no video card, and the monitor connected to the iGPU) with all the power-saving features in the "ECO" section of ClickBIOS II enabled, and with all the power-saving features disabled.
The results are interesting! Although there's no difference in power consumption under AIDA64 stress testing, note the substantial 40% savings when the system is idle. Overclocking doesn't add much to the power draw except under stress, where it balloons by 20%. There are several lessons to take from this, but the main one is that enabling the power saving features is a no-brainer, since you'll save quite a bit (unless your computer's running high CPU loads all the time), and there's no performance penalty. MPOWER OverclockingMSI advertises the Z77 MPOWER board as "OC Certified", and explains that this means that the board has received a 24 hour burn-in test with "liquid-cooler overclocked CPU". Although the CPU and exact overclock aren't specified, the 24 hour burn in is still impressive. The prominent "OC Genie" button on the motherboard invokes this feature: simply press it when the system is off, and an automatic overclock will be applied to the memory and the CPU at the next boot. With my Intel Core i7-3770K CPU, OC Genie raised the CPU turbo multiplier from a maximum of 39 to 42, and automatically found and applied the XMP profile in my Kingston memory, raising the memory frequency from 1333MHz to the XMP profile's 2133MHz. The OC Genie overclock seems to be based on a lookup table or heuristic of some sort; while you get a guaranteed stable overclock, it's not very aggressive. ASUS' Turbo V Evo automatic overclocking will generally achieve better results with the same CPU since it will incrementally increased clock speed and voltage until the system crashes during a quick stress test, then automatically fall back to the last stable overclock. Still, OC Genie's built-in overclock is just a starting point, and it makes a good base for further tweaks. In the "My OC Genie" section of ClickBIOS II, you can adjust the parameters that will be applied when OC Genie is invoked, so that pressing the button automatically applies your overclock. 
Tweaking the values myself, I was able to achieve stable operation under AIDA64's "System Stability Test" with a maximum CPU multiplier of 47, and a CPU core voltage of 1.2V. This resulted in a significant increase in benchmark scores, and I was able to easily program my hand-tuned values into OC Genie and apply them with a button click (or even from within Windows with MSI's Control Center.) However, I was unable to test the full overclocking prowess of this board due to two limitations: first, as I've noted in previous reviews, 4.7GHz is the limit for my 3770K, regardless of the motherboard it's in, and second, features like MSI's extra power connector for the PCI-E slots really only come into play with extreme overclocking in multiple-card setups with water cooling or better. I'll give my final thoughts and conclusion on this motherboard in the next section. MSI Z77 Final ThoughtsIn the original Aliens movie, the android Ash says of the murderous alien creature rampaging through the ship, "I admire its purity." That kind of sums up what I feel about the MSI Z77 MPOWER: with its beefed up power circuitry, voltage control points, and overclocking features in the BIOS and Windows applications, it's rather single-minded in its positioning: it's aimed at overclockers. It doesn't support DLNA over WiFi or include a PLX chip for PCI-E lane multiplexing; the hardware is pretty much just the basic Intel Z77; its only real "extras" are the ALC audio, the extra USB 3.0 ports, and the Parade voltage/temperature monitoring chip. This is an excellent board for beginning to moderately experience overclockers. Starting with OC Genie, and using the fan control and temperature monitoring functions in Control Center to fine-tune the best overclock possible with the hardware and cooling available, and the included fold-out overclocking guide will be a big help to the beginner. The mil spec circuitry means that you'll never have to worry about the reliability of your board as you push it as far as you can.
That said, I still wish MSI had gone a little further with their software. There are no enhanced transfer modes for the USB 3.0 ports (like UASP), and their WiFi and Bluetooth implementations are minimal: there's no system monitoring or remote control over Bluetooth (both are possible, but only over WiFi, which is problematic if you prefer wired connections for your desktop machines as I do), and WiFi doesn't offer DLNA or hot spot capabilities. And while you can control the speed of the extra fans connected to the board's PWM headers, only the CPU fan's speed can be linked to temperature; for the other fans, you're limited to specifying a percentage of full speed. I hope that future versions of the software will add more capabilities, because this hardware really deserves more. Last but not least, MSI covers this board with a three year warranty. Z77 MPOWER ConclusionThe MSI Z77 MPOWER motherboard is a solid platform for building a high performance LGA1155 system. MSI has gotten the hardware right, and the features and software provided make it possible for a user to build a solid, high-performance system. The overall performance of the system was excellent, as far as CPU and memory performance go. OC Genie gave the CPU speed a nice boost and automatically applied the XMP profile of the 2133MHz memory I was using. USB 3.0 performance could be better if advanced transfer modes like UASP were possible; as it is, only standard USB 3.0 block transfers are supported. MSI goes for a black and yellow scheme with this motherboard, with brush metal accents calling out "MSI", "Big Bang", and "Military Class III" at various points around the motherboard. These days, this qualifies as "understated". It's attractive enough and will be supplemented by the various LEDs on the board should you have this in a windowed case. The construction quality...well, what can you say except "MIL-STD-810G". It's kinda hard to top that. And should something fail anyway, there's that three year warranty to fall back on. Functionality is the board's biggest weak point, and I'm not talking about the lack of extra SATA 6G ports or PLX chips or anything. The problem is that this board needs a better software bundle. It needs procedural automatic overclocking, UASP for the USB 3.0 ports, and more capability for the WiFi and Bluetooth ports. The good news is that all my complaints in these areas can be addressed with a software update if MSI's willing to put the development time into it. For all that, though, this board represents a good value. For $199.99 (Newegg / Amazon), the MSI Z77 MPOWER comes in at the mid range of the "performance Z77 board" price scale, and the mil spec components and 3 year warranty indicate that MSI has confidence that the board will do the job they advertise it to do. If only they'd beef up the software package... Pros:
|
|||||||||||||||||||||||||||||||||


Comments
I don't doubt that I initiated the NG install before getting service packs, .net and other important updates.
That's more than likely what had happened, I just remember seeing a program called Network Genie and getting super excited to see the capabilities. (Me so newb)
I will say though, I now have a few MSI boards, and all been extremely dependable EVEN without tower protection in my humidity filled basement! OC-genie'd amd 6-core (passed my personal assessments) Never had a problem with either of them. MSI-Reliability is where it's at.