| Intel DZ77GA-70K Motherboard Overview |
| Reviews - Featured Reviews: Motherboards | |
| Written by David Ramsey | |
| Friday, 04 May 2012 | |
Intel DZ77GA-70K Motherboard Overview
Manufacturer: Intel Corporation Full Disclosure: Intel Corporation provided the product samples used in this article. While Intel provides design documents and technical help to vendors using its processors and chipsets, they don't create "reference designs" that everybody starts with as do video card manufacturers. When NVIDIA and AMD introduce new GPUs, the first wave of boards from their partners all use an identical design, provided by NVIDIA and AMD. This gives third party vendors a quick release cycle with a verified design. Later, vendors enhance the design to add their own unique features. One important thing to keep in mind is that with this model, NVIDIA and AMD do not sell cards directly to the consumer, so they're not in competition with their partners. Intel, on the other hand, does sell directly to the consumer. They have a complete line of motherboards for the Z77 Express chipset, and their Extreme Series boards are aimed at the enthusiast market.
The problem Intel has had is that their previous Extreme Series boards haven't exactly set the world on fire. While companies like ASUS, MSI, Gigabyte, and the like manage to provide feature-stuffed, perfectly functioning boards in full retail kit to reviewers weeks before release, Intel typically seeds reviewers with incomplete kits missing manuals and most accessories, with buggy BIOSes and sub-par performance. So imagine my surprise when the Intel DZ77GA-70K I received turned in performance equal or better to the more expensive ASUS P8Z77-V Deluxe and had a few unique and compelling features of its own. Detailed ComponentsIntel doesn't populate its boards with custom ASICs and processors as does ASUS, but they do use a number of third party chips to enhance functionality. The most interesting is the Genesys GL3520M USB 3.0 hub, which allows the DZ77GA-70K to have eight USB 3.0 connectors (four internal, four external) from the four native USB 3.0 ports provided by the Z77 Express chipset. They use their own 82579 and 82574 Ethernet controllers to provide the two Gigabit ethernet ports, and an ITE 8892E PCI-E to PCI bridge to support the two old-school PCI slots. A Marvell 88SE9172 powers two additional SATA 6G ports, Texas Instruments provides the FireWire 400 capability, and good 'ol Winbond supplies a sensor/fan controller chip.
The DZ77GA-70K has eight SATA ports (nine if you count the ESATA port on the back panel). The two gray ports are SATA 6G ports supported by the Marvell 88SE9172 chip; the four black ports are SATA 3G provided by the Z77 chipset, and the two bright blue ports are the native SATA 6G from the Z77 Express. 
Intel provides WiFi b/g/n (but not a) via this PCI-E 1x module. This board makes the first PCI-E slot on the board, a 1x, actually useful.
This strange plastic box is the Bluetooth 2.1 module. As you can see from the connector it's designed to plug into a motherboard USB 2.0 header, and Intel provides a cable for this. Fortunately there are three USB 2.0 headers on the board so two remain available. The rear of the module has a strip of sticky tape on it. Although it's not obvious where the module's supposed to go, I suppose you run the cable outside your case and tape this module to the back of the case or something. It's a somewhat clunky solution when competitors are providing better integrated hardware with Bluetooth 4.0 and HS support.
The DZ77GA-70K motherboard has a full complement of seven slots. The two PCI-E x16 slots are spaced so that two double-wide graphics cards will get plenty of ventilation. Oddly, Intel includes two PCI slots, an anachronism on a modern motherboard.
But enough with the hardware. This star of this board is its BIOS, which I'll get to in the next section. DZ77GA-70K BIOSIntel calls their new UEFI BIOS implementation Intel Visual BIOS. I unapologetically begin with an image of the BIOS splash screen, and I'm not even going to criticize the cheesy skull image. What's impressive about this is that it comes onscreen almost instantly and stays there for a timed five seconds. If you've ever frantically stabbed at a key when the BIOS splash screen flickered onto your screen, only to disappear a second later, you'll appreciate this.
Next is the summary screen you see if you hit the F2 key to drop into the BIOS. At the left are your bootable devices, and you can drag them to rearrange the boot order or double-click on one to boot from it directly. To the right of that section is the Overclocking Assistant section, and all you have to do to overclock the CPU from this screen is drag the little slider to the right until the Turbo frequency shown is what you'd like. Note that the adjustments shown below the slider-- Processor Current Limit Override, Burst Mode Power Limit, Sustained Mode power, and so on, are all automatically adjusted on the fly to appropriate values as you move the slider. With my Core i7-3770K CPU, dragging the slider all the way to the right gave me an instant, stable 4.5GHz overclock, which exceeds the quick overclock provided by the ASUS and MSI motherboards I tested. Clicking on the Graphics or Memory tabs takes you to overclocking sections for the iGPU and DRAM, and large legible buttons below this take you to a more detailed tuning section, a list of motherboard devices, the SATA section, and an area to store settings profiles. This is easily the simplest and most functional BIOS screen I have ever seen.
If you click the subtle arrow at the far right side of the screen, you'll see this screen. The left panel shows what devices you have plugged into your slots, the middle panel shows fan speed as well as board temperatures and voltages (in real time), and the right panel shows what devices you have plugged into your SATA ports...and as you hover over the devices, the specific SATA port associated with the device is outlined with a green rectangle. I should also mention that switching among BIOS pages is always accomplished with a smooth, animated transition.
Clicking the Advanced Setup button near the top of the screen brings you to this page, a jumping-off point for delving deeper into the system. It's mainly a status page.
The Devices and Peripherals screen has three sections: USB, SATA, and Video & Other Devices. The USB screen lets you enable or disable USB 3.0 and legacy USB device support, as well as enabled or disable any of the 14 USB ports on the board.
The SATA Drives section is where you configure IDE or AHCI mode, as well as enabling or disabling the secondary SATA controller. The Video & Other Devices page contains configuration options for the iGPU (memory, mainly), which graphics device (iGPU or discrete video) will be the primary device, and other devices that can be enabled and disabled, like consumer I/R, front panel audio, and so forth.
But there's even more... DZ77GA-70K BIOS ContinuedOne of my criticisms of this motherboard is that it has only four fan headers, including the CPU header. But at least they're all four-pin PWM headers, and Intel gives you pretty fine control over them. As you can see below you can define how each fan is used as well as set minimum and maximum fan speeds.
Under the Temperatures tab, you can define the temperatures the motherboard will use to control the fans, as well as how the fans "respond". A high responsiveness with low damping means fans speeds will change continually and instantly in response to temperature changes, which provides the best cooling but might be annoying from a sound standpoint. Alternatively you can dampen the response so that the change is slower. The Thresholds tab, part of which is visible at the right side of this image, defines the voltage thresholds (over and under-voltage) that can be used to generate alerts with the proper monitoring software. While this could be a useful feature, Intel doesn't provide any such monitoring software.
The Performance tab takes you to a summary screen showing the default, currently active, and "proposed" (set but not yet applied) parameters for the processor, memory, iGPU, and system voltages.
The Processor tab is representative of what you'll see on the other Performance tabs. You can set the CPU voltage and define the turbo multipliers to be used for 1, 2, 3, or 4 cores. To the right are settings for enabling or disabling features like SpeedStep, Hyper-Threading, and the C states as well as VDROOP and sustained and burst mode power overrides. 
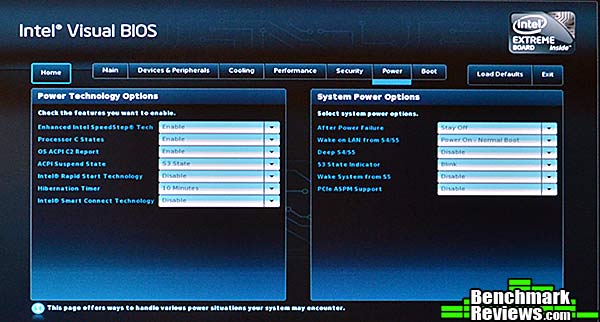
The Power screen has controls for processor and subsystem power usage. Intel Smart Connect Technology will wake a sleeping computer at defined intervals so that programs such as Microsoft Outlook can update themselves without the computer having to be on for the entire time.
One of my favorite features in the BIOS is the Search input. At the bottom right of every BIOS screen is a little Search input area. Click in it and start typing to bring up every place in the BIOS the search term occurs. In the image below I've typed "boot", and the results consolidate everything the BIOS knows about "boot" into a little custom panel with active controls. This is great for finding your way around a complex BIOS, although frankly Intel's Visual BIOS is so well-designed and intuitive that this feature almost isn't needed except as a short cut. 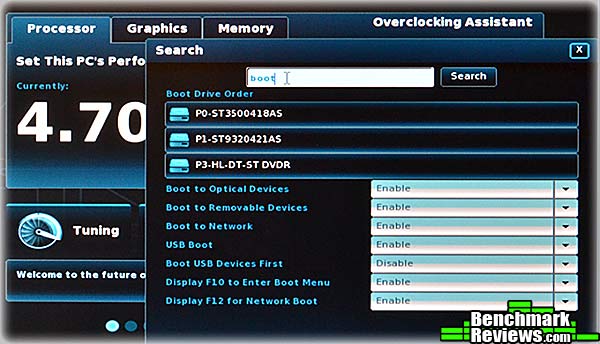
In the next section I'll give my final thoughs on the Intel DZ77GA-70K motherboard's feature set. Motherboard Features Final ThoughtsI can only hope that the Intel DZ77GA-70K motherboard represents a new push by Intel to make their motherboards more competitive. ASUS isn't trembling in their boots just yet, and there are still some rough edges in Intel's design and implementation. However, in my opinion this is the first Intel motherboard that represents a credible choice for an enthusiast looking to build a new rig. Intel has done a really good job with the hardware feature set on this board. Users will appreciate the eight USB 3.0 ports, extra SATA 6G ports, dual Ethernet ports, and POST code display, POST sequence LEDs, and power phase LEDs. But the star of the show is the Intel Visual BIOS. It's aesthetically pleasing, well laid out, and very functional. Enthusiasts and overclockers will spend more time in the BIOS than other users, and using this one is a real pleasure. The more you use it, the more obvious it is that some very smart people really sweated the details. It makes every other BIOS I've used seem primitive by comparison.
The only place this board comes up short is in its supporting Windows software...or lack thereof Admittedly this is hard to judge since there was no driver/utility CD provided with the motherboard, so it's not clear what the final retail version will offer. Aside from some drivers and very basic utilities, the only real Windows software Intel provided was its Extreme Tuning Utility, which merely offers manual settings of various parameters within Windows, without any automatic overclocking features. Using the slider-based overclocking in the BIOS will be easier for most people for whom the few hundred extra mHz possible with manual tweaking is too much trouble. Still: a solid set of innovative features and a BIOS to die for. It might not be the ultimate Z77 board, but it's Intel's best effort to date, and I look forward to seeing what else they can come up with. Benchmark Reviews invites you to leave constructive feedback below, or ask questions in our Discussion Forum.
Related Articles:
|
|


Comments
There are still a couple of things I would agree to whine about. I'm in my late 40s, and I don't want a board with a stupid skull on it, either in my startup screen nor on the board itself. That's a really juvenile choice by Intel and I can only wonder just what were they thinking? I would be embarrassed to start this computer up with people looking on.
The other thing, as you mentioned, is the PCI slots. I can't remember that last time I needed a PCI slot. Time to say bye bye.
##intel.com/support/motherboards/desktop/sb/CS-032034.htm