| BitFenix Colossus E-ATX Computer Case |
| Reviews - Featured Reviews: Cases | |||||||||||||||||||||||||||||||
| Written by Nate Swetland | |||||||||||||||||||||||||||||||
| Wednesday, 27 October 2010 | |||||||||||||||||||||||||||||||
BitFenix Colossus Computer Case ReviewBitFenix is very much a newcomer to the saturated market of computer cases. They are looking to get their foot in the door and to make a big name for themselves. With the introduction of the Colossus case, it is clear they intend to make a very large impression on the market. This large tower form factor case is almost two full feet tall and deep, so you know it lives up to the name Colossus. Benchmark Reviews has been given the opportunity to take a look at the case as it nears its United States debut. With advertised features such as a security-minded top storage/access panel, unique exterior LED lighting system, and massive cooling capabilities, this case has much promise to be a great debut for BitFenix as a company. Will it live up to the Colossus name, and up to Benchmark Reviews' standards? Read on to find out! Many people are a firm believer in the mantra "bigger is better". The Colossus subscribes to that idea both in name, and in practice. This case is designed with "big" in mind, and it shows. With the ability to hold up to 7 hard drives, 5 optical bay devices, two 230mm fans, and three 120mm or 140mm fans; you know it is big. With BitFenix being such a new name in the industry, they need a real winner to show they have the stuff to make it. While only a new company, BitFenix is staffed with industry veterans, so they know what works and what does not. The Colossus offers many cosmetic options, as it comes in either all white or all black. The LED lighting also allows for several different configurations, which we will get into detail later on. If you like full tower cases with plenty of cool features, stay tuned to see if the Colossus is the right case for you.
Cases are very cosmetically orientated items, but they also must perform and function to certain standards before they can be considered worth purchasing. Items reviewed by Benchmark Reviews are rated on the following categories: Performance, Appearance, Construction, Functionality, and Value. While some of these categories can tend to be a bit more subjective than others, Benchmark Reviews strives to provide the most professional and unbiased review as possible.
Manufacturer: BitFenix Co. Ltd. Full Disclosure: The product sample used in this article has been provided by BitFenix Co. Ltd. BitFenix Colossus Features
BFC-CLS-600-KKLB1-RP Specifications
Closer Look: ExteriorMuch of the initial appeal of a computer chassis is the Exterior appearance. If it does not look good, then why buy it? The BitFenix Colossus has such exterior features as the unique LED lighting, and wrap-around design that set it apart from other cases. In this section, we will take a look at some of the exterior features of the Colossus.
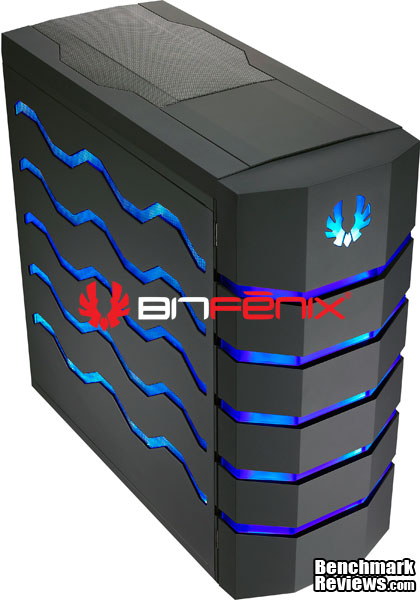
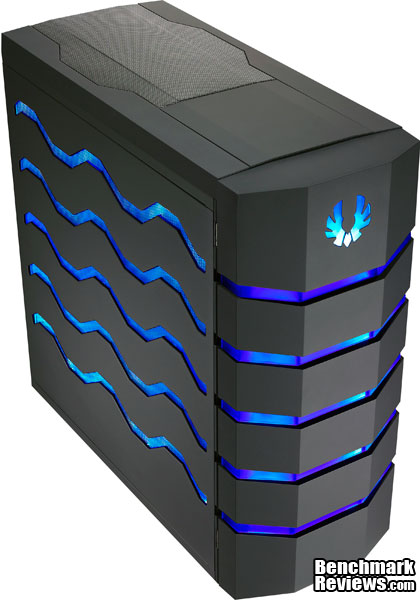
The Colossus is a large case. At almost 2ft tall, 2ft deep, and roughly 10in wide, it lives up to the name Colossus. All this size is hard to miss, and BitFenix tries to make this case look good, too. Featuring a wrap-around adjustable LED lighting scheme, with a sleek black finish, it combines elegance with a symbol of power.
This is an image of the front of the case. Emblazoned with the BitFenix insignia on the top, and 5 rows of LED lighting, the front lights up brightly, but not so much that it is annoying. The front of the case is a door that reveals the optical drive bays, as well as some cable management features. We will get more into some of these features later on.
This is the right side of the Colossus. This is the side that the motherboard is installed on, and is also the side where many of the ugly interior cables will be hidden. We will get to the cable management later on. On the bottom, you can see the feet that keep the Colossus from being flat against the ground, and allow air flow to the bottom intake openings on the case. The side LEDs, like the front, light up very nicely and do not get so bright that it becomes annoying to look at.
This is the rear of the Colossus case. BitFenix provides room for 8 expansion cards in the case. The bottom hole is for the power supply. You may notice in addition to an opening for an optional 140mm rear fan, there are 4 grommets for water cooling hoses to allow for many different cooling options.
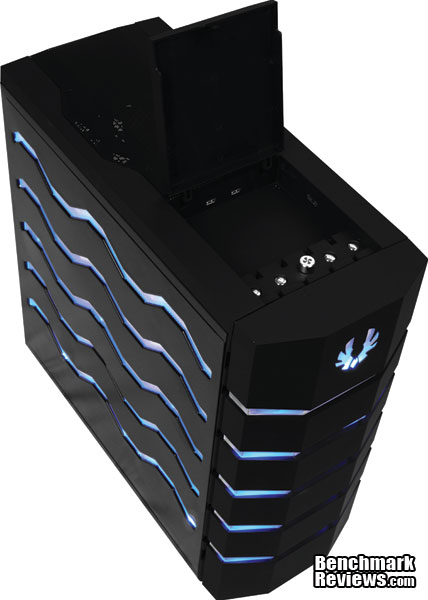
This is an image of the top of the Colossus. This shows the grill for the top 240mm fan. The fan grill is removable, which can allow you to clean, modify, remove or replace the fan if needed. The square-shaped compartment can also be seen in this photo on the left, and when it is closed, it lays flush with the rest of the top. Detailed Exterior FeaturesIn this section, we go into detail on some of the other exterior features such as the secure storage compartment, the LED lights, and the external cable management. These features and more help BitFenix to set the Colossus apart from many of the other cases out there.
Here we can see the top compartment of the Colossus. Inside this compartment are 2 USB 2.0 ports, 2 USB 3.0 Ports, Mic/Headphone jacks, and an eSATA port. This compartment also serves as a place to store/hide your gadgets such as a phone, mp3 player. etc. The compartment lays flush with the top of the case, but leaves a small ledge above the front door where you can push against in order to open it.
Here is a closer look of the top compartment of the Colossus. In addition to the front I/O ports on the case, the top compartment houses the reset and power buttons, the 6-fan controller speed knob, and the control buttons for the LEDs. The right-most button allows you to change from three different display modes, fully on, pulsating, and completely off. The button to the left of that toggles between red and blue colored LEDs. On the front of the case at the top, there is a lock for the top compartment. While only being a simple key lock, this can mean the difference between you stuff being secure, or someone easily walking away with your fancy smart phone or mp3 player. Below the lock and to either side, you can see the LEDs for the HDD and power. In my opinion, these are unfortunately placed. You cannot see these LEDs through the front door, so almost serve no purpose. Now, a rule of thumb is that if the big external LEDs are on, the power is on, but I often put my computer to sleep, and the only way I can tell that my computer is asleep is by the blinking power LED. If the LEDs are off, how do I know if my power is off, my computer is asleep, or if I simply turned off the external LEDs during a movie, and never turned them back on? Again, this is personal preference, and others may find that it doesn't bother them a bit. Also shown in this picture are the channels used to manage your cables from your front peripherals plugged into the front I/O ports. We will talk a bit more about these in a minute.
Here is a photo showing that the door can be mounted on either side of the Colossus, allowing it to swing either to the left, or to the right. To change sides, it is a matter of about 10 screws and two hinges needing to be moved from one side to the other. It can be done alone, but a friend holding the door is very helpful. In addition to the cable management grooves mentioned on the previous photo, the door has small notches on either side of it that match up with exit points along the cable grooves. These allow the cables to exit without having to keep the door open. There is a small problem, however. The notches seem just a bit too small for some USB plugs. This is not a problem on the side where the door opens, but they do not fit through where the door is attached, so the cables must either be positioned before you mount the door, or you will have to remove the door (or at least one of the hinges) later on to fit some cords through. This is not a huge con, but it is something worth thinking about when deciding on where you are going to place the door, and the Colossus itself. Magnets are in place on either side to hold the door shut, however, I ran into a little trouble with them. It seems that the magnets could stand to be a bit stronger. I found myself occasionally brushing against the case, and it would knock the door open. If the Colossus sits on an uneven surface such as carpet, you may find it swinging open by itself from time to time.
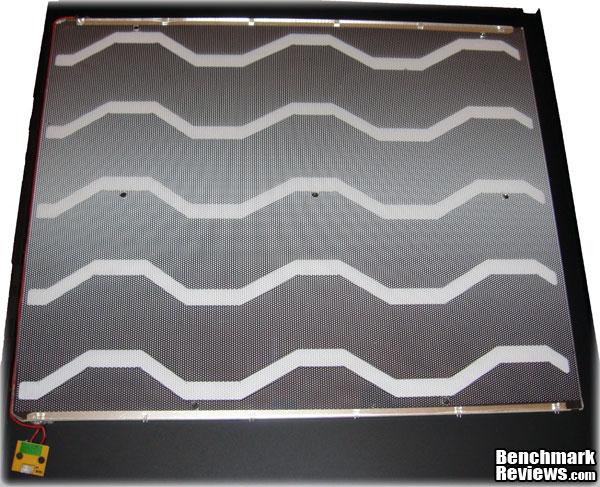
This is a detailed image of the LED lights used to light up either side of the Colossus. It is composed of a fairly simple plexi glass and LED setup. The plexi lights up, and then shows through the openings cut into the side of the case. A black piece of cardboard screws over this, so that light does not shine all over. The front of the Colossus is set up very similarly, but instead of having openings cut into the front door, the door is plastic, and has translucent plastic where the LEDs shine through.
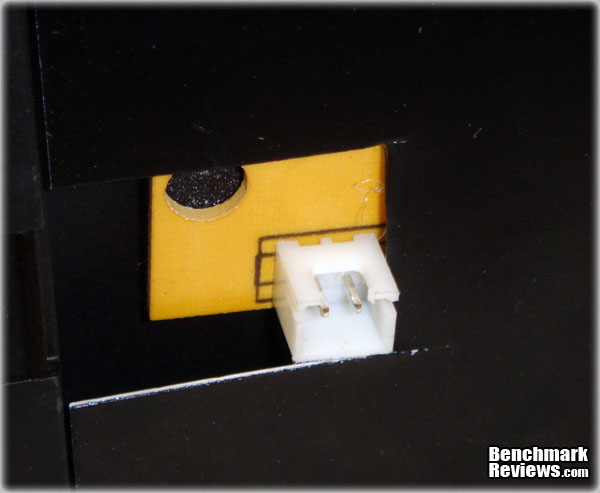
This is a close-up of the connection used for the exterior LEDs. There is one of these on either side, and two on the front door (one on each side to allow the door to open in either direction). The connections are placed at the front bottom of the side panels. Closer Look: InteriorIn the next section, we will look at some of the interior features of the Colossus before any components are installed. BitFenix boasts some tool-less installation designs, and a potentially helpful cable management system to clean up the clutter. These claims are easy to make, but we will see shortly if BitFenix actually delivers on these promises. 
Here is an image of the Colossus bare. The Colossus can hold up to 8 expansion cards, 7 hard drives, and 5 optical drives. It supports Mini-ITX, mATX, ATX, E-ATX form factor motherboards, for a wide variety of options. Behind where the motherboard would be mounted, you can see the very large opening that allows access to behind the motherboard. This will allow access to the bottom of the CPU for all of you cooling enthusiasts out there to easily switch out your heat sinks and water cooling setups without having to remove the motherboard. You may also notice the abundance of rubber grommets surrounding where the motherboard will be mounted. This gives you a lot of options to route your internal cables so you can improve both the look on the inside, as well as improve the airflow inside the case.
This is a close up shot of where the power supply will be mounted inside the Colossus. The power supply will sit on 4 rubber stand-offs to allow air to pass under the power supply, and through the grate located underneath. The power supply can be mounted in either orientation, allowing you to choose the best position of your intake/exhaust fans, and wire configuration.
Shown in this photo is a close-up of the PCI brackets on the Colossus. BitFenix boasts a tool-free design for PCI devices. There are also included grilled PCI bracket covers to help with air flow and to keep harmful dust out. The tool-free clamps simply pull back to release, and then you push them forward to lock your expansion cards in place. 
On the top of the Colossus is a 240mm exhaust fan. This huge fan takes all the hot air and expels it out the top of the case. Because of the large size of this fan, it can operate efficiently at a low RPM, and because of that, is very quiet. I had a very difficult time even hearing this fan in action, and would not know it was on unless I could see it moving. The green PC board in this picture is part of the top component compartment, and more specifically, the USB 3.0 plugs.
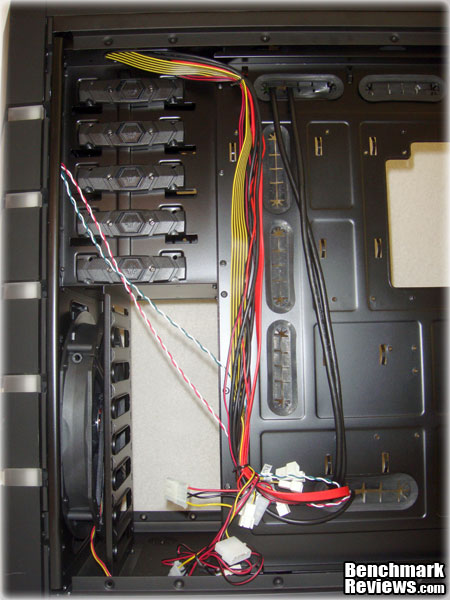
On the left side of the case, once the side panel is removed, we see how the cables look when the case is first shipped. Already there are quite a few cables that go to the fans, LEDs, top compartment, fan controller, etc. As we add more stuff inside this case, the cables will be routed back to this area, where they will hopefully be hidden by the side panel.
The 5 optical drives are mounted on the top of the Colossus. The optical drives must be slid in through the front of the case (which must be fully removed; door, fascia and all). Once the front is removed, if you want more than one optical drive (or if you want to add any other component that goes into the optical bays, you must break out the metal pieces in the front. If you have read any of my other case reviews, you will know that I loathe those things. I prefer to either have a simple little placeholder, or nothing at all. I should not have to worry about cutting my fingers to shreds while installing a new optical drive. Once the drive is slid through the front, you can lock them into place by pressing the BitFenix logo on the middle of these latches and sliding them to lock the drive. If you want to be sure, there are 4 holes where you can screw the drive into place as well.
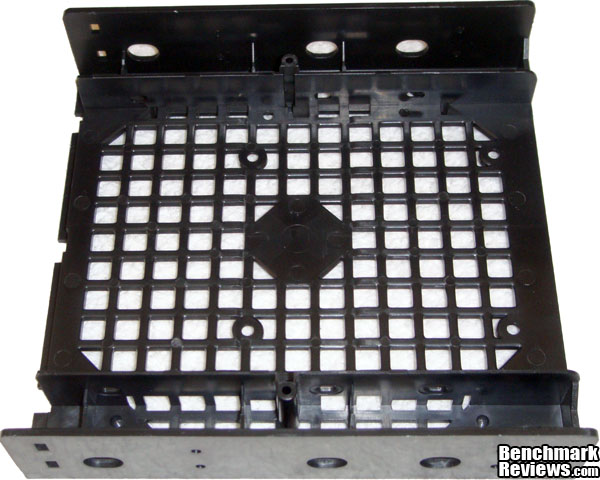
Included with the Colossus is an adapter for installing 3.5" drives in a 5.25" bay. This can be used for card readers, hard drives, fan controllers, etc.
Shown above is one of the 7 included hard drive mounts. These snap on to a standard 3.5" hard drive, and then allow it to slide into one of the 7 HDD bays in the Colossus. There also are holes on the bottom of these mounts so you can use them with smaller laptop drives or SSDs. The mounting pins are encased in rubber to help cut down on vibration. Detailed Interior FeaturesDuring the installation is often where all the good and bad features of a case design show up. If a case is well designed with ease-of-use in mind, installation and cable management is often a breeze. However, if all aspects of the design are not thought through properly, it can cause huge headaches during the installation phase. BitFenix has plenty of room for a large variety and quantity of components in the Colossus, as well as a cable management system, and several other features that should help during the install to make it painless, and fun.
Here is how a typical hard drive looks when it is put in the bracket. The hard drive can be placed in either horizontal direction, whether you want the cords to be in the front or in the back. There are no tools required for this, as the bracket just needs to be bent apart a little bit and then the pins slide into the HDD screw holes.
Here is what it looks like when a few drives are mounted in the Colossus. The drives simply slide in and snap into place. They can then be removed by pinching the little tabs on the end and pulling them out. If you notice on the left hand side of the HDD cage, there are holes in the center of each drive. These can be used to secure the drives into place, so that they won't slide around if the case is moved around, or if you run into it in the middle of the night. In my install, I opted to face the hard drives backwards so that the cables will be behind the drive. This causes the securing holes to not line up properly. This is not a design flaw, it is simply the way it is if you choose to mount the drives this way. The addition of another hole would take care of this, but it is not something that I would give negative feedback for.
To help with the install, the Colossus comes with a few motherboard risers already put in place, but you may need to move some around depending on what form factor your motherboard is. Much of the mounting hardware (screws, etc.) is already included, as per usual with most new cases. After mounting my motherboard, I have begun to put some of the case wiring through the grommets.
Here is a full shot of the installed motherboard and the hard drives. The cables you see are only the ones that go to the case components, such as the LEDs and top compartment, so it looks pretty sparse for now. We will see how well the abundance of grommets helps when we start adding all the rest of the components and cables into the Colossus. Take note of the small hole under the bottom left corner of the motherboard. I am curious as why there is no grommet there.
The installation of the PSU is a snap in the Colossus. There is plenty of clearance between the PSU and the bottom of my motherboard to allow for airflow, as well as for cables. I opted to mount my PSU intake fan up both for cable length purposes, as well as the fact that I am stuck with wall to wall carpet, and prefer not to suck in carpet fibers and scatter them all over my components. I opted to run my main 24pin ATX cord through the grommet-less opening (I can only assume that is why that hole is there in the first place). I then ran most of the other cables such as the SATA cables, HDD power, and front I/O connections through the other hole with the grommet. A modular power supply is very helpful for cable management, but if you don't have one, you can at least try and run the rest through the back and hide the cables on the other side of the motherboard tray.
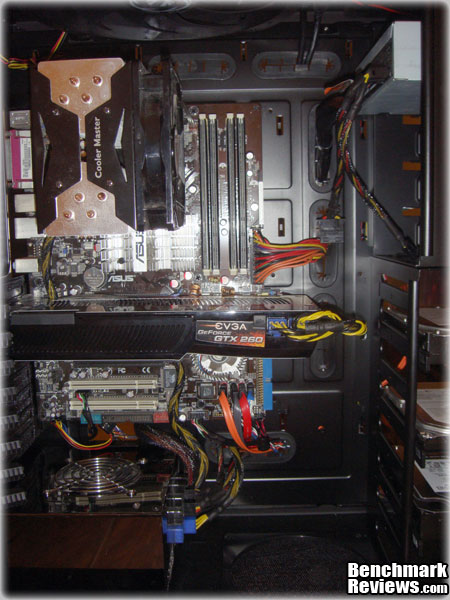
Remember a couple photos ago when I mentioned I installed my PSU a certain way due to cable length? You may not be able to notice, but my 24 pin ATX power cord just barely plugged into the motherboard. I had very few other choices, and luckily, this one worked out well, but you experience will depend very much on what power supply you have, and the motherboard you use. After installing the power supply, I moved onto the video card, a EVGA GTX 260 core 216. These cards are not known to be petite, but in a case as large as the Colossus, there is still plenty of room behind the card to reach in there and do some cable management, as well as allow you some room to change components around if you need to. Though it is not pictured here, there are two large zip-tie like straps included with the Colossus. These straps can be fastened to the motherboard tray, and then go over your GPU in order to secure it both from movement, and from theft. For those that are curious about interior dimensions and clearances, the distance between the HDD tray and the rear of the case is about 13.75", but the PCI cards stop short of that at 13" due to the mounting method. The distance from the motherboard tray to the exterior panel is roughly 7.75", and the distance from the top of the motherboard to the top fan is about 2.5" The grommets along the side allow quick exits for any cords in this area, so they don't clutter up your interior, and create bad air flow. So far, the cabling looks pretty good in my opinion, mostly thanks to the many different grommets the Colossus has for this purpose. The grommets are not completely trouble free, however. I found that many cables find the best route through many of the same grommets, which can be trouble if you have to run larger plugs such as the ATX power and IDE cables through the grommets. Planning ahead is very helpful, and can save a lot of trouble, because if you push a grommet through, they can be a pain to set back in the hole properly.
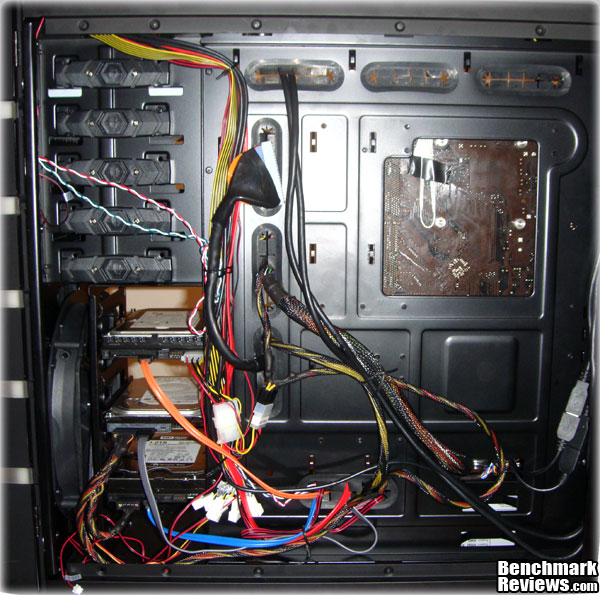
Here is the back side of the case. This is where all the cables come through. While it may look like a mess, this is actually after a small effort to clean it up from what it looked like before. There are spots all over the back where you can secure wires to with zip ties, as well as a channel on the very outside edges of the case where you can also hide cables. For you neat freaks out there, I opted to secure the cables in a very temporary manner, and not take the hours it would normally need to properly route and secure them, so there is absolutely room for improvement here. There are a deceptively large amount of cabling the Colossus requires just for the front I/O and the 6-fan controller, and pairing that with all the components I just installed, it makes for a large task. The best part is, that you do not need to see this, ever. When you put the side panel on, this whole area is covered up, and you cannot see it from the outside, or even from the other side of the case.
Here is a final image of the Colossus with all my components installed. The installation was in whole, very easy, and very frustration free. I think that the cable management system that the Colossus has in place with the abundance of grommets going behind the motherboard tray makes a huge difference when tidying up the cables in the case. E-ATX Case Final ThoughtsMany people simply want a box that will hold their computer components, and never give it a second thought. The Colossus case from BitFenix is not for those people. The Colossus is built for people that love their hardware, and enjoy things that perform as good as they look. The Colossus is big enough to provide for even the most demanding of rigs out there, yet it is attractive enough so that you can do it in style. The unique LED lighting, secure top compartment, and front cable management all show that BitFenix was keeping enthusiasts in mind when this case was designed. With the inclusion of not only one, but two huge silent 240mm fans, mounting options for other fans, water cooling focused features, and stellar cable management options, it is obvious that the Colossus had cooling and performance in mind as well. The Colossus is a very solid case both in form and function, but it is not completely without its flaws. A few missed steps, such as the slightly annoying front cable exits being too small, do detract a very small amount from the case. This is not to say that the case cannot perform perfectly well without them, as they are merely minor annoyances. I would recommend the Colossus to anyone who is serious about their enclosure, and wants to show it. The Colossus demands attention and respect, and attention and respect is likely what you will get when people see it. The price of $169 may seem a bit steep, but if you consider all the great features it has to offer, it is really a fair price to pay. If you are searching for a new full sized, full features ATX case, then the BitFenix Colossus is surely worth a look. BitFenix Colossus ConclusionThe Performance of the Colossus is great. The fans perform very well, and are practically silent. I have had no issues with temperatures at all, and I have not had any trouble with dust in my case. The front I/O panel performs as it should. The only thing that did not perform as well as it should was the door, and that only gave me a little trouble. If the Colossus is on uneven carpet, the door may swing open by itself once in a while, especially if bumped occasionally. I think the Appearance of the Colossus is quite amazing. I really enjoy the dark color of the case, as well as the bright LED lights. I also like that I can choose between red and blue LEDs and also that I can choose different display modes of those LEDs. I think that the name Colossus is very appropriate for the case, and I think that it will turn more than a few heads at your next LAN party. The Construction of the Colossus does not leave me fearing for the safety of my components. The case itself is very heavy, but it is sturdy. I don't believe that the top compartment or front door would break after excessive use, nor do I think the mounting hardware for the PCI cards, optical drives, or hard drives run the risk of being broken, if used correctly. The interior has no jagged corners or other places where you can catch your fingers, or snag a cord, other than the dreaded break-away plates for the optical drives. The Functionality of the Colossus is above average. The top compartment is very handy for those of you that like your gadgets, and also do not want them to be stolen. The fan controller is a very nice function of the case, as it allows for up to 6 fans to be controlled at once. The front door is a nice function for those that do not need constant access to their optical bays. All in all, there is really nothing on this case that did not function the way that it should. The Value of the Colossus is fair, in my opinion. At MSRP $169, the BitFenix BFC-CLS-600-KKLB1-RP model is not something you would want to simply purchase without thinking it over twice, but I don't think it is asking a lot considering all the features packed into the case. The Colossus is on par with many other cases of this size and feature set. I think it is a good case at a good price. I think BitFenix has a real winner with the Colossus, and that is much to be said for a debut case from a very new company. I will keep a watch on their future products for sure. Pros:
|
|||||||||||||||||||||||||||||||


Comments
Did you review a production case or a prototype? I read a previous review that indicated that Bitfenix was making a few adjustments post-review; this goes back a few weeks.
A Velcro strip would be a nice quick fix for the door indeed. A small magnet with a stick back would also work, but both would not allow the door to close flat. Making sure the case is on a level surface allows the door issue to go mostly unnoticed.
The case I reviewed was in fact a full retail sample.
Thanks for your comments!
It has been confirmed that there are actually magnets that hold the door shut. While they do hold the door, they are a bit weak, and the door is still prone to bumps and uneven surfaces. This may very well be an isolated incident, but I noticed it enough to mention it originally.
I wanted to be sure, and to clarify this for everyone. The article has been updated with this information as well.