| SilverStone Grandia SST-GD07B HTPC Enclosure |
| Reviews - Featured Reviews: Cases | |
| Written by Bruce Normann | |
| Wednesday, 20 June 2012 | |
SilverStone Grandia SST-GD07B HTPC Case
Manufacturer: SilverStone Technology Co., Ltd. Full disclosure: The product used in this review was supplied by SilverStone The latest HTPC cases from SilverStone's Grandia line are the newly launched GD07 and GD08. They're both full-sized cases that can handle standard ATX motherboards and full length, high-end video cards. Today, Benchmark Reviews will explore the GD07, which features a full-width, lockable, aluminum front cover. The GD07 may not be slim, but it's still sleek looking, with an air of elegance.
Space has been a constant factor in HTPC case design, ever since the beginning of the genre. Consumers want sleek, fashionable components in their living rooms, not big tower cases with exposed drive bays and fans bulging out on all sides. There are certainly a host of small, svelte boxes available that work with a mini-ITX motherboard, or even a micro-ATX system. They can do an excellent job of serving up basic home theatre needs in style, especially in a fully networked environment where your primary storage requirements can be met by other servers tucked away out of sight. Trouble is, the long-predicted convergence is going to come around and bite you. Want to do a little gaming on your skinny HTPC - not the best experience. 3D's even tougher. Want to transcode some of your videos and upload them to your tablet - that takes too long. Want to use your NAS for backup, instead of front-line storage - better make space for some more drives. Reality is, if you want your live-in PC to be all that it can be, you probably need a more muscular form factor. Who needs a glorified DVR, running Windows? Silverstone's GD06 addressed this situation, with a self-imposed limitation of a micro-ATX motherboard. You can certainly get some stellar performance out of today's uATX boards, but it's easier with full ATX; you have so many more choices. One more thing the GD07 and GD08 bring to the table is a huge amount of space for internal storage. SilverStone GD07 HTPC Server Case Features
SilverStone GD07 HTPC Server Case Specifications
Closer Look: ExteriorOnce the SilverStone GD07 is out in the open, the first thing you look at is the front panel. It's plain but attractive, with just a few design features that break up the expanse, and the fine-grained dark anodized finish is immaculate. I was a little surprised that there was no protective sheet covering the front surface, because it's so easy to scratch or scuff up nicely finished metal panels during assembly or packaging. Never mind the finger prints that usually show up. Kudos to SilverStone's manufacturing team for getting the product into the box at the end of the production line with no handling marks. That's a lot harder than it looks, BTW. This is the view you're going to be looking at 99% of the time you spend with this case, so be sure it fits in with your feng shui, or whatever concept you use for interior design. 
Behind the door, are four exposed 5.25" drive bays in pairs on the left and right, the usual collection of USB and Audio ports, and the Power and Reset buttons. The USB ports are USB 3.0 compliant, in the familiar blue livery. The Power button has an external actuator that makes it accessible from the front panel, plus it includes a locking feature that allows you to make the front panel completely inert. If you've got little kids wandering around, this is a very welcome feature. The Reset button is already hidden behind the front panel, there's no way to push it without opening up the front cover. The audio ports are nothing special, just your basic 3.5mm stereo Microphone and Headphone jacks. Can't very well have a HTPC without some sort of front panel jacks; Silverstone keeps them hidden on the Grandia GD07 so you don't have to look at them when you're not using them.
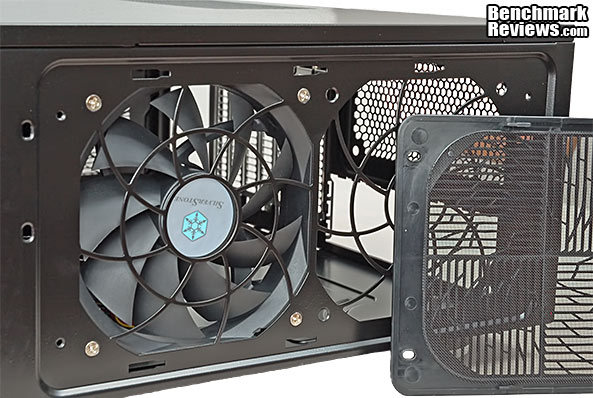
Around on the right hand side of the case are mounting locations for two 120mm case fans and a single grille/filter assemble that's removable for cleaning. One fan is supplied and installed from the factory, in the front mounting position, configured as an Intake. The overall airflow design that SilverStone chose for the GD07 is intended to create positive pressure inside the case, so all fans are installed as intakes, in the default set up. Once we look inside the case, we'll see that this side is equivalent to the top surface of a traditional tower case, and airflow in this area will be interacting strongly with the CPU cooler fan. That's going to be a major topic of discussion later, as we get into the build process. Suffice to say that cooling is a critical part of any HTPC build, because of the usual space and layout constraints and the need to keep noise to a minimum. More later, but let's just say that having options in this area is a good thing. The grill is removable for cleaning, by sliding it towards the front, and a strip of no-mar tape is supplied during packaging to keep the louvers in place during shipping.
The left hand side of the case has another single opening, this time to provide air for the PSU, which is mounted on its side in the back corner. Most power supplies have a "top-mounted" fan, which will line up perfectly with this inlet. The incoming air will circulate inside the PSU and get pushed out the rear of the unit, meaning the entire heat load and airflow of the PSU is isolated from the rest of the case. All of the grilles we've looked at so far have fine plastic mesh filters bonded to them, which are easy to clean and durable, in my experience. All of the filters snap into place with locking tabs, instead of mounting rails or grooves.
Moving around to the rear of the case, there's a variety of features to note. On the upper left are two fan grilles with 80mm mounting points. These are meant to be set up as exhaust units, and have no grilles or filters. Below that is the large opening for the standard ATX I/O plate. To the right are seven expansion slot openings, with slotted covers, with an eighth location mounted sideways above them. The latter position is useful for placing I/O expansion plates, which interface with headers on the motherboard, instead of PCI slots. To the right of these, is the opening and mounting holes for the power supply. As noted earlier, the PSU is intended to be mounted with the fan pulling air from the side vent, but if you want to pull air from inside the case, there are an extra set of mounting holes that allow the unit to be flipped 180 degrees from the normal pattern. The only remaining thing is the two small screws at the top, which holds the top cover in place. Once these are removed, the formed lip in the center is used to pull the panel to the rear and then lifted up to remove it completely.
The top of the case has a square-pattern grate located directly above the expansion card area. In the normal airflow scheme, this is an escape path for hot air that is pushed out of the case by positive internal pressure. Between the twin 80mm fan grates, the slotted expansion slot covers and the top vent, most of the outgoing air is going to be leaving the case in this general area. Since a lot of the heat from the internal components is also generated in this region, it's a smart design, with very short pathways for the heat to exit the case.
We've seen all the major features, now let's focus in on a few of the exterior details in the next section. Detailed Exterior FeaturesThe bottom of the GD07 has mounting locations for three 120mm fans, arranged side-by-side along the front edge of the case. Two of the spots have 1200 RPM fans installed from the factory and the third is empty. Two filter grilles cover the length of the fan array, and they snap into place similar to the other locations. I would have preferred a slide-in arrangement in this location, as it makes it easier to clean the filter when you don't have to flip the case over on its side. The width of all three fans runs over into the area where the feet are located, even though the front feet are pushed out all the way to the edge. It would be difficult to slide a filter past the feet, so we have to live with this maintenance challenge. It's the compromise that had to be made in order to fit three fans in the front of the case.
Sliding the grill off, on the right side of the case, exposes the intake side of a SilverStone branded case fan. The nine blade unit runs at a nominal 1200 RPM, which offers a balance between noise, CFM, and pressure. The combination of bridge patterns in the metalwork and the plastic grille break up resonance nodes and randomizes the noise profile somewhat. The grille is very firmly clamped into place with a combination of slots and tabs, which also helps with noise.
On the other side of the case, a smaller grille with a similar pattern serves as the intake vent for PSU cooling. It uses a different type of retention tab than the grille on the right side, which requires a different approach to removal and replacement. Thankfully, SilverStone has molded in some text on both of the grilles to help you remember how it comes off. The larger grille slides on and off, and the label tells you to "PUSH" it towards one end, in the direction of the arrow. The smaller grille snaps into place with hook latches, and the embossed label tells you where to stick your finger and "PULL", in order to remove the grille. The filter grilles on the bottom of the case have no labeling on them, but one end has two large pull tabs on it, and that seems like the logical place to start.
The power switch is attached to the inner front panel, and a separate actuator is mounted to the decorative outer front panel. This outer button has a locking mechanism that's accessible from the back of the front panel, which means that you need the key to get to it. A simple slide lever locks and unlocks the button. Hidden in plain sight is another useful feature that solves a problem that many people have. The LED indicator for power shines through an aperture on the front panel, and if you're sitting in a darkened room watching a video, sometimes the equipment status lights get to be a bit too much. The blinking ones are particularly offensive. Lots of people have their first experience with black electrical tape when they decide to blank off all those irritating lights. SilverStone added a control to dim or block the light entirely, by rotating a small knob on the bottom edge of the front panel. As a mechanical engineer, I'm always pleased when the most effective solution turns out to be a mechanical device. Notice that I used the word "aperture" above, this is not an electrical dimmer circuit. All the front panel controls are located on the lower right side, and for the most part remain hidden and inaccessible when the outer panel is lifted up into place. The same goes for the devices located in the 5.25" drive bays on the right or the left side. There does seem to be some extra space around the bezels, which is something I'll look at during the install. Normally, I'm finicky about the gap around external drives in the front panel, but the front door will be closed most of the time. The filler panels are held firmly in place with robust tabs on each end, which eliminates another one of my pet peeves, filler plates which fall out every time you look at them sideways. All of the large plastic parts are made of the same material and have the same surface finish, so they blend together seamlessly. I'm not wild about the color, but its hidden most of the time and the gorgeous aluminum front trim panel more than makes up for it.
From the exterior, there is no doubt that this is a stylish case. The fact that there aren't a whole lot of external features to look at or talk about, pretty much sums up the whole point of the exterior design of this case. When it comes to the 21st century living room, less is more. The challenge is: how do I fit a full size motherboard, a full size video card (or two), and a half dozen drives in there? Let's tear off the top panel and look inside, shall we? Closer Look: InteriorOnce the top cover comes off, the first glimpse of the interior looks like this. With the warning on the box still fresh in my mind at this point, I did what no self-respecting guy should ever do; I looked at the manual. It was mainly the drive area that had me looking twice. It's an all-in-one module that lifts out en-masse once the four mounting screws are removed. Hard drives are relatively heavy parts, so if you install more than one or two HDDs in the large center bay, you will definitely appreciate the large, supplied handles.
Once the drive module is out of the chassis, it looks even more obtuse. In the image below, the front surface are facing downward and the surface at the far back of the assembly face up when it's installed in the GD07. On the left is the area where 2.5" and 5.25" drives share a space. Both of them are mounted in the horizontal orientation, at this end of the module. In the center is the primary 3.5" hard drive bay. There is room for four HDDs in there, and there is some built-in flexibility on the orientation of the drives. The manual does a good job explaining what works and what doesn't. This is also the general area where full length video cards will encroach, so some planning will be in order. That's also the main reason why the mounting points for the drives use three screws on the top side and only one on the bottom. The shorter length of material on the bottom section provides the required clearance for oversized video cards. On the far right is space for vertical mounting of 5.25" devices. Most optical disk drives are a pain to use when mounted this way. The disk falls out of the tray, unless special retainer tabs are employed, and they're fiddly to use anyway. Most users will probably end up using this space for stowing unused PSU cables.
Once the drive pod is removed, the inside of the case looks a lot more spacious, and it's easier to see the relationship of the various components. It's also easier to visualize the airflow from the three supplied case fans. Basically, the right hand corner of the case gets pressurized and cool air get pushed across the motherboard on its way towards the rear vents. Each of the three fans has a 19" long 3-pin power cable, so you should be able to reach an appropriate fan header on the motherboard in all cases. All of the front panel connections are passed through a cable retainer in the general direction of where they will most likely terminate on the motherboard. The cable guide allows insertion and removal of any or all of the cables at will, so if one of the cables needs to be dressed a different way, it's no problem.
The inside surface of the top panel has elastomer damping panels attached in the spots where the drive caddy handles might hit. Normally, I would say this is overkill because the case is just sitting there on a shelf, but the drive caddy has the potential to house ten drives of various flavors. Anything you can do to suppress noise and vibration from those rotating devices is a good thing. All the panels are .85mm steel, and the top panel is folded over in places to make it thicker. In a typical HTPC environment, you never know what components are going to be stacked on top of your PC case, so it's good to have a sturdy top panel.
Removing the drive carrier and the four filler panels for the 5.25" drives provides a better view from the inside than you can get with all the regular components installed. The internals look very complicated when you first open up the case, but as you dig deeper inside it all makes a little more sense. One thing to note, if you want to install an eATX motherboard, the middle and right-hand 120mm fans have to be replaced by 80mm units to make room for the larger board. You can see the smaller (80mm) hole pattern on the bottom plate in the image below. You don't have to have fans in these positions, but it does help pressurize the case, which then helps to keep dust out. I don't expect this to be a popular configuration, but this is one of the few HTPC cases that will accept an eATX mobo, so I thought I should mention it. 
In addition to the major restructuring that SilverStone has done on the Grandia GD07, there are a number of smaller features that you'll encounter during a typical build process. Let's look at some of them in a bit more detail. Detailed Interior FeaturesIf you're looking at a case this size, it's a fair bet that you want to install a discrete video card. The latest APU chips from AMD do a wonderful job supporting a HTPC that just handles the basics, but for most gaming applications the on-die graphics controller won't cut it. One or more of these expansion slots is going to be home for that video card, and it will be held firmly in place by the time-honored machine screw. I'm not like most people - I always know where there's a Philips screwdriver, so the lack of tool-less fasteners here makes no difference to me.
What I don't get, and what I curse under my breath just about every time I encounter one, is the little piece of sheet metal that guards the expansion slot covers. This is not a LAN Party case, I simply don't see what it is we're trying to protect here. If this HTPC case gets deployed like most, you'll have to take the chassis completely out of the location where it's sitting, in order to install or remove an expansion card. I guess the good news is that you'll have full access to the extra screws you need to remove before you can get to the screws holding the card in place.
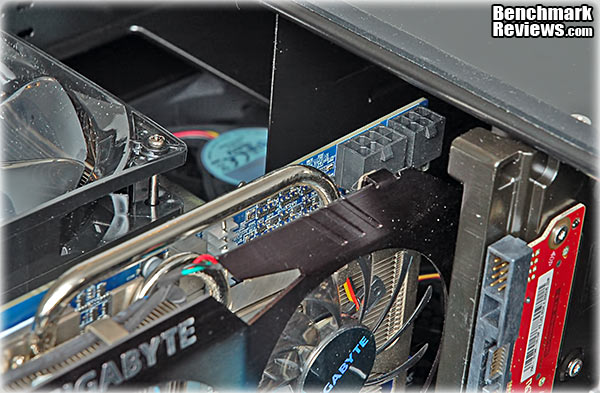
Once it comes time to install that discrete graphics card, there might be a moment of panic if the card is over 9.5" long and has the PCI power connections on the top edge. With the Gigabyte GTX 480 card I tried first, all but one of the seven rows of pins was blocked by the top edge of the drive carriage. There was only 25mm of clearance between the connector body and the sheet metal, so there was no way the power cable was going to fit. Cards that have the power connection on the end of the PCB will have no issues, as there is plenty of room in that direction.
I'm getting a little ahead of myself, but it's hard to talk about how the 2.5" drives are hooked up, without a picture. The two rectangular slots that we saw on the top surface of the drive carriage are not cable routing paths, but are access holes for your fingers. The way the two 2.5" SSDs are mounted tight up against the top surface of the carriage, there's no way to install the power and signal connectors on installed drives without having these access holes placed where they are. Note that 90 degree connectors aren't going to be useful here, because they would turn upwards which is the wrong direction. Single wire power connections are also favored with this setup, as the two sets of wires coming out of a mid-cable connector are a tight squeeze below the cross bar. In most builds there will also be a 5.25" ODD located just below here, which makes those access holes doubly important. Wiring up the drives is one of the challenges in this HTPC case, as the drives and their consolidated drive carriage overlaps the motherboard, in the exact area where the SATA drive connections are most likely located.
The 120mm internal case fans supplied and installed by SilverStone are their own models (HA1225L 12SA-Z). All three are all identical, and are marked with ratings of 12VDC, 0.33A, and 1200 RPM. There's no particular high tech on display here, but there is also no substitute for quality and I've always had good experiences with SilverStone's case fans. They're all 3-wire, tachometer output devices, which will work fine on almost all motherboard fan headers. Even the 4-pin headers will default to tachometer operation if only the first three conductors are connected.
Looking at the fan arrangement one more time, I think I'm going to make two changes in fan location. The bottom fan that's currently mounted in the center might be more useful at the far left side of the case, where it can supply fresh air to the GPU cooling system. The side mounted fan at the top of the image below can also be utilized better by having it directed on the heatsinks for the VRM section. The upper left corner of the CPU is populated with PWM controllers, drivers and two power transistors per phase, supplying power to millions of transistors. They carry a lot of current, get much hotter, and need to dissipate more heat than the DDR3 DIMMs ever will. The down flow CPU cooler is pushing air down on them anyway, which is more than sufficient. Better to use that cool, fresh, outside air for the VRM section than the DRAM.
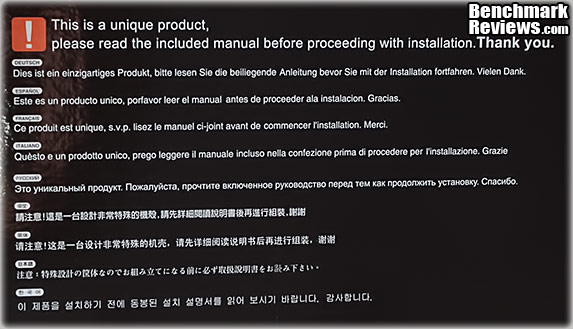
Building the GD07 required a lot of planning, which is not unusual for HTPC builds. The difference between the SilverStone Grandia series and other solutions is what the HTPC can do, after you're done with the build. When's the last time you saw SLI and HTPC in the same sentence? I'm sure it wasn't easy to design, and I know it wasn't easy to build, but in this case the end justified the means. SilverStone Grandia GD07 Build NotesI had two thoughts when I considered what the build experience would be like with the SilverStone Grandia GD07. The first was that this thing is so big, it'll be a piece of cake. The second was, well that depends on how much gear I stuff into it! Clearly, this is not going to be a mini-ITX, Atom-based HTPC. Even if that is something I would consider, it's still going to have a full length video card hanging off the PCI Express slot and several HDDs filling up the drive trays. As it is, I decided to put a full ATX-style motherboard inside, sporting an Intel i5 CPU that normally sits under a Prolimatech Megahalems heatsink with a 3000 RPM 38mm Delta fan blowing air through it. I'll load it up with 2.5" and 3.5" drives, and I haven't decided what video card to drop in, yet. No sense holding back, when there's this much opportunity for excess... A full-sized HTPC case comes in a full-sized box. The standard issue Styrofoam end caps fit snugly into a well-protected cardboard enclosure. The case itself is wrapped in a plastic bag, to protect the finish. When you first open the box there is a notice that basically says, "Hey, this case is something special. It doesn't conform to your pre-conceived notions about how cases are supposed to be built. So, don't mess it up. Read the manual first, okay?" Luckily getting the case out of the packaging posed no unforeseen challenges!
The first thing we're going to look at during the build process is the drive carriage. I don't think I've ever seen a removable drive housing that holds 2.5", 3.5", and 5.25" devices all in one. In addition, all four of the 5.25" drives spaces are set up as external bays. The center section holds the traditional 3.5 HDDs in an unusual grip - one side is fully supported and clamped by three screws, and the bottom side of the drive only has one screw, passing through a shortened sheet metal section. This abbreviated mounting surface is what makes room for the tail end of a full length video card. In just a minute, we'll look at how the graphics adapter fits in amongst the drives. There's a bit of give and take that has to occur, for everything to fit. On the right, you can see where the 2.5" drives are mounted, just above the ODDs that are installed horizontally. The large relief holes in the sheet metal are there to allow easier access to the SATA connections on the back of the SSDs. You can mount 2.5" HDDs there as well, but I'm guessing anyone building a system from scratch will opt for one or more 3.5" HDDs, for the extra capacity.
The previous picture is a bit misleading, in that you can't install the 5.25" optical drives in their bays before you load the entire drive housing into the case. I couldn't anyway....the front bezel interfered when I lowered the carriage straight down. Even though I slid the drive towards the rear, it still stuck out just enough in the front to prevent the carriage from sliding into place. The correct mounting method is to slide the optical drives into place once the carriage is already installed. It would be nice if they could travel along with their storage partners on the way in and out of the chassis, but at least when all the drives are out, there is loads of working space around the motherboard. That wouldn't be the situation if the ODD mounting points were fixed in place. Once the drive housing is back in place you can see that I had a strategy for where and why I placed the hard drives the way I did. I wanted to maximize the airflow from the bottom-mounted fans, yet still leave a bit of breathing room between the two HDDs. We still have to see how well this plays with the video card, and that partly depends on which PCI Express slot is used to hold it. Many of the newer Intel boards only have one x16 slot available, so we may not have a lot of choice when the moment arrives to install the final components.
With the motherboard finally installed, the final piece of the airflow scheme is in place. There are precious few traditional U-tube type HSF CPU coolers that will fit within the 138mm height restriction. Sadly, the Cooler Master Hyper N 520 that I used on a recent uATX build is 3mm too tall for the job. In general, the shorter coolers on the market feature smaller fin stacks and smaller fans that have to spin faster, so they tend to make much more noise than a typical model with a 120mm fan. I chose a down-flow style cooler that's only 105mm tall, with the supplied 120mm x 25mm fan. Since this is a HTPC build, I'm trying to keep the noise profile to a minimum. As it is, with three 120mm case fans, and a GPU cooler on a high-end video card, you don't want to add too much more fan noise with the CPU cooler, if you don't have to. At this point, I'm counting on the SilverStone fans matching the high quality levels that I've experienced in the past. Many motherboards support PWM and tachometer-based speed controls for at least some of their fan headers; they're essential for an HTPC build.
With the video card in place, you can see how the location of the system HDDs has to be planned in advance. Perhaps the best approach is to lay the bare motherboard in the chassis, look at the options for x16 PCIe slots, and then put some painters tape on the drive carriage where the video card impinges on that space. Pay attention to the airflow leading into and out of the video card when performing this exercise. If you have more than one option for an x16 PCIe expansion slot, one of the locations will probably produce a much cleaner airflow through the case. That's the one you want to use, even if it means moving the drives around, and making cable management a bit of a chore. If you load four 3.5" hard drives in the main HDD bay, it will take some serious cable knitting, but this is one of only a few HTPC cases that even makes that possibility a reality.
Swinging back around to the front of the case, this is where the vertically-mounted ODD comes out the front of the chassis. To be honest, I think these bays are best suited for mounting an external card reader or fan controller, rather than an optical drive with a disk tray. Even the ones that have clips to keep the disk from falling out are a nuisance to use, although a slot-loading drive would work fine here. I just haven't seen any that would mount like this. In the end, I think I would mount the DVD drive on the other side of the case in the top-most of the two horizontal slots. That's a decent distance away from the fans on the bottom, and the SSDs mounted just above there don't care how tightly they're packed in, or how much ventilation they get.
The only thing left is to tie up all the loose ends, literally. I'm a big fan of modular power supplies, even though it does introduce one more dry electrical connection into a high current application. Sometimes you don't have a choice, though and you're stuck trying to find a good place to hide an unruly bunch of polyester-sleeved snakes. AFAIK, no one has ever made a PC case with a compartment labeled "Put Unused Cables Here". On the best cases there are always some obvious options that you can tell were part of a conscious design effort. Sometimes there are more creative options available, like putting them behind the motherboard tray. That's always my first choice for the 8-pin ATX CPU cable, but it wasn't possible this time, leaving me no choice but the ugly one. The fact that the motherboard tray is the absolute bottom of the case, and there's no dead space below there to stash or route cables, means that cable management is a little tougher than normal. In the SilverStone Grandia GD07, there is a straight shot from the back end of the PSU into the vertical 5.25" ODD bays on the far left side of the chassis, which will go unused in probably 90% of the builds, IMHO. Although it's missing the aforementioned sign (Put cables here...), it's still the best option. SilverStone supplies a few tie-down posts in the accessory kit, which I always appreciate. I have a private stash of my own, but that's just me...
Building out the interior of the GD07 was somewhat easier than I expected. Most other HTPC builds that I've seen gave me nightmares, even if I didn't build them myself. There were still a few unexpected twists and turns, and cable management was painful, but I didn't feel like I was locked into a bad science fiction plot. We're done with the actual review part, so let's get down to business, where I give you my Final Thoughts and Conclusions. HTPC Server Final ThoughtsTwo dimensions define almost the entire HTPC genre, the height of the case, and the depth. The height is normally kept to a minimum, for aesthetic reasons, and that causes the number one problem: CPU cooling. The best way to cool a CPU quietly is with a big set of fins, lots of heat pipes, and a large fan running at low speed. It's the "No substitute for cubic inches" approach - a big motor with lots of power at low speed; think Hemi v. Honda. Even in a case as big as the Grandia GD07, with its 175mm overall height, the standard U-tube cooler with a 120mm fan is too tall. What you see below is my Prolimatech Megahalems sitting about an inch too high to fit inside this chassis. That's with a 120mm fan, and what you really want is a 140mm fan, which can move the same amount of air with less noise. The biggest cooler of this type that will fit, has a 92mm fan with an annoying noise profile. Two workable alternatives are water cooling, and a down-flow type heat pipe cooler. I didn't have time to try a water-cooled system in the Grandia GD07, but the down-draft cooler I installed worked well and fit with room to spare. Still, I felt the rest of the airflow patterns inside the case weren't really optimized for that style of cooler. Too many sharp, right-angle turns, IMHO.
The depth dimension is equally critical, because a HTPC usually has to fit on a shelf that was chosen for its aesthetic proportions, not its utility. In the Grandia GD07, Silverstone cleverly overlaps the HDD carriage with the motherboard and the video card footprint. As a result, they were able to keep the depth dimension to 435mm. You have to make some allowances for cables which connect on the back, and some of them are big stiff cables with large connectors. One of the reasons HDMI is popular is because the connectors aren't the size of a credit card. The down side is they're flimsy, get loose, and fall out occasionally. My shelves have a depth of 495mm on the lower half of the unit, but I know mine is a bit oversize. I'm also sure there are plenty of other HTPC shelf units in service around the world, which don't have that much room to work with. A little extra planning is required before starting on the build, mainly because of the additional options this chassis offers, compared to smaller cases. And once everything is set into place, you'll pay a substantial penalty in time and effort to make even minor changes. That's nothing new for this market space, which doesn't cater to the enthusiast who changes components on a regular basis. SilverStone Grandia GD07 HTPC ConclusionPerformance for most any computer case usually comes down to thermal management. How cool does it keep the internal components and how much noise does it make while doing so? Noise is perhaps the dominant aspect for a Home Theater application. Not every DVD has non-stop explosions and car chases, which would mask the sound of six cooling fans. HTPC users have their quieter moments, too. Hopefully, most systems will be configured with temperature-controlled fans, so that when the system is idle, the people in the room won't even know that it's on. With my selection of hardware, a GTX 560 and Core i5-750 providing most of the heat, I was able to do just that and keep the temps well within safe operating range during normal use. This is not a PC case I would use for a folding farm, but for HTPC use, it performs far above most alternatives. Appearance is the strongest suit of the SilverStone Grandia GD07. For me, nothing fits into a fashionable Home Theater setup as well as a nicely finished aluminum front plate, free of lights, buttons, doors, vents, cutouts, perforations, connectors, and everything else that ends up on the front surface of a typical PC. Replacing the chrome barrel lock with a black version would be a welcome improvement; that's the only thing that sticks out on the front panel. The rest of the case is powder coated steel, with a low-gloss texture that is unobtrusive. The plastic components have a uniform matte finish and consistent coloring, which is a nice touch.
The GD07 is solid and sturdy, the same as the other SilverStone HTPC cases we have reviewed recently at Benchmark Reviews. The majority steel and plastic construction of the chassis is appropriate for the application, there's nothing to be gained by weight savings here. Better to have a more rigid assembly, where everything fits without having to flex hole alignments into place. The feet on the bottom are a step up from the usual rubber pad, and blend in with typical high-end audio components that will be positioned nearby. The fan filters are all robust and tight fitting, which reduces any bypass of the airflow. There are stiffening ribs and braces incorporated in most of the panels and elastomeric surfaces where major panels meet - all good design techniques to reduce transmitted noise. Altogether, construction is another strong point for this GD07 model in SilverStone's Grandia series. The GD07 offers a level of functionality that is at the extreme high end of the HTPC market. The generous drive capacity, the ability to handle multiple full-length video cards, and the unusual compatibility with eATX motherboards puts it way over the top, compared to the meager capabilities of most alternatives. There are flexible options for system airflow, and the base configuration works well, with minimal noise. Down draft and horizontal flow CPU coolers are both viable choices, although the U-type coolers are limited to 92mm fans or below. The positive case pressure concept works, and the filters are effective at keeping dust and other household contaminants out of the internal components. I do wish the bottom filters were accessible from the front, and I didn't have to lift the chassis up to clean them. The extra 5.25" drive bays don't seem that useful, until you realize that they're just the place to put both a fan controller and a memory card reader. Or maybe you want to use the space for a water cooling reservoir. Cable management is still a bear in the GD07, but that's the price for all that additional drive capacity. Given the outsized capability and the good looks of the Grandia GD07, I think Silverstone has priced it very fairly at $139.99 (Newegg / Amazon). There aren't any "extra" features included, like fan controllers, IR repeaters, or a built-in LCD display. The hook is, for those that want to have all their main storage integrated into their HTPC and/or want to do some serious gaming on the big screen in the family room, this is one of the very few cases that can do that in style. By the time you add up the cost of all the components in a "serious" HTPC, this case will only be a small fraction of the total cost. In the Great Hackintosh Debate on our site, someone called PCs "ugly", and they have a valid point. Most HTPC cases have been designed to mitigate some of the inherent clutter that comes with the territory. With the Grandia GD07, SilverStone has put all of that behind a beautiful, dark, brushed aluminum panel. They have also provided a lock for that panel that keeps little fingers and little minds from creating havoc. This is not just a step in the right direction, this is the final destination. I think Ugly may have finally met his demise. Pros:
|
|


Comments
I think that's a great idea, to build in hot-swap bays for the drives. The tighter the packaging is, inside the case, the more I despise the SATA power cabling design. Most people think that hot-swap bays are just beneficial for quick drive swaps, but they clean up the cabling mess quite nicely, too. I haven't seen anyone use them on an HTPC case, but it make a whole lot of sense! THIS is why manufacturers read our reviews, to get smart ideas from our readers...! {B^D
Could fan controller knobs fit in there? For instance, a Scythe server?