Biostar Hi-Fi Z77X Motherboard
Manufacturer: BIOSTAR Group
Product Name: Hi-Fi Z77X
Model Number: IZ77EAHT-RD2 VER5.1
UPC: 80270050479
Price As Tested: $149.99 ( Newegg)
Full Disclosure: The product sample used in this article has been provided by Biostar.
The latest chipset from Intel, the Z77, has been around for
a little while now and has certainly spurred a lot of interest by aftermarket
motherboard manufacturers. Little actually changed between the Z68 chipset and
the Z77 chipset. Z77 added Smart Connect to let you receive emails while your
computer is asleep and Rapid Start to speed up boot times. With so little
changing, it is up to the manufacturers to pack their motherboards so full of
features that they stand out above the rest of the competition. That is exactly
what Biostar has done with the Hi-Fi Z77X.

Biostar itself has put six Z77 motherboards on the market.
The most recent motherboard released by Biostar is the Hi-Fi Z77X. Biostar focused on audio enhancements when
they built the Hi-Fi Z77X. The target market for the Biostar Hi-Fi Z77X
includes audiophiles everywhere. Gamers, HTPC builders, or even those who want
to listen to their music in the best possible way while they are doing their
homework. Biostar claims perfect sound delivery with their new Hi-Fi
technology, enabling PC users the ability to experience virtual surround sound
without investing in any extra equipment.
To provide this extensive audio experience, Biostar has
added a lot of new hardware to the Hi-Fi motherboard. All of the pieces
maintain the Hi-Fi monitor. They include the Hi-Fi Ground, the Hi-Fi Amp, Hi-Fi
Caps, and Hi-Fi Resistors. Now, we will get into much more detail on each of
these items later in this review, but for now it's enough to say that Biostar
has made some serious design changes to the Hi-Fi Z77X that promise a great
deal of audio power.
Besides the Biostar Hi-Fi Z77X, Biostar has
another motherboard equipped with the Hi-Fi hardware. That motherboard is
called the Hi-Fi Z77S and is a little less fully-featured than the Z77X and set
in Biostar's Performance category. The Hi-Fi Z77X hangs out in the Tech
Enthusiast category with other high end Biostar motherboards like the Tpower
X79, the TZ77XE4, and the TZ77XE3. So without further ado, let's move on and
find out more about this audio-powerhouse Biostar Hi-Fi Z77X.
Closer Look: Biostar Hi-Fi Z77X
Before delving into the specialty features of the Biostar
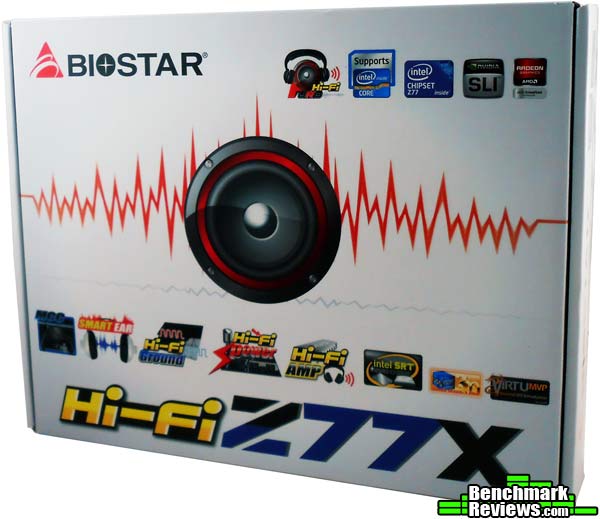
Hi-Fi Z77X, let's take an overview of what you'll get with the Hi-Fi Z77X. The
white box that the Hi-Fi Z77X comes stands out pretty well. It definitely touts
the audio centric nature of the motherboard.
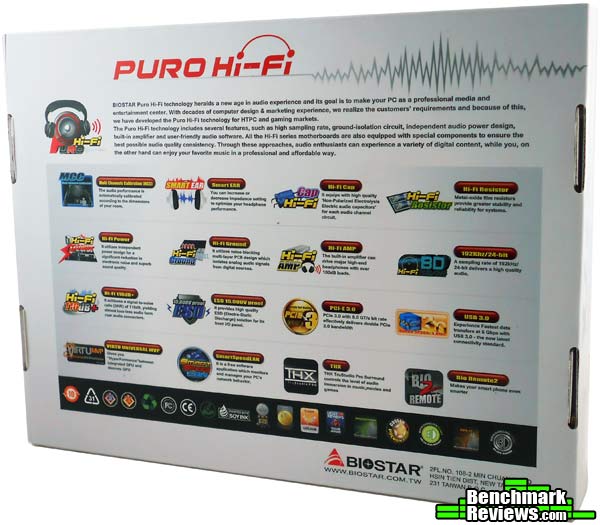
The back of the box gives a great overview of all of the features offered by the Biostar Hi-Fi Z77X, including a paragraph specifically dedicated to the Puro Hi-Fi technology integrated onto the motherboard.
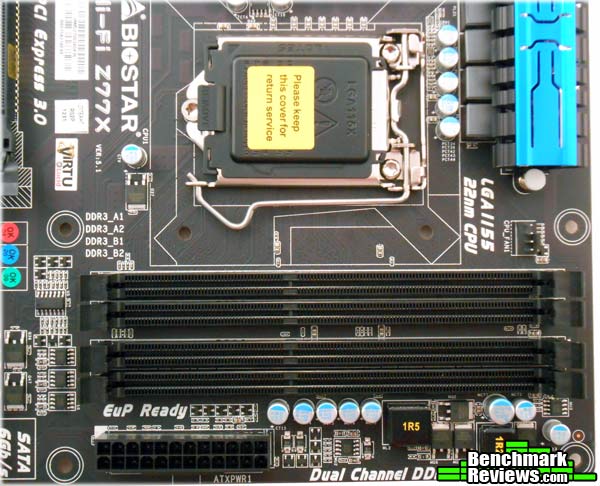
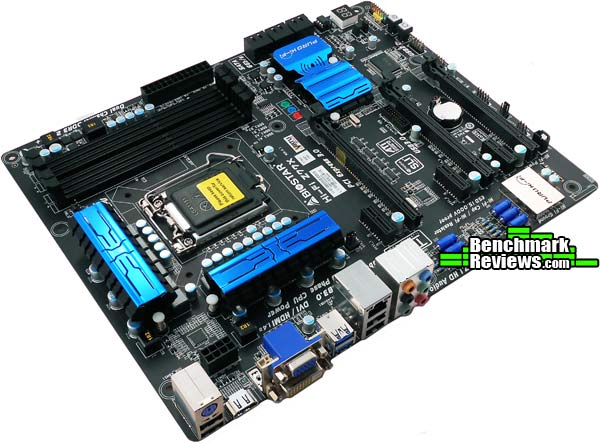
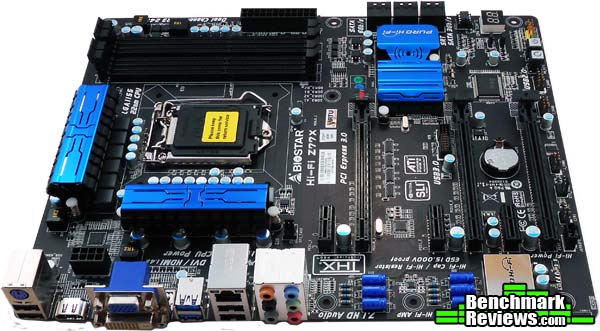
From the top, the Biostar Hi-Fi Z77X offers all the basics
you'd expect from a Z77 motherboard. The Hi-Fi Z77X sports a black and blue
color scheme that looks nice. The PCI slots, DIMM slots and the PCB itself are
all black and the Heatsinks and some of the other components are blue.

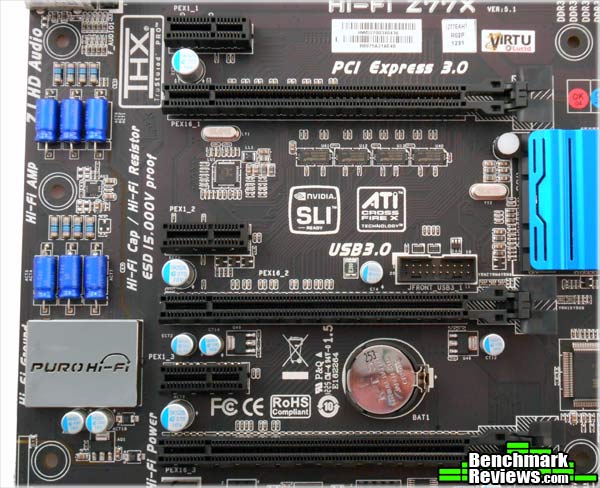
The Biostar Hi-Fi Z77X sports three PCI Express 3.0 x16
slots and three PCI Express x1 slots. The PCI-E x16 slots function at x8 + x8 +
x4 when all three are in use. Of course, the PCI-E x16 slots are only PCI
Express 3.0 slots when an Ivy Bridge CPU is in use. The Z77 chipset also
supports Sandy Bridge CPUs, but since the PCI controller is on the CPU, the
slots are only PCI Express 2.0 slots when Sandy Bridge CPUs are being used.
As far as RAM is concerned, the Biostar Hi-Fi Z77X sports
the standard four DDR3 DIMM slots. Now, Ivy Bridge increases RAM support to
1600MHz, but Biostar takes it a bit further. Biostar says that the Hi-Fi Z77X
will support RAM up to 2600+MHz.
One thing Biostar does with the Hi-Fi Z77X that confuses me
a little is that they only provide the minimum amount of SATA 3.0 ports. That
means two. In fact, Biostar only gives more 6Gbps ports to its very highest end
Z77 motherboard, the TZ77XE4. Now, an extra controller would cost extra money,
but a lot of devices are moving up to SATA 3.0 and I don't think we are going
back anytime soon. Nevertheless, the other four SATA ports on the Hi-Fi Z77X
are SATA 2.0 ports.

Taking a look at the I/O for the Biostar Hi-Fi Z77X, we find
all the basic suspects, including an antiquated legacy PS2 port. I know, I've
heard all the arguments, but I think that the amount of simultaneous keystrokes
available through some USB keyboards now takes care of that. I think it's time
to dump the PS2 and add a couple more USB ports. Under the PS2 port are two USB
2.0 ports. Next up is an HDMI port, a DVI port, and a VGA port. Two USB 3.0
ports follow come next, followed by two final USB 2.0 ports and an RJ45 LAN
port. Rounding out the I/O are the six audio ports.

Now that we've had a good overview of the basic
features, let's get a closer look at the details of the Biostar Hi-Fi Z77X
motherboard.
Hi-Fi Z77X Detailed Features
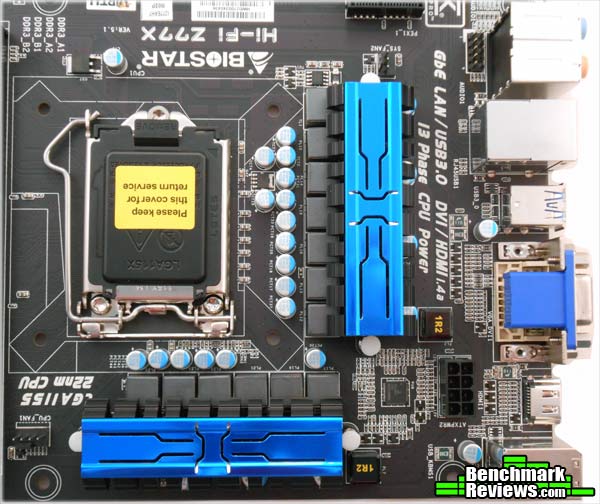
When building the Hi-Fi Z77X, Biostar certainly focused on
construction quality. The capacitors on the Hi-Fi Z77X are all 100% Japanese
Solid State Capacitors placed with "armor-plated Biostar Technology". These
capacitors are used to increase life span and durability across the motherboard.
Additionally, Biostar included a massive 13 phase power design on the Hi-Fi
Z77X. That should provide plenty of extra power to help boost overclock speeds.
For the LAN controller, Biostar went with the Realtek
RTL8111F GbE controller for the Hi-Fi Z77X. This is a widely used controller
that functions very well, but it well documented that this controller is
outperformed by the most recent Intel GbE controllers. Of course, Biostar isn't
touting the LAN capabilities of this motherboard, they are touting the Audio
capabilities. For that, they also went with Realtek. The Audio Codec is the
Realtek ALC898 8 Channel Blu-Ray Audio Codec. Of course, that codec is boosted
by a bunch of other stuff that we will discuss in the next section.
Video support on the Biostar Hi-Fi Z77X is an interesting
matter, as it is with most Z77 motherboards now. With Z77 motherboards, both
CrossFireX and SLI configurations are supported. That's nothing new, but what
you won't find on the Biostar Hi-Fi Z77X is a lot of extra PCI-E lanes. If you
run more than one GPU, it will be at x8 + x8 or at x8 + x8 + x4. Now,
technically, PCI-E 3.0 runs about twice as fast as PCI-E 2.0, so if you are
using an Ivy Bridge CPU and a PCI-E 3.0 video card it will theoretically run at
the same as PCI-E 2.0 x16 + x16.
The other video feature of note is the Lucidlogix Virtu
Universal MVP that comes supported with the Z77 chipset. Virtu Universal MVP
allows you to pair the on-die graphics of the socket 1155 chip that you choose
with a discrete graphics card. That means you can use Intel's Quick Sync
technology to rapidly encode or decode video while still having enough graphics
power to play the latest games.
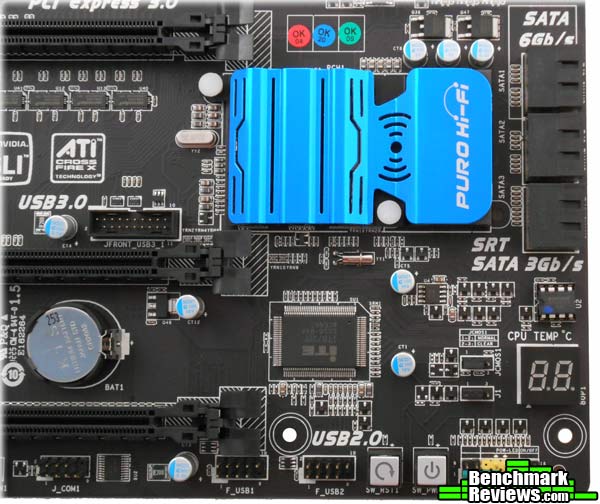
Another couple of interesting features on the Biostar Hi-Fi
Z77X motherboard include the Rapid Switch 2 and the Rapid Debug 3. Rapid Switch
2 was engineered by Biostar specifically for their high end and enthusiast
targeted motherboards. It's a similar feature to what you will find on many
enthusiast motherboards and consists of a power and reset switch built directly
into the board. That way, if you are tinkering or building on a testbench or
other unconventional case, you can easily turn the system on or off or restart
it.
The Rapid Debug 3 feature is another feature that is similar
to what many other motherboards have added. Biostar puts a digital LED display
on the Hi-Fi Z77X that displays codes during startup and operation. If any sort
of system error occurs, the device that is causing the problem will be flushed
out and the appropriate code will show up LED display. This display also shows
the CPU temperature.
.jpg)
Continuing with special features, the Biostar Hi-Fi Z77X has
a function called Charger Booster. Again, this is similar to functions that
other motherboard manufacturers have implemented as well. The Charger Booster
allows you to charge your portable devices connected over USB much faster. They
tout a 42% decrease in charge time for an iPad when compared to charging
without Charger Booster enabled. The really impressive thing about Charger Booster
is that it can actually charge your device regardless of the power state of
your computer. To experience this, you plug your device in while the computer
is on, then you can put your PC into Standby, Sleep, Suspend, or Hibernate mode
and the device will continue charging. By switching a jumper on the motherboard
and disabling EuP in the UEFI, you can even charge your device when the system
is off.
All of these detailed features that we have
looked at so far are not necessarily unique to the Biostar Hi-Fi Z77X. You may
find a lot or all of these features on other motherboards, so let's move on and
look into the details of what the Biostar Hi-Fi Z77X provides that you won't
find outside of a Biostar motherboard.
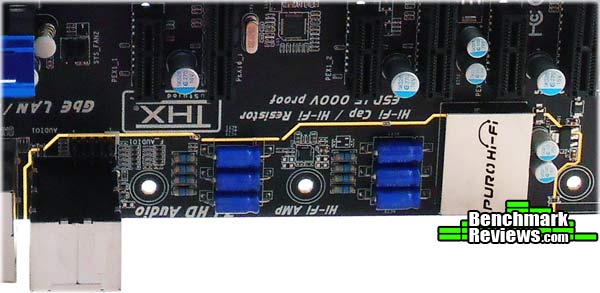
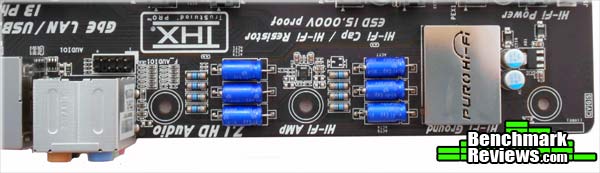
Hi-Fi Z77X Proprietary Features
The thing that sets the Biostar Hi-Fi Z77X apart is the Puro
Hi-Fi technology. It starts out with Hi-Fi Power. This feature takes a page out
of the AV equipment book by setting aside an independent power design
specifically for the audio components. This should allow the audio components
to experience a greatly reduced amount of electronic noise. The Hi-Fi Power
technology is coupled with Hi-Fi Ground. The Hi-Fi ground technology is built
on a noise-blocking multi-layer PCB design. The PCB isolates analog audio
signals from digital sources. These two features focus on isolating the audio
components from everything else on the motherboard, ensuring the clearest possible
signal reaches your ears.
The next feature in the Puro Hi-Fi basket is Hi-Fi 192/24.
The Biostar Hi-Fi Z77X motherboard has a sampling rate of 192kHz/24-bit, which
is Blu-Ray grade audio. This sampling rate is delivered over an analog connection
to your speakers or home theater system. The Puro Hi-Fi system also has a built
in amplifier that can drive performance headphones with over 100dB loads. The
Hi-Fi AMP also delivers wide bandwidth, low noise, high slew rate, and low
distortion from the front panel audio I/O.
The Puro Hi-Fi system focuses a lot of functionality towards
the front I/O panel, since this is where gamers or anyone using headphones is
likely to plug in. Another feature dedicated to the front I/O is the High
Quality ESD, which stands for Electro-Static Discharge. The High Quality ESD is
designed to prevent static electricity from affecting your system or your
motherboard when you plug in or unplug headphones. Also for your headphones is
the Smart EAR audio utility included with the Biostar Hi-Fi Z77X Puro Hi-Fi
system. Smart EAR allows you to quickly adjust system volume through a GUI.
Gain settings are also adjustable through Smart EAR.
Going back to your home theater system, the Biostar Hi-Fi
Z77X Puro Hi-Fi system uses Multi Channel Calibration. This incorporates the
use of the included microphone to help calibrate your speakers. To use the
bundled MCC software, you simply keep your existing speakers where they are now
and set up the microphone. The MCC software listens to the sound coming out of
your speakers and adjusts the channels for the best possible listening
experience.
As for the actual components used in the Puro
Hi-Fi system, Biostar opts for Hi-Fi Resistors and Hi-Fi Capacitors. The Hi-Fi
Resistors are metal-oxide film resistors. The oxide resistors are designed to
offer better stability and reliability than your normal metal film resistors,
specifically when working in a large temperature range. The Hi-Fi capacitors
are high quality non-polarized electrolysis electric audio capacitors. These
specifically audio-centric capacitors are made to put out less noise and
distortion and operate over a wide bandwidth. This should help alleviate any
noise pollution from within the isolated audio section of the PCB.
Biostar UEFI and Bundled Software
Just about every motherboard produced now comes with a UEFI rather than a BIOS. The Biostar Hi-Fi Z77X is no different. The Biostar Hi-Fi Z77X also comes bundled, as most motherboards do these days, with a slew of software products to help enhance the experience. In this section, we'll take a look at both.
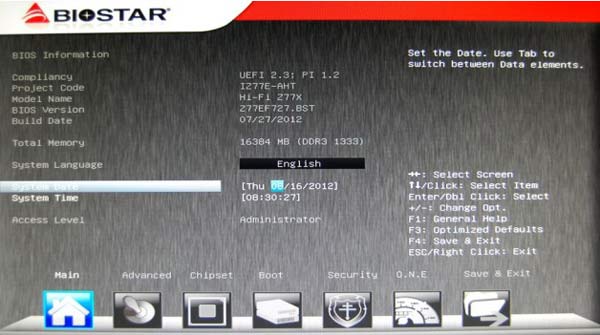
UEFI
The first thing that shows up when you enter the UEFI is the
main screen. Here you are provided with the basic system information, including
the motherboard model, the UEFI version and build date, and the total amount of
memory. This screen also allows you to set the system date and time.
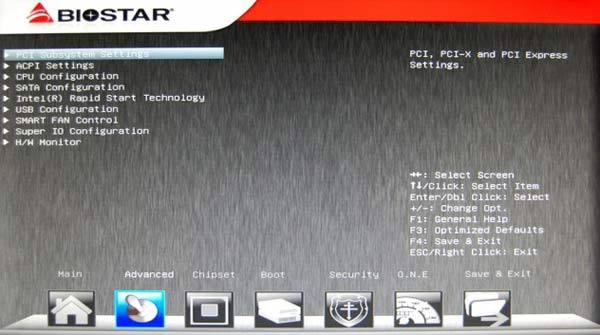
The next section in the UEFI is labeled advanced. This
section is full of sub-sections that allow for very intricate system
configuration. The PCI Subsystem Settings you can configure PCI latency and the
Active State Power Management features. The ACPI section allows you to set
power-on features, wake timers, and sleep and hibernation modes. The CPU
section is dedicated to configuring CPU active cores, C-state, and
hyperthreading options. In the SATA section, you can configure the SATA
controller to IDE, AHCI, or RAID mode. Next up is the Intel Rapid Start
Technology section to enable or disable this feature, followed by the USB configuration
section. SMART FAN control allows you to change your fan speed for your CPU
depending on the temperature and Super IO configures the serial port and CIR
features. In the last section you can monitor your system's temps, voltages,
and fans.
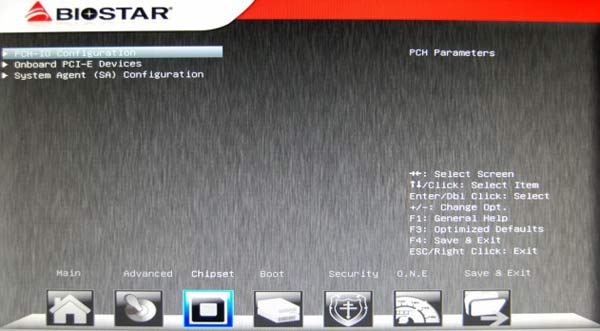
Under the Chipset section there are fewer sub-sections. The
first one, PCH-IO, allows you set PCI-E speeds and set the USB to either XHCI
or EHCI. The PCI-E Devices section lets you configure storage, video, and LAN
settings. Finally, the System Agent section holds the configuration settings
for the IGP.
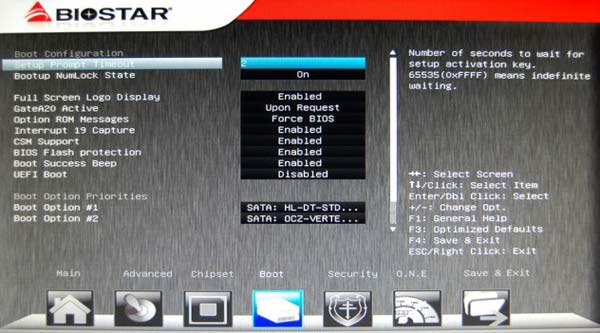
The Boot section of the UEFI on the Biostar Hi-Fi Z77X lets
you set up the amount of time your system will wait for the setup activation
key. You can set the NumLock state here and enable the full screen logo display
on startup. If you disable this function, you will see the startup text
instead. The BIOS Flash Protection, when enabled, won't allow the UEFI to be
written to. Also in this section you can set your boot priorities.
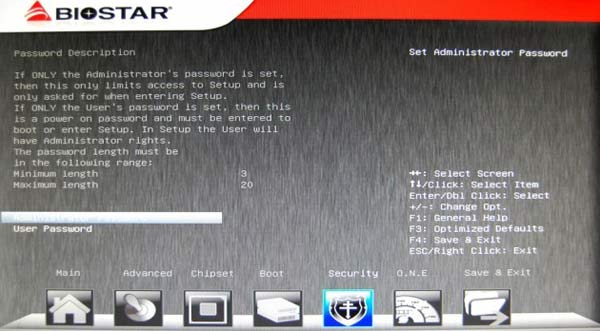
The Security section is pretty straightforward. Here you can
set an administrator or user UEFI password.
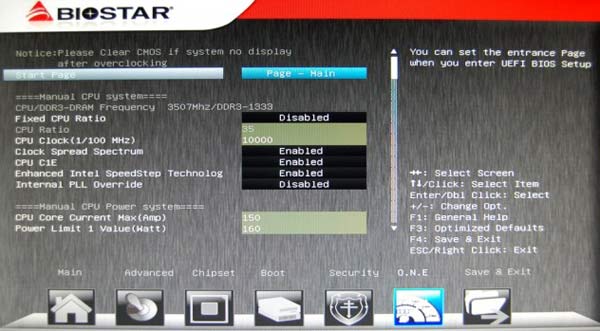
The O.N.E section is the section we've all been waiting for.
This section stands for Overclocking Navigation Engine. Here you can configure
all of the settings for your CPU or RAM in order to reach that extreme
overclock. Disable the fixed CPU ratio to set your own numbers. In the manual
CPU power system you set your current maximum values and wattage values. In the
CPU turbo system you set the individual ratios for each core, and right under
that you can set the limits for the iGFX core. Under the CPU settings come the
memory settings. Set the multiplier, timings, and latency settings here. Down
at the very bottom of the O.N.E section is where you set the voltage settings
for the CPU.
The last section is the Save and Exit section.
Here you can restore the UEFI to default settings if you want to start over.
You can also choose a boot override device if you want to quickly boot to
another device. In this section you can also save different UEFI profiles to
load immediately.

Software
The Biostar Hi-Fi Z77X comes bundled with a few pieces of
software. The first is a 90-day trial of BullGuard Internet Security. This
security suite comes with a dual Antivirus engine, Online Backup, PC Tune Up,
Game Mode, Parental Control, Firewall, and Safe Browsing features.

(Image from BullGuard.com)
T-Overclocker
is another piece of software that comes with the Hi-Fi Z77X motherboard.
T-Overclocker is a windows-based overclocking utility that lets you tune your
overclock settings from within Windows. From within T-Overclocker, you can
tweak CPU and Memory settings, as well as setting fan-speeds and checking on system
temps and voltages. T-Overclocker comes with a few pre-set modes for easy
overclocking.

Biostar G.P.U. (Green Power Utility) is another piece of
software bundled with the Biostar Hi-Fi Z77X. This program helps you save on
your power draw by disabling extra power phases when you aren't using them.
The BIOScreen Utility is one of my favorite programs that
comes with the Hi-Fi Z77X. This program lets you customize a boot logo for
yourself.
Another favorite of mine is the Bio-Remote 2 utility. This utility turns your Android or iPhone into a remote control for your computer. You can control your multimedia functions, mousepad functions, and even powerpoint presentations using this application.

Finally, the Biostar Hi-Fi Z77X comes with
eHot-Line Utility that lets you automatically send technical support requests
to Biostar Globe tech personnel.
Motherboard Testing Methodology
Motherboards are a tricky component to test. Comparing one motherboard to another in terms of component performance doesn't really work out well, because the tests are focused on the individual components. The motherboard brings them all together and helps them work in tandem to run your system smoothly. Because of that, it is better to test the actual features of the motherboard.
For the Biostar Hi-Fi Z77X motherboard, the features that are touted more than any other are the audio features from the Puro Hi-Fi System. Using DAWbench, we can attempt to test the audio features through the multimedia tests. Other features include the Charger Booster, which we can test against itself by checking speeds with the booster active and inactive. The final feature we can really test from the Biostar Hi-Fi Z77X is the T-Overclocker utility to see how well it overclocks the CPU and the difference it can provide.
Test System
- Motherboard: Biostar Hi-Fi Z77X Motherboard; ASUS Sabertooth P67 Motherboard
- Processor: Intel Core i5-2500K Sandy Bridge CPU 3.3GHz
- System Memory: 16GB (4 4GB DIMMs) Corsair Vengeance DDR3-1600 (9-9-9-24)
- Disk Drive: OCZ Vertex4 128GB
- PSU: Corsair CMPSU-850TX 850W 80-Plus Certified
- Operating System: Windows 7 Professional 64-bit
Benchmark Applications
- DAWbench DSP Universal -2012 - R2
- Charger Booster
- Cinebench R11.5 64-bit
DAWbench DSP Universal -2012 - R2The DAWbench Benchmark is a combination of Low Latency, High Track Count, and Extreme DSP Loadings. It is heavily dependant on CPU, Memory and Audio Interface Driver Efficiency. The benchmark uses native sessions for Cubase, Protools, Reaper and StudioOne to test the audio capabilities of your system. The test session can be easily configured in any DAW application.
For the tests, I used the RXC Compressor Instances test to see how many instances are achieved at varying buffer settings. In order to isolate the specific audio components of the Biostar Hi-Fi Z77X, its important to keep all of the other system components the same. For that reason, I only tested against the ASUS P67 Sabertooth motherboard.
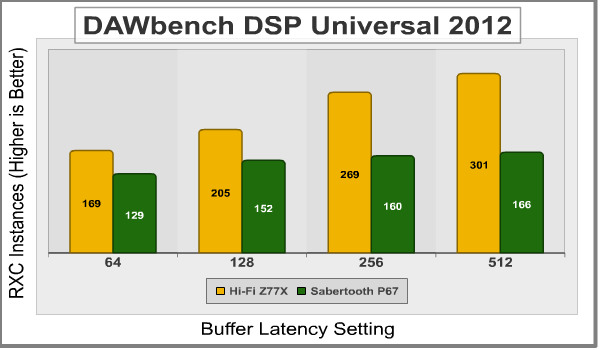
One thing to keep in mind here is the effect of the buffer latency settings. Lower latency settings means the audio tracks can depend more on the CPU and will communication with the CPU more quickly. When the latency settings are raised, the CPU is used less and less, freeing up more power to run more tracks. This makes the audio tracks depend more on the audio components. You can see that the Sabertooth P67 starts to stagnate at higher latency settings while the Biostar Hi-Fi Z77X continues to excel.
Charger Booster Tests
For the charger booster tests, I charged by Samsung Nexus S 4G, my Samsung Galaxy Tab, and my iPad 2 from empty to full both using the Charger Booster and with it inactive. Here are the results:
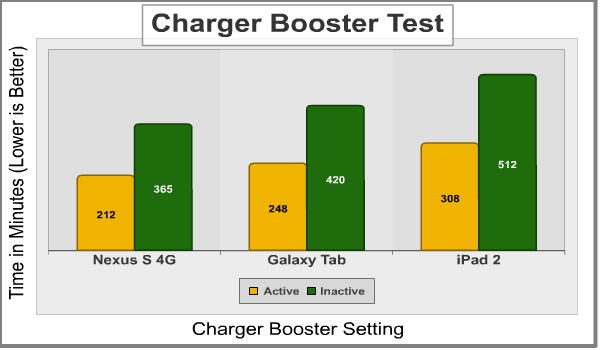
Charger Booster makes a significant difference. My charge time for the iPad 2 went from over 7 hours to just over 5.
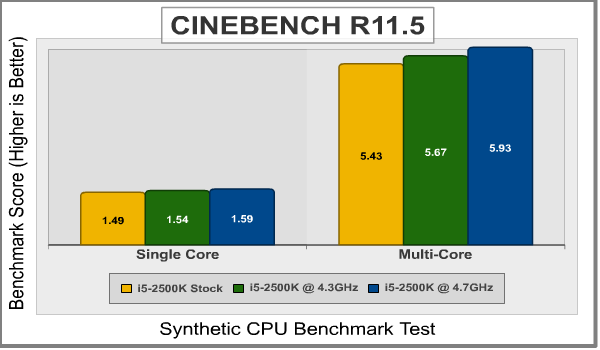
Overclocking Tests - Cinebench R11.5 64-bit
Using T-Overclocker to auto overclock the Core i5-2500K, a got an overclock of 4326MHz. The T-Overclocker program set the clock to 103MHz and the multiplier to 42. Interestingly enough, this is the exact same overclock that I got with the Sabertooth P67 motherboard when using the auto-overclock function. Not as interesting was the fact that I reached the same maximum overclock with both the Biostar Hi-Fi Z77X and the Sabertooth P67 at 4738MHz. To get there, I set the clock to 103MHz and used a multiplier of 46. The following chart shows the results of the overclocking.
Hi-Fi Z77X Final Thoughts
The Biostar Hi-Fi Z77X is an interesting motherboard. At
$149.99, it sits right around the middle of the road for Z77 motherboard. While
it carries a lot of the features I'd expect to see from a motherboard at that
price, it also lacks a few. The shining feature of the Biostar Hi-Fi Z77X is,
of course, the Puro Hi-Fi system.
I've seen something very similar to the Puro Hi-Fi system on
the ASUS Rampage IV Formula motherboard. On that motherboard, ASUS isolated the
audio components to avoid interference and noise pollution. The Biostar Hi-Fi
Z77X takes things a step further. Not only did Biostar layer the PCB and
isolate the audio components, they also used particularly audio-centric
components such as Hi-Fi resistors and capacitors to boost the audio
performance. There is a power phase dedicated to the audio components as well.
The Puro Hi-Fi system also builds in a powerful amplifier and it uses a very
high sampling rate.
The difference doesn't end there, however. The Puro Hi-Fi
system includes a microphone to use for Multi Channel Calibration that helps
the system calibrate your surround speakers so they sound their best. It also
dedicates a lot of resources to the front panel I/O so that gamers and
enthusiasts using headphones aren't left out.
For the most part, the Biostar Hi-Fi Z77X is a normal Z77
motherboard and provides the functions that you need and plenty that you want.
The only thing that really sets it apart is the Puro Hi-Fi. My recommendation?
If you are an audiophile or want a great, albeit full-sized, home theater PC,
then the Biostar Hi-Fi Z77X is for you. You'll definitely notice a difference
in your movies, games, and music in terms of sound quality and output. If you
are in the mood for more PCI-E lanes, SATA 6Gb/s ports, or USB 3.0 ports, you'll
have to look elsewhere.
Bottom line: Audio level = Awesome.
Biostar Hi-Fi Z77X Conclusion
The Biostar Hi-Fi Z77X performs just like you would expect a
Z77 motherboard to perform. It works great, supports high speed RAM, and runs
like a champ. The features are easy to use and very self-explanatory. The Hi-Fi
Z77X doesn't really outperform other systems in any areas besides the audio.
The audio performance, however, is rock solid. If you want powerful sound, this
is your board.
I definitely like the appearance of the Biostar Hi-Fi Z77X.
The blue and black theme is appealing and I like the look of the heatsinks. The
isolated portion of the audio shows up with a yellow line and looks pretty cool. Also, the Hi-Fi
resistors and capacitors in the audio section of the board look pretty awesome.
Biostar stepped up on the construction of the Hi-Fi Z77X.
The motherboard uses all 100% solid state Japanese capacitors. The MOSFETs are
covered by heatsinks and well protected. The motherboard is solid and uses a
multi-layer PCB to separate the Audio components from the rest of the board.
The 13 phase power design is above average as well.
As for functionality, the Biostar Hi-Fi Z77X is really hit
or miss. I wish there were more than two SATA 6Gb/s ports and more than just
four USB 3.0 ports. Also, some extra PCI-E lanes would be nice, although the PCI-E
3.0 specs make that less important. That being said, the Biostar Hi-Fi Z77X
does include a lot of nice features that you generally find on more expensive
motherboards. Those include the LED post display, the onboard power and reset
switches, and the bundled software for overclocking, LAN, and more. The best of
functionality for the Biostar Hi-Fi Z77X is, of course, the audio. The Puro
Hi-Fi system really takes the cake.
For only $149.99 (Newegg), the Biostar Hi-Fi Z77X sits about in the middle of the Z77 range. That being said, it does include a lot of features only found on more expensive motherboards. Also, the Puro Hi-Fi system sets this motherboard apart and, if you are an audiophile, makes it well worth the price.
Pros:
+ Puro Hi-Fi Audio is Awesome
+ Onboard Power and Reset Switches
+ LED Post Error Display
+ Customizable Boot Logo
+ Nice Overclocking Utility
+ Microphone Included
Cons:
- No Screenshot in UEFI
- Only 4 USB 3.0 ports
- Only 2 SATA 6Gb/s
Ratings:
- Performance: 8.50
- Appearance: 8.50
- Construction: 9.00
- Functionality: 9.50
- Value: 9.00
Final Score: 8.9 out of 10.
Quality Recognition: Benchmark Reviews Silver Tachometer Award.
Benchmark Reviews invites you to leave constructive feedback below, or ask questions in our Discussion Forum.
Related Articles:
|
