| MSI Z87 MPower MAX Motherboard |
| Reviews - Featured Reviews: Motherboards | |
| Written by David Ramsey | |
| Saturday, 01 June 2013 | |
MSI Z87 MPOWER MAX Motherboard Review
Manufacturer: Micro Star International Full Disclosure: MSI provided the product sample used in this article. The desktop computer market is in decline: with reports of a 12-percent drop in sales over the last year (on top of previous declines), and total PC sales reportedly at their lowest point since 2006, the days of the computers that a Dilbert strip referred to as "grandpa boxes" (in August of 2011!) are definitely numbered. I, for one, welcome our new tablet, ultrabook, and smartphone masters. That doesn't mean that we desktop enthusiasts can't go out with a bang, though, and companies like Micro Star International, aka MSI, are taking the opportunity presented by the release of Intel's new Haswell platform and its new LGA1150 socket and Z87-Express chipset to refresh their motherboard lines.
The first of several third-party Intel Z87-Express desktop motherboards to arrive at Benchmark Reviews headquarters was this MSI Z87 MPOWER MAX. Designed for the hardcore enthusiast and gamer, it's stuffed with special features and software, and the jet black and bright yellow color scheme certainly make the board stand out. Let's take a closer look in the next section. Closer Look: Z87 MPOWER MAXThis is a full sized ATX motherboard, so you get the expected complement of slots (seven), DIMM sockets (four), and more SATA ports (eight) and USB ports (six USB 2.0 and ten USB 3.0) that you'll likely ever need.
The MPOWER MAX comes with more accessories than I've ever seen included with a motherboard: two software and driver DVDs, six latching SATA cables, back panel eSATA and USB 3.0 adapters, a WiFi/Bluetooth module with two magnetic-base antennas, a nice metal case badge...
But that's not all: you also get two manuals, a Certificate of Quality and Stability, a signed and dated 24-hour overclocking burn-in sheet with individual test scores, a very handy overclocking guide, wire leads for the onboard voltage monitoring points, a clever door hanger, and of course an I/O shield.
Probably the first thing most people will notice about the board is the enormous black and yellow aluminum heat sink over and around the processor power circuitry. My first though was that this would preclude the use of many large air coolers, but my Thermaltake Silver Arrow, certainly one of the largest CPU coolers available, fits just fine.
The Z87 chipset drops support for legacy PCI slots, so the MPOWER MAX is PCI-E all the way. An interesting feature is the mSATA socket at the lower middle of this image. If you install an mSATA SSD in this slot, you'll lose the use of SATA port #5.
At the front of the board we have two USB 3.0 headers (with, oddly, different orientations), the ATX power connector, and the voltage test point block. 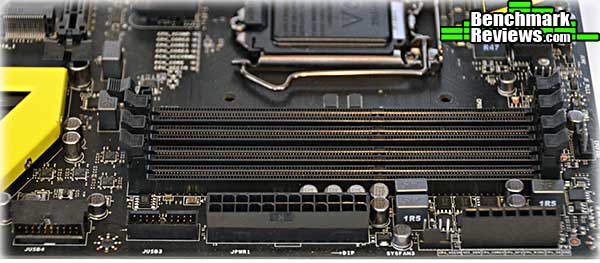
Working from the left, the I/O panel has a PS/2 mouse/keyboard connector, two USB 2.0 ports, a Clear CMOS button, the antenna connectors for the WiFi/Bluetooth card, four USB 3.0 ports, an Ethernet port, an optical audio connector, two HDMI ports and one DisplayPort, two more USB 3.0 ports, and the analog audio panel, which uses gold-plated connectors. Four of the USB 3.0 ports are courtesy of the Z87 chipset, while two more are provided by a Renesas D720202 USB 3.0 controller. You might wonder how MSI provides 6 rear USB 3.0 ports and four front-panel USB 3.0 ports with chips that only support six ports total...the answer is the use of an ASMedia ASM1074 USB 3.0 hub, a trick I'm starting to see used in other boards as well. 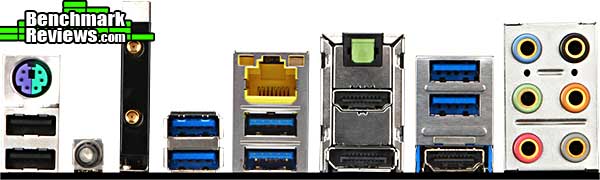
There's more to go in the next section. Z87 MPOWER MAX Proprietary FeaturesThis board is designed for the user who likes to get down and dirty with their hardware, so it's full of fun extra features. To begin, check out this button array. The Power and Reset buttons aren't unusual, but the "+" and "-" buttons allow you to adjust the base clock frequency in 0.1MHz increments while the system is running are (0.1MHz might not seem like much, but remember that the base clock value is multiplied by the multiplier, so at the stock frequency, each 0.1MHz base clock increase means a 3.5MHz increase in operating frequency). A side note: the "+" and "-" buttons are non-functional unless you install the "Direct OC" software from the driver disk. To the left of the power button is the OC Genie button. Pressing this button so that it latches down (while the system is OFF, please!) applies a modest but guaranteed to work overclock to the CPU and iGPU. But see that tiny switch with the blue LED just to the left of the OC Genie button? What's that about?
That switch controls the degree of OC Genie overclocking, the first feature of this type I've seen. When the switch is down as in the image above, the LED is blue and the overclock (applied to a 4770K) is a boost multiplier of 40 and a CPU core voltage tweak to 1.1v. When the switch is up, an angry red LED illuminates and a higher multiplier of 42 (i.e. 4.2GHz) is applied at a voltage of 1.2v. MSI calls these two settings "Gear 1" and "Gear 2" in some places, and "Gamer" and "Turbo" in others. Note that you can also program the OC Genie button to apply your own overclocking settings as defined in the BIOS.
There are two BIOS chips to the left of the POST code display. The switch below them selects which one is used, and the choice is confirmed with a blue LED next to the active chip. The blue LED at the lower left of the POST code display is a hard drive activity LED, and the button below the POST code display forces the system into the BIOS at boot time. You might wonder why this is necessary: it's because there's a "Fast boot" option in the BIOS that speeds POST times but makes the keyboard unavailable, so you can't drop into the BIOS by pressing the DEL key as you would normally. This button is for when you want to get to the BIOS after enabling "Fast boot".
If you remove the two tiny screws that secure the backlit "Audio Boost" plate, you'll find a Realtek ALC1150 sound chip. Backed by a Texas Instruments OP1652 audio amplifier, the 8-channel chip is one reason discrete audio cards just aren't that popular any more. The metal "Audio Boost" plate isn't just for show, according to MSI: combined with the metal base, it acts as an RFI shield for that part of the audio circuitry. 
There are two 8-pin EPS power connectors, for those of you who like to crank LN2 cooling and really high power draws. 
If you're one of those people who don't trust the voltage readings in the BIOS (you know who you are), the MPOWER MAX provides a set of voltage test points at the front edge of the board. MSI provides wire leads for these points so you don't have to jam your multimeter probes in there. The points are even labeled, a nice touch. There are additional labeled voltage test points to the left of the CPU socket, although they're just tiny solder pads. 
MSI's plug-in wireless card provides WiFi b/g/n and Bluetooth 4.0, 3.0+HS, and 2.1+EDR. Although the antenna connectors aren't labeled, it's obvious that the bottom connector is for Bluetooth.
At the bottom edge of the board are two system fan connectors, and like many high-end boards, each fan connector is a 4-pin PWM connector to allow speed control for PWM fans. On a board at this level I'd really prefer to see more fan connectors, and preferably two CPU fan connectors. Next are two USB 2.0 connectors (four ports total; the red connector provides high-current SuperCharger charging for tablets and similar devices), the previously-discussed POST code display and BIOS switch, and a mysterious unlabeled connector to the left of the BIOS switch whose function MSI does not document. 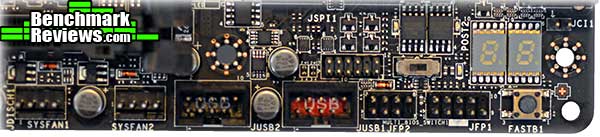
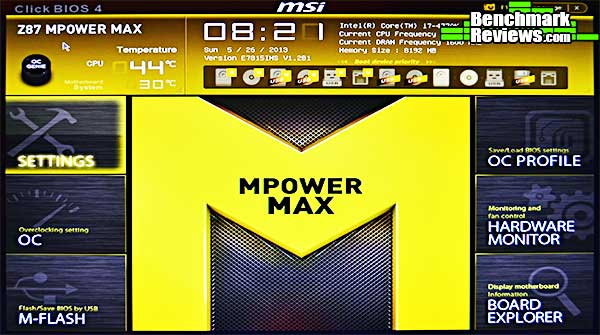
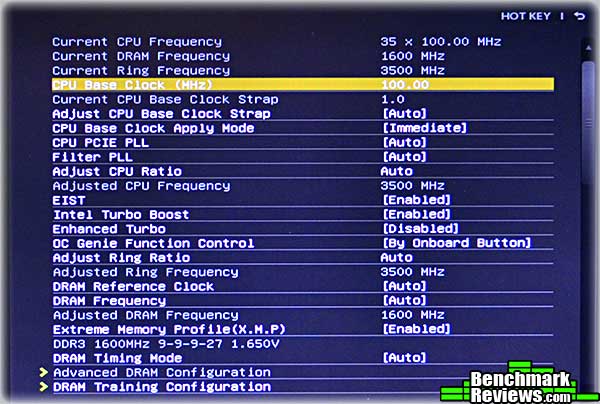
Let's check out the UEFI BIOS in the next section. MSI Z87 UEFII've never found MSI's ClickBIOS graphical UEFI quite as easy to use or intuitive as some others. However, MSI has continued to refine it, and the latest iteration, ClickBIOS 4, is quite good. The basic layout remains the same: a central data area surrounded by six large "buttons" (SETTINGS, OC, M-FLASH, OC PROFILE, HARDWARE MONITOR, and BOARD EXPLORER) that select what functions, data, and settings are shown in the central area.
There's not enough room in any review to cover all of the dozens of pages available in this UEFI, so I'll just hit the high points. The SETTINGS page is the entry for all the standard things you'd want to do to your board: configure the iGPU, USB, power management strategy, and other items.
I had the most fun in the OC section, which is of course where you can adjust the clock frequencies, multipliers (depending on your CPU) and voltages to put your CPU, memory, and iGPU performance right where you want them. As with many vendors these days, MSI includes an Enhanced Turbo features that runs all CPU cores at the maximum multiplier under load. For example, with the 4770K, Intel's maximum multiplier for a single core is 39x, but it drops to 37x when all cores are loaded. With Enhanced Turbo enabled, all four cores run at 3.9GHz.
Of course, if you're going to be overclocking (and if you're not, why did you buy this board?), you'll need fine voltage control of every conceivable point on the board. And of course there are other sections where you can set power characteristics like vdroop or the maximum amount of time increased current draw is permitted under load. 
Once you have your overclocking settings dialed in, you can save them in the OC PROFILE section.
There's an extensive hardware monitoring section, although as a monitor it's of limited use since if you're in the BIOS, the system isn't going to be working too hard. Still, you can set detailed fan controls in this section, controlling fan speed by temperature, defining minimum and maximum speeds, and so on.
But my favorite part of ClickBIOS 4 is the new Board Explorer. Similar to what Intel's been doing with some of their boards, Board Explorer shows you exactly what's plugged in where. In this shot I'm looking at the SATA ports, and my Seagate ST3500 drive is plugged into SATA port 1. This can be a great help, especially if your system's in a case rather than out on a test bench. Mousing over the board sections like the RAM and PCI-E slots will show you what's plugged into each.
MSI provides lots of utility software with the Z87 MPOWER MAX, which I'll cover in the next section. MPOWER MAX SoftwareWith the base capabilities of any motherboard defined by the CPU and the chipset, vendors strive to distinguish their products, which they can do either with enhanced hardware or software. Most of the top tier vendors these days do both: MSI adds enhanced power circuitry, wireless connectivity, extra USB and SATA ports, and other hardware features, but with their Z87 line they've stepped up their software game. The main exhibit here is the new MSI Command Center. The idea is to provide some of the status and control you'd normally need to drop into the BIOS to work with up at the Windows level.
Of course if you're overclocking from the Command Center, you'll need to be able to adjust voltages too. Command Center doesn't provide power control (vdroop, etc.) though.
You can leave Command Center running, and by doing so you get some useful capabilities, like the ability to set warning thresholds for voltages, fan speeds, and component temperatures.
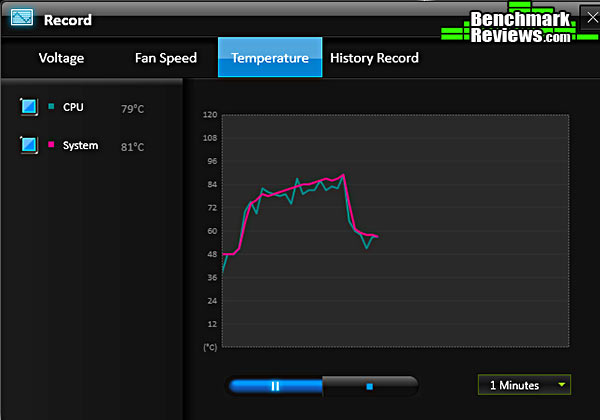
A recording feature lets you designate what to record, and for how long, great for stress testing and overclocking runs...or just seeing how toasty things get during a gaming session with your overclock settings.
As you'd expect, you can also use Command Center to drill down deep into hardware details, such as RAM timings. 
You can collapse the Command Center main window into a small status window you can leave on the screen. Since Microsoft has tossed the idea of sidebar apps, stuff like this is especially useful under Windows 8. 
I'll continue with the bundled MPOWER MAX software in the next section Bundled Software ContinuedWith RAM prices at historic lows, stuffing your rig with gigabytes of memory has never been cheaper. Of course there's very little software that will make effective use of all that RAM, so what good is it? Well, MSI thinks a persistent RAM disk with auto save on shutdown and load on boot would be cool, so they provide it. 
You can do some overclocking from Command Center, but you'll have more detailed control with MSI's branded version of Intel's Extreme Tuning Utility. Although you can control parameters as detailed as how many seconds the board will provide extra power to the CPU under load, there's no facility for automated overclocking/stress testing as with ASUS' Turbo V Evo. 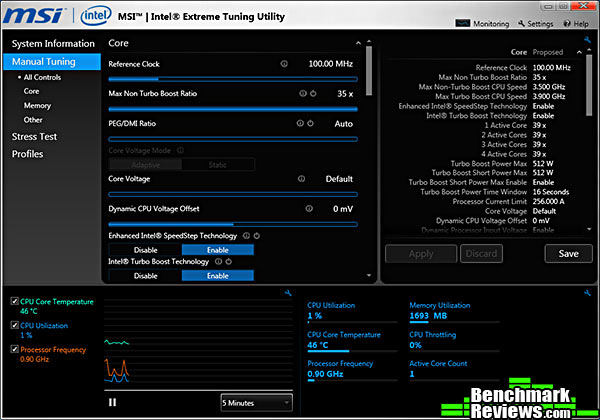
Gamers will appreciate MSI's inclusion of Qualcomm's Killer Network Manager. The first thing to do is run a speed test, so the system knows what it has to work with. 
You can monitor network traffic and the load placed on your CPU, but the most useful function is the ability to set limits on each application's upstream and downstream bandwidth. In this example I've set Internet Explorer limits at 0.9Mbps up and 10Mbps down, which will be allocated out of my 1.43Mbps up/16.34Mbsp down measured maximums. 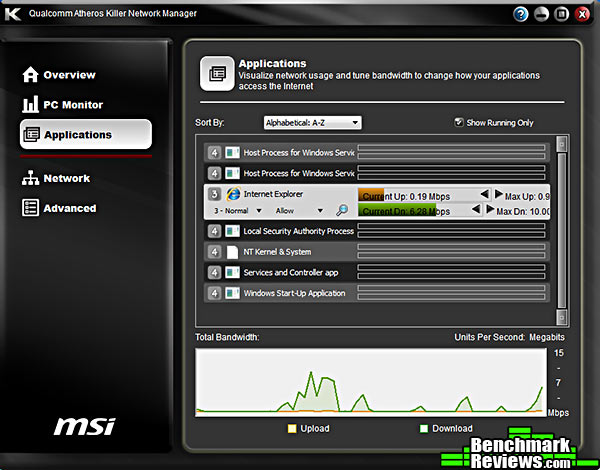
Audiophiles-- and maybe just serious gamers who need to be able to hear that person sneaking up from behind them-- will appreciate the Sound Blaster Cinema software that leverages the full capabilities of the Realtek ALC1150 sound chip. Sadly, it's largely wasted on my puny two-speaker-plus-subwoofer audio. 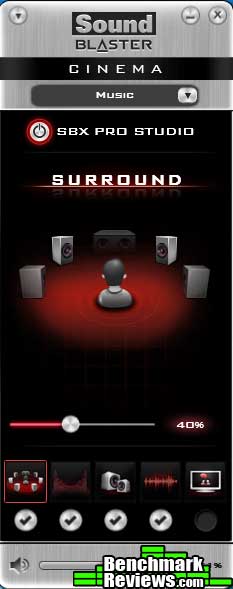
Let's check out the performance of this motherboard in the next section. Motherboard Testing MethodologyAfter a few years of testing motherboards, I've noticed that motherboards based on the same chipset tend to have very similar performance. This wasn't always the case, but now that the memory controller's in the processor, and the PCI-E lanes are in the chipset, it's not surprising that everyone's "Y22" chipset motherboard performs pretty much alike...at stock settings, anyway. So testing motherboards, unlike testing CPUs or video cards, is more about examining the proprietary features that make one different from another, as well as testing a board's overclocking ability, especially if it's marketed to the enthusiast community. I tested the MSI Z87 MPOWER MAX board with a Core i7-4770K CPU at both stock and overclocked speeds. For the overclock, I used the OC Genie button at both its "Gear 1" and "Gear 2" settings, as well as the highest manual overclock I could achieve. Test System
Benchmark Applications
I'll start with synthetic benchmarks in the next section. AIDA64 Benchmark ResultsFinalwire AIDA64 is a full 64-bit benchmark and test suite utilizing MMX, 3DNow! and SSE instruction set extensions, and will scale up to 32 processor cores. An enhanced 64-bit System Stability Test module is also available to stress the whole system to its limits. For legacy processors all benchmarks and the System Stability Test are available in 32-bit versions as well. Additionally, AIDA64 adds new hardware to its database, including 300 solid-state drives. On top of the usual ATA auto-detect information the new SSD database enables AIDA64 to display flash memory type, controller model, physical dimensions, and data transfer performance data. AIDA64 v1.00 also implements SSD-specific SMART disk health information for Indilinx, Intel, JMicron, Samsung, and SandForce controllers. All of the benchmarks used in this test- Queen, PhotoWorxx, ZLib, and hash- rely on basic x86 instructions, and consume very little system memory while also being aware of Hyper-Threading, multi-processors, and multi-core processors. Of all the tests in this review, AIDA64 is the one that best isolates the processor's performance from the rest of the system. While this is useful in that it more directly compares processor performance, readers should remember that virtually no "real world" programs will mirror these results.
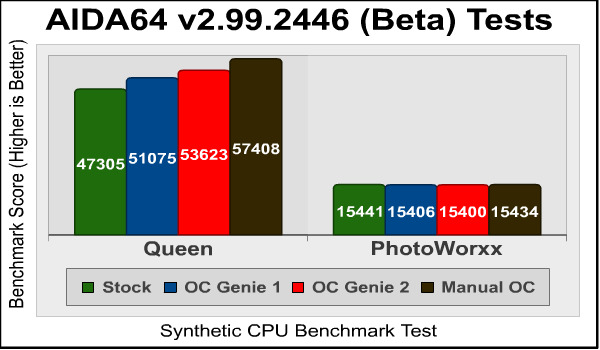
The Queen and Photoworxx tests are synthetic benchmarks that iterate the function many times and over-exaggerate what the real-world performance would be like. The Queen benchmark focuses on the branch prediction capabilities and misprediction penalties of the CPU. It does this by finding possible solutions to the classic queen problem on a chessboard. At the same clock speed theoretically the processor with the shorter pipeline and smaller misprediction penalties will attain higher benchmark scores. Like the Queen benchmark, the Photoworxx tests for penalties against pipeline architecture. The synthetic Photoworxx benchmark stresses the integer arithmetic and multiplication execution units of the CPU and also the memory subsystem. Due to the fact that this test performs high memory read/write traffic, it cannot effectively scale in situations where more than two processing threads are used, so quad-core processors with Hyper-Threading have no real advantage. The AIDIA64 Photoworxx benchmark performs the following tasks on a very large RGB image:
OC Genie's "Gear 2" setting improves the Queen score by 13.4%, while my manual overclock increases it by 21.4%. As we've seen before, overclocking does not impact PhotoWorxx scores.
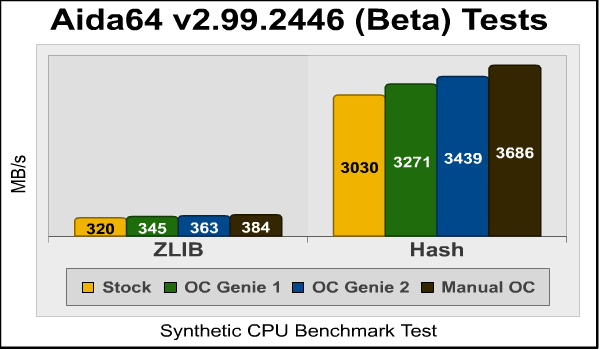
The ZLIB improvements are hard to see due to the scaling in this graph, but going by the numbers the Gear 1, Gear 2, and manual overclocks increases the performance by 7.8%, 13.4%, and 20%, respectively. Hash scores increased by 8%, 13.5%, and 21.7% SPECviewperf 11 Tests ResultsThe Standard Performance Evaluation Corporation is "...a non-profit corporation formed to establish, maintain and endorse a standardized set of relevant benchmarks that can be applied to the newest generation of high-performance computers." Their free SPECviewperf benchmark incorporates code and tests contributed by several other companies and is designed to stress computers in a reproducible way. SPECviewperf 11 was released in June 2010 and incorporates an expanded range of capabilities and tests. Note that results from previous versions of SPECviewperf cannot be compared with results from the latest version, as even benchmarks with the same name have been updated with new code and models. SPECviewperf comprises test code from several vendors of professional graphics modeling, rendering, and visualization software. Most of the tests emphasize the CPU over the graphics card, and have between 5 and 13 sub-sections. For this review I ran the Lightwave, Maya, and Seimens Teamcenter Visualization tests. Results are reported as abstract scores, with higher being better. LightwaveThe lightwave-01 viewset was created from traces of the graphics workloads generated by the SPECapc for Lightwave 9.6 benchmark. The models for this viewset range in size from 2.5 to 6 million vertices, with heavy use of vertex buffer objects (VBOs) mixed with immediate mode. GLSL shaders are used throughout the tests. Applications represented by the viewset include 3D character animation, architectural review, and industrial design. MayaThe maya-03 viewset was created from traces of the graphics workload generated by the SPECapc for Maya 2009 benchmark. The models used in the tests range in size from 6 to 66 million vertices, and are tested with and without vertex and fragment shaders. State changes such as those executed by the application- including matrix, material, light and line-stipple changes- are included throughout the rendering of the models. All state changes are derived from a trace of the running application. Siemens Teamcenter Visualization MockupThe tcvis-02 viewset is based on traces of the Siemens Teamcenter Visualization Mockup application (also known as VisMockup) used for visual simulation. Models range from 10 to 22 million vertices and incorporate vertex arrays and fixed-function lighting. State changes such as those executed by the application- including matrix, material, light and line-stipple changes- are included throughout the rendering of the model. All state changes are derived from a trace of the running application.
SPECviewperf tests actually comprise code from real-world applications, so their results are more indicative on total system performance than the pure CPU performance we see from synthetic tests like AIDA64. It seems there's a performance ceiling of some sort on the Maya and TC-VIS tests, which improve by 24% and 21%, respectively, with the Gear 1 overclock, but don't improve after that with higher overclocks. My guess would be that this means the Radeon HD6850 video card is the limiting factor. The Lightwave test, which performs its own rendering using the CPU, continues to scale nicely as the CPU clock speed increases. x264HD 5.0 TestsTech ARP's x264 HD Benchmark comprises the Avisynth video scripting engine, an x264 encoder, a sample 1080P video file, and a script file that actually runs the benchmark. The script invokes four two-pass encoding runs and reports the average frames per second encoded as a result. The script file is a simple batch file, so you could edit the encoding parameters if you were interested, although your results wouldn't then be comparable to others. This is another example of a useful benchmark that's based on real-world code. I like encoding benchmarks since they're one of the few tests that can measure a real-world use of the power of modern multi-core processors. 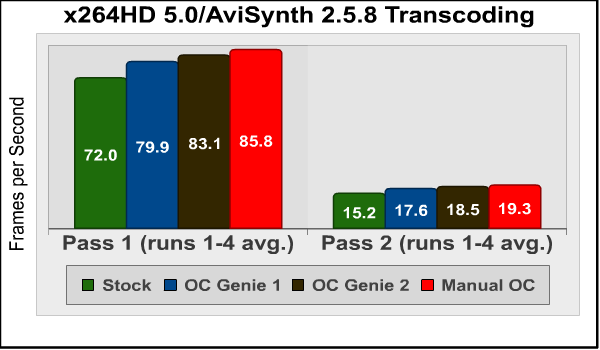
Here we see some very nice scaling, as expected with a purely CPU-bound benchmark. Using OC Genie's "Gear 2" setting increases the Pass 1 score by 15.4% and the Pass 2 score by 21.7%, while my manual overclock returns 19.2% and 27%, respectively. OC Genie can give you a nice performance boost. But it's hard to beat an hour or two spent tweaking voltages and frequencies by hand. I'll describe this process in the next section. ATX Motherboard OverclockingThere are few signs that a motherboard was designed for overclocking more obvious than dual EPS power connectors such as the ones we see on this motherboard. If you overlook those, perhaps the signed and dated 24-hour overclocking test sheet would be a clue, or the giant (handy!) fold-out overclocking tips sheet. But the results on the overclocking test sheet were from an OC Genie "Gear 2" overclock, which bumps the multiplier to 42x resulting in 4.2GHz. While the benchmarks in the previous sections show it's a nice dollop of free performance, no automated process (yet) beats some hand-tweaking. Although Intel's made the classic base clock adjustment a viable overclocking mechanism with Haswell, my experience with this same is that it overclocks even worse than Ivy Bridge, itself a significant step down from Sandy Bridge. Granted, as of the time of this review this is the only functioning motherboard I've been able to test the Core i7-4770K in, but I suspect I won't see anything dramatically better with other motherboards. 
Many people don't seem to realize that Intel's quoted maximum boost multiplier of 39x only applies to one core under load-- load down all four cores, and you're looking a only 57x (3.7GHz). Yeah, that's conservative, and many motherboards (including this one) offer "Turbo Enhancement" features that run all four cores at the maximum multiplier. That's the way I like to run, but you'll need a really good cooler to be able to sustain a 45x multiplier under load for any amount of time. Like Ivy Bridge, Haswell runs very hot under load, 22nm low-leaking transistors notwithstanding. The best I was able to do was 4.5GHz on all cores at 1.3v. Even adding another 50MHz with a base clock tweak would cause the system to crash in some benchmarks. Of course, this relatively modest overclock didn't come anywhere close to needing the second 8-pin EPS power connector MSI provides, but perhaps it could be pressed into service for dry ice/acetone or LN2 runs. I'll give my final thoughts and conclusion on this motherboard in the next section. MSI Motherboard Final ThoughtsI'm always a little jittery the first time I review a motherboard with a given chipset. The reason is that I have nothing to compare it to: I don't know how its performance and features stack up to the competition. And that can make a difference, of course, since a highly-rated motherboard might be eclipsed by innovations in a competing product that I wasn't aware of. Also, motherboard hardware and software features have become so elaborate, at least at the high end, that it becomes difficult or impossible to test or even cover them all, especially working under a tight embargo deadline. On the other hand, I have over the years reviewed a lot of motherboards, so at least I have some idea of what to look for. Hardware-feature wise, the Z87 MPOWER MAX hits most of the bases an enthusiast would want: a slot layout optimized for SLI/CrossFireX; hardware buttons, a POST code readout, switch-selectable dual BIOSes, voltage check points, dual EPS power connectors, and so forth. All this hardware goodness is backed up by an improved BIOS and supporting Windows-based utilities.
MSI hasn't skimped on the consumer utility side, either. A very nice audio system, enhanced-current USB ports for tablet charging, and an mSATA connector are features that anyone can appreciate. However, I wouldn't be filling my duty as a reviewer if I didn't find a few things to carp about. I would have liked to have at least seen the option for active cooling of the chipset and VRM heatsinks. And a mere four fan headers seems stingy. And there's nothing in the manual about how PCI-E lanes are allocated, which is annoying since there are only 24 lanes to play with, and some of them must be used to support third party SATA and USB controllers, both of which this board has. Will plugging in one more USB 3.0 device disable a SATA port? Who knows? Well, you should be able to find this information. With two video cards in the first two x16 slots, what lanes are available for the remaining x1 slots and x16 slot? At an MSRP of $259.99, this is a high end motherboard, although there may still be a few steps above it in MSI's hierarchy. Can a Big Bang version be far behind? MSI Z87 MPOWER MAX ConclusionI don't think there's any compelling reason to move from an Ivy Bridge or even a Sandy Bridge based system to a Haswell system-- there simply isn't enough performance and feature differential to justify it. On the other hand, if you're building a new rig from scratch, there's little point in investing in end-of-life platforms, so going Haswell/Z87 makes sense. MSI enhances the performance and utility of this board with a broad array of proprietary hardware and software features. An mSATA connector, high-end sound, controller buttons, eight SATA 6G ports, and 10 USB 3.0 ports ensure that it's unlikely you'll ever need anything this board doesn't supply. We've seen MSI's yellow and black color scheme on other MPOWER boards, but they've taken it an extra step further here. The bright yellow accents really stand out, and the massive heat sink cooling the VRMs around the CPU socket really demands a water-cooled system with a window for maximum visibility. That said, the black painted finish is a little delicate and you should exercise caution when strapping on your giant air cooler. The construction continues MSI's tradition of using "military class" componentry: a "Gen 4" fabric PCB improves moisture resistance, anti-ESD ICs and fuses protect against electrostatic discharges, and Hi-c caps, super ferrite chokes, and aluminum-core "dark caps" provide increased reliability, especially under high-temperature operations. And it's worth noting that MSI does not use "military class" casually: the components so described have passed MIL-STD-810G tests for high and low temperature, humidity, vibration, and shock. ATX mainboards are big, and MSI leverages that space by providing extra functionality such as hardware buttons, extra ports and connectors, a POST code readout, and voltage measurement points. At $259.99 (Newegg | Amazon), this MSI Z87 MPOWER MAX will probably cost $50-$75 more than more mainstream Z87 motherboards. If you can use the extra features provided, though, it's a good value. Pros:
|
|


Comments
The higher end version is the XPower II, which is basically a bigger version that can support 4 GPUs.
At this point, to be honest, I really don't have a preference for motherboard makers - it's really going to come down to what they offer. I personally am willing to pay more, but where the experience is worth it.
I find that the top of the line boards right now don't offer much for the average air/water OC'er the "Maximus Extreme" or "XPower" (unless you run 3-4 GPUs), but that the tier right below though is basically as good as it gets for air cooling.
Among the other competitors, I should also mention that Gigabyte Z87X-OC, which is a pretty good board as well - it's pretty much a stripped down board. I haven't seen Asrock's or the other competitor's boards.
Right now I do feel like Asus has the best EFI implementation. The other components though - yeah it's well, too close to call I think. It'll come down to a combination of your faith in the brand, what the company offers at the price point you're looking for, and the general reaction of these boards.