| Lian Li PC-AO4 Aluminum Mini-Tower PC Case |
| Reviews - Featured Reviews: Cases | |
| Written by Bruce Normann | |
| Sunday, 24 April 2011 | |
Lian Li PC-A04 Aluminum Mini Tower Case
Manufacturer: Lian Li Industrial Co., LTD Full disclosure: The product used in this review was supplied by Lian-Li Just for a minute, we're going to stop looking for the biggest, baddest, most ferocious PC gaming case and look at something a little less hardcore. It's not even black, if you can imagine that..... Another thing that sets the PC-A04 apart from the norm is that it's limited to micro-ATX motherboards. Two or three years ago, this would have been a showstopper, but in recent times there have been some excellent uATX boards hitting the market. There are even some offerings that forgo integrated graphics in favor of more performance-oriented chipsets. ASUS and MSI both make X58 boards for instance, and there are also several P67 choices available. So, don't feel that you have to reign in your performance expectations just because you want a smaller, more attractive box beside your desk. Lian Li has an enviable reputation for fine metalwork, particularly in aluminum. They also offer a very wide range of designs, from massive eATX towers, to special editions with AMD dragons decorating the side window, to tiny iTX hatboxes, and finally the middle ground. Today we're looking at the PC-A04 Aluminum Mini Tower Case, in silver. With its clean and sleek profile, it could pass for an Apple product. In fact, it's probably the perfect case for that hackintosh you've wanted to build after reading this article.
The outside of the case is a very strong visual statement that will appeal to a certain segment of the market that longs for the Apple style, but can't stomach the closed architecture or the pricing that goes along with it. In black, which is the other available color, it probably blends in a bit more with modern decor, but in silver it really stands out and says, "Hey, look at me!" So far I've focused on the exterior, but don't worry; we'll spend equal time looking at the interior and even look at a build sequence to show how it all fits together. Next, let's take a look at the actual features and specifications for the PC-A04, direct from Lian Li. Lian Li PC-A04 Mini Tower Features
Lian Li PC-A04 Mini Tower Specifications
Closer Look: ExteriorThe front of the PC-A04 presents a restrained, classical look that's artfully blended with high tech. There are two 5.25" drive bays in the front, and unless you have an optical drive with a matching silver faceplate, the front of the case loses a bit of its monolithic character once the brushed aluminum drive bay covers are removed. Sadly, I threw out the silver faceplate that came with the last ODD I bought, thinking that I'd never have any place to use it. The perforated section on the lower part of the front panel is both functional and decorative, just the way things should be, IMHO. The studio lighting in the image below shows some of the internal metal framework behind the grille, but in normal use that won't show through. At the upper right-hand corner are two small acrylic lenses that funnel light from internally mounted LEDs, signaling Power ON and HDD Activity.
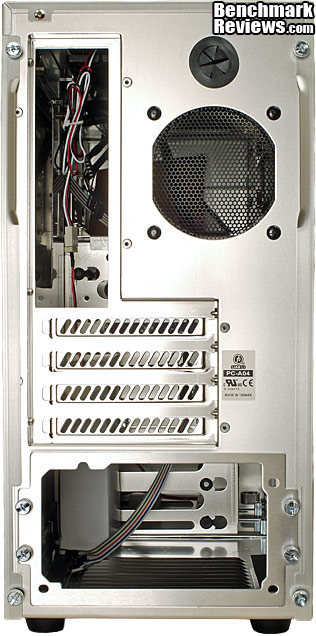
The rear of the case shows a preview of the craftsmanship that is found on the interior of the case. There are only four expansion slot locations, consistent with the limitations of the micro-ATX standard. There is one pass-thru hole with a grommet at the top, like you would typically see for liquid cooling lines, but it's there for another purpose. Believe it or not, it's for a USB 3.0 cable that is meant to attach to a rear I/O panel connector and provide USB 3.0 connectivity on the top panel at the front of the case. It looks completely out of character when utilized that way, but there doesn't seem to be a common standard, or at least a lot of support if there is one, for an internal header style of USB 3.0 connection on the motherboard.
The mesh grill on the back is the same size as an 80mm fan opening, complete with mounting holes, but it's just a passive vent and the grill uses the mounting holes. Mounting a fan would require fitting a different type of fan guard, which is not too difficult if you already have to procure the fan. That may seem like an odd design choice, but once we look at the fan layout we'll see that Lian Li purposely made this a positive pressure enclosure. The system PSU mounts on the bottom of the chassis, and has a separate face plate that allows the unit to slide in and out the rear of the case. It's symmetrical, so that the PSU can be mounted right side up, or upside down. The opening for the motherboard I/O panel is about the only thing standard on the rear panel.
The top surface of the Lian Li PC-A04 is home to two major attractions. First, the grille for the single 120mm fan, serving to exhaust heated air from the case. Second, the usual "front panel" controls and a couple of handy I/O points. In between is a lot of brushed aluminum, and along the front edge is a black plastic accent strip. The top panel is not readily removable, as it is held in place by four screws, but we'll see later that it does come off and needs to lifted somewhat in order to route the 12V ATX CPU power cable. It sounds tougher than it really is.
The left side of the case is a popular spot for additional fans, especially on gaming cases where the high-powered video card needs lots of cool, fresh air to push through its cooling system. Although the Lian Li PC-A04 can accommodate video cards even longer than the AMD HD 6990, it's not really optimized for that market. The two 120mm fans that come installed in the front of the case feed needed cooling air into the middle and lower section of the chassis, and we'll have to do some testing to see how effective this airflow arrangement is. The basic premise for this case is: two fans in and one fan out, creating positive pressure inside the chassis. The large vent at the rear keeps the pressure from building up too high and keeps the volume of air high. Case fans typically lose a lot of CFM if they have to work against much static pressure, unlike fans which are typically selected for use on dense cooling fin assemblies.
The right side of the PC-A04 is much like the right hand side of any PC case, especially mainstream hardware. It's purely functional, in that it just covers up the back side of the motherboard tray, and any cables that may be routed along there. But it's also decorative, because it usually represents the largest un-broken surface of the case, and the overall quality of the surface finish is really on display here. Any tiny defect will be immediately spotlighted and ruin what should be a perfectly smooth, uniform surface. Of course by know, you already know that this particular case has two identical opportunities for a lack of quality to make itself known. From my experience, both opportunities were missed, as there is not one single blemish to be found on these two large surfaces.
The bottom of the PC-A04 holds one obvious feature and has hints for another that won't be fully appreciated until we install some hard drives in the system. The PSU mounts in the bottom of the case, and there are a generous set of louvers beneath it to provide cool air directly to the unit's fan. In order to prevent the inside of your PSU from becoming one big dust museum, Lian Li thoughtfully provides a filter on the bottom surface which can be removed for cleaning, although the case needs to be tilted on its side or lifted up to gain access. I know that's the best way to do a thorough cleaning job, but I prefer filters that can slide out the side without moving the case. The problem with that lazy-boy approach is that there is usually a warren of dust bunnies still left underneath the case which will immediately be drawn over to the filter as soon as the PSU fan turns on again. We've seen all the major features, now let's focus in on a few of the exterior details in the next section. Detailed Exterior FeaturesThe control panel is pretty basic, and that's a visual design choice I believe, more than anything else. From left to right there are, the Power and Reset buttons which have a nice sturdy feel to them. The next items are all I/O points leading to cables on the interior of the case. We have the standard MIC and Headphone jacks with lime green and salmon colored trim rings to identify them. Then we have a standard USB 2.0 port, a new USB 3.0 port, and to wrap it up, an eSATA port. Nothing is illuminated here; in contrast to many enthusiast cases, the only lights on the PC-A04 are two small LEDs for power and HDD activity.
There are two 5.25" drive bays in the front, and unless you have a drive with a matching silver faceplate, the combination of one drive and one cover plate looks a little untidy. It definitely ruins the monolithic character of the design, and forces it to show its true colors. It's soooo obvious that it's a PC now, not a Mac. Any Apple product worth its salt would have a very thin gap milled in the front surface for a slot-loading DVD drive. Sadly, I threw out the silver faceplate that came with the last ODD I bought, thinking that I'd never have any place to use it. Two black-faced ODD units would look much better, even though they may not be needed. Maybe this is the right time to buy that Blu-ray drive you've been wanting...
Swinging around to the bottom of the case, here's a close-up of the intake filter for the PSU cooling air. It's relatively easy to latch and unlatch if you have case on its side, but difficult to do if the case is standing upright. I applaud the fact that you don't have to open the side panel to access the filter, but I think I would have preferred a slider arrangement. Maybe I need to move my case aside more often, and vacuum underneath it, but if I can just slide the filter out and clean it without disturbing the case, I'm more likely to do it on a regular basis. Just below the filter are the rubber feet that the case sits on. They are made from fairly hard rubber, and are glued to the bottom of the case. The tread embossed on the bottom helps with traction, and the case does not slide around when it is placed on a hard surface. Whether that is a good thing or not, depends on personal preference.
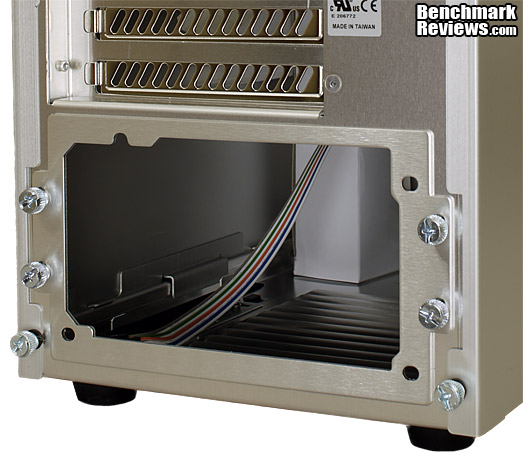
The PSU itself is mounted to a removable plate on the back face of the PC-A04. The plate has only one set of the standard mounting holes for the PSU, but the plate itself is reversible which allows you to mount the PSU in either orientation. I chose to mount the modest Corsair CX430 with the fan facing straight down, so it would pull air directly from the louvers on the bottom. That way, the positive pressure environment that the case was designed to run with wouldn't be disturbed. In a small case like this, the ability to slide the PSU in from the back after the other major components have already been installed is a really nice feature. It's the sort of thing you generally see on maxed-out high end gaming cases that need 1000+ watt power supplies, which can be quite long. Lian Li correctly figured out that on a small case such as this, it would offer the same benefits. Later we'll see the slider rails inside the case that also help with the PSU installation.
The front of the case looks a bit different once you take away the outer trim. Here you can see that the drive bay covers are held in place by the main chassis, rather than the front fascia. They are easily removed and replaced, although it's a lot easier if you have the side panel open and you can see the dimples on the cover lining up with the matching holes in the support rails inside the chassis. On the upper right are the LEDs for Power ON and HDD Activity. At the very top are two countersunk holes and a thin slot, which are for mounting an optional fan controller board, available separately from Lian Li. Right below the ODD drive bays is the uppermost of the two front fans, both of which serve as intakes.
Here's a better view of the fans and there are some details that are worth exploring. First of all, they are basic black units, without any form of lighting. Secondly, they are each mounted on vibration isolation mounts at all four corners. Unlike some vibration mounts, these make it relatively easy to remove and replace the fans, in case you want to use different fans or just want to do a little spring cleaning. There will be much less cleaning required however, as both of the units have filter frames installed ahead of them. I removed one to show the fan and its mounting hardware a bit more clearly; both come preinstalled from the factory. They are identical to the one mounted on the bottom of the case, and use the same hinge/latch design for easy attachment. Lastly, you can see just beyond the fans themselves, the sheet metal for the internal HDD bays. Just looking at them, you can see that they provide a significant impediment to airflow. Luckily, they are completely configurable as we will see when we start looking at the interior.
From the exterior, there is no doubt that this is a stylish and well built case. It may not look like the first choice for someone putting together a serious gaming system, but you might be surprised. The exterior only tells half the story, however. Anyone looking at high end cases expects the internals to offer some features and benefits as well. Let's see what the Lian Li PC-A04 has waiting for us inside. Closer Look: InteriorThe first thing you notice, once the side panel is removed, is the entire interior is finished in bare anodized aluminum. It's not like you aren't expecting it, the clues are all there, but it presents a very bright landscape which is a little overwhelming if you aren't prepared for it. It's a bit of an exaggeration, but it's not too far off to say that sunglasses are required equipment for the build process!
Visible here are the various internal cables, from top to bottom and left to right: front panel HD audio, USB 2.0 header connection, USB 3.0 Type A plug for external connection, 3-pin header and four pin Molex adapter for the top fan, eSATA connector, front panel controls and indicators on a multi-colored ribbon, and two 3-pin header/4-pin Molex cables for the front fans. Also shown is the small cardboard box with all the various screws and hardware for assembly, which was firmly secured for shipment with a sturdy wire tie. I still look twice when I don't see the usual 120mm chassis fan at the rear of the case, but I'm guessing that the two front intake fans are going to do the job of pushing air out the back vent, aided by the CPU cooler fan, perhaps.
The right-hand-side of the interior shows a fairly open landscape in the area below the motherboard tray and behind the seven HDD bays. The motherboard tray is unfortunately a rather blank canvas on the back side, which is going to make cable dressing a bit difficult. Without a couple of tie-down points for wire ties, it's hard to keep the cable where you want them. There's also not a lot of room between the motherboard tray and the inside surface of the side panel, 11.5 mm to be exact. Any cable that has to traverse the "spine" that runs from top to bottom has to ride over the folded edge of aluminum, which cuts the clearance to 10mm. There's enough room for the 12V ATX cable to run up to the CPU socket and any collection of cables smaller than that, but the main 24-pin power cable is out of the question and it has to stay over on the front side. The opening on the mobo tray is quite large and will accommodate the installation and removal of any sized CPU cooler backplate.
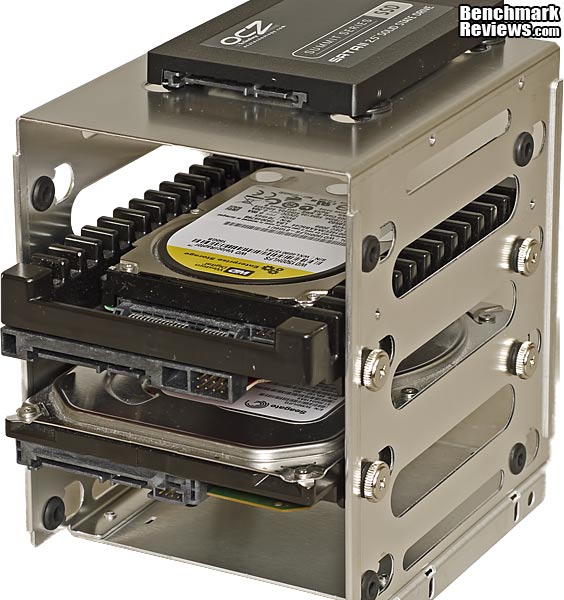
Here's the configuration for the drive cages that I selected for this build. I wanted to let at least one of the fans breathe without restriction, and I knew that the 3 HDD mounting locations (+1...) would be enough. SATA power cables have a nasty characteristic of not fitting well on two drives in adjacent slots; they work perfectly when there is at least one space between the drives, but that wastes a lot of space. You can't alternate connections from two cables either, because all the connections are lined up vertically and the stiff wires don't slalom around the adjacent connector very well. We'll see how this plays out in the build notes, but it's one of my pet peeves about SATA.
Here's a close up look at the bottom of the case, where the PSU sits on two raised rails permanently attached to the bottom plate. The top of these rails is covered with fairly dense foam, which reduces vibration and prevents scratches to the finish of your PSU. The rails put the bottom of the PSU about 12mm (0.5") off the bottom surface of the case and allow plenty of space for airflow, and clearance for a fan grill on the PSU, if there is one. Many cases have vents in this location, but the Lian Li PC-P50R is the only one I know of that has louvers. What's the difference? Louvers create an air path that does not have a line-of-sight path to the outside, which reduces the likelihood of starting your house on fire if your PSU explodes. It all sounds a bit dramatic, but at least someone's thinking of your best interests. 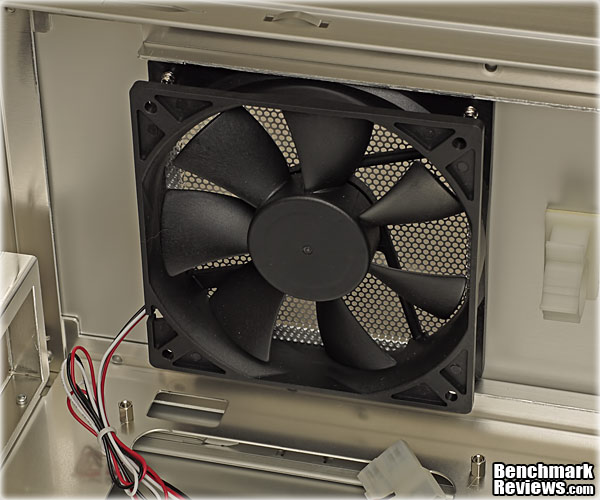
The only exhaust fan for the case is mounted to the top panel. It is a 120mm fan, identical to the two units mounted on the front, where they blow fresh air into the case. Two fans in, one fan out provides a very simple recipe for positive pressure inside the case, something I am very supportive of as it really helps keep the internal components cleaner. The fans specs for the model LI121225SL-4 are pretty modest, in the interest of low noise: dual bearing, 3-pin, 37cfm and 18dBA. Lian Li has a 1500 RPM fan in the model range that puts out 56 CFM at 24.7dBA, so they clearly went for low noise in this application. Feel free to substitute your favorite case fan, lighted or not, if your priorities lie elsewhere. All three fans come with a standard 3-pin header connection for linking the units to a suitable supply on the motherboard. They also come equipped with an adapter to get power from a 4-pin Molex connection, in case your motherboard doesn't have three headers for case fans. I was lucky enough to have an ASUS ROG motherboard laying around for this build, and it has all the requisite connections, so I removed all the Molex adapters. There are no finger guards here, and precious little room to maneuver around inside the case once the major components are installed, so watch those pinkies!
The rear panel on the interior is pretty straightforward, compared to some of the Lian Li cases I've seen recently. In lieu of sophisticated clamps, there are simple thumb screws for each expansion slot. As much as I enjoyed using the tool-less clamps on the high end model, these are actually just as easy to use and there are no worries about the clamp interfering with the expansion card bracket. Some of the video cards get carried away with reinforcing in this area, and for me it's been hit or miss sometimes whether the clamp will sit correctly on the card. It looks a little strange to only see four slots and four covers, but that's the best you can do with uATX. Already, I'm adding up the cards I need to install on this machine, and it's going to be tight. That's probably an anomaly though, as I need to put a fax modem in here, and I've got an old wireless card that needs to be installed as well. All horribly old school I know, but I've seen stranger builds. Let's continue looking in the next section, at some of the detailed features on the inside of the PC-A04A. Detailed Interior FeaturesThe Lian Li PC-A04 is a true micro-ATX size case, and is not an outsized tweener. As such, it relies on some design features to make it easier to work on during the build process. One of those is the removable and reconfigurable drive cages. It's easy to remove completely and that's probably the preferred protocol for installing hard drives. Once the cages are out, it becomes a bit more obvious how you can install them in any orientation. The only one that doesn't make sense is for the back end of the drives (the connector end) to face the front fans. I thought I'd try something a bit unconventional, and I set up the drives and cage to put the connector end facing out the left side of the case. Most cases have that end facing the back side, based on the assumption that you can hide more cables back there. I thought it was worth a try to do it the other way around, as I often end up with a rat's nest of wires back there and this case has limited space behind the motherboard.
I used a fairly substantial cooler, or I should say I TRIED to use a substantial cooler for this build. First off, it wouldn't fit in the horizontal orientation; that is with the fan blowing from front to back. Remember, that was the rationale for the simple vent on the back. The idea was that the CPU cooler would push air out the back after it exited the fin assembly. Well, if you turn a Venomous X cooler that way, it runs into the upper fan in a BIG way. It clears the memory modules and the MOSFET/Chipset cooler fine, but it's too wide by half to fit in that configuration. So, I turned it 90 degrees and all was well, or so I thought. The Venomous X is listed as being 160 mm tall, and the tallest of the heat pipes stood at least 4 mm proud of the frame, preventing installation of the side panel. Lots of vertical-style coolers with 120mm fans are right in that 157-160mm range; even the Cooler master V6GT is listed at 165 mm, so think hard about the cooler you choose for this case. A downdraft unit might be best, like the Scythe SCRT-1000, the Tuniq CR-PRO120-BK-RV1, or the Noctua NH-C12P SE14.
Up in the same general area on the back side, there is another challenge, although this one turned out for the better. There is a handy cutout on the motherboard tray for the 12V ATX CPU power cable to be routed, provided there is enough cable length to run it up behind the tray. With a small case like this, the cable supplied by the PSU manufacturer is usually adequate, and if not, I've laid in a stock of extender cables for just this purpose. The difficulty that presents itself is the wide overlap between the cutout and the flange that comes down from the top of the chassis. It is impossible to run even a 4-pin ATX connector through the narrow gap that's left there, much less the 8-pin version. Fortunately, the top panel comes off with four screws and it's now a piece of cake to run the cable through the access hole. Once the connector's through, and everything is buttoned back up, there's plenty of room for the sleeved cable. If you want the maximum flexibility down the road, just do this trick with a 6" extension cable before you route and tie down all the I/O and fan cables from the top panel down to the motherboard. The removable PSU mounting panel makes it easy to install the PSU last in the build process, and the extender cable will be ready and waiting when it's time to run the power cables.
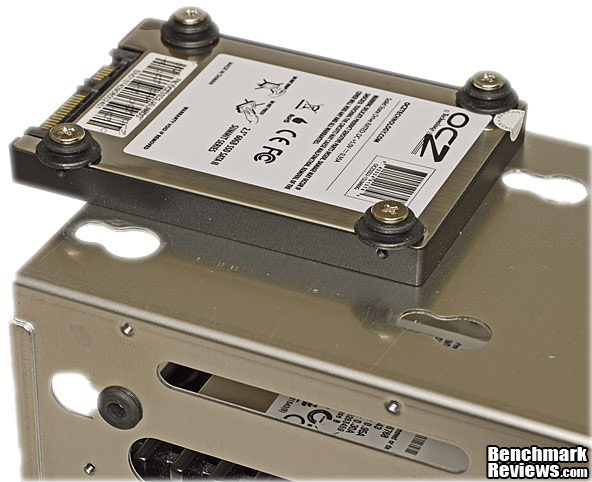
Folks who have jumped on the SSD bandwagon are well taken care of, as both drive cages are designed to accept 2.5" drives, with vibration reducing mounting grommets, no less. In addition, the bottom surface of the upper cage has another set of countersunk mounting holes, sans grommets, that can be used. All total, there are spots for three 2.5" drives without resorting to adapter brackets that fit into 3.5" bays. This was one of the simpler methods I've used to mount these smaller drives and it was very secure once I slid the rubber grommets into place.
There is plenty of free space between adjacent drives, and the vent holes in the side of the cage are perfectly aligned to take advantage of the space for air to flow through, courtesy of the two front-mounted fans. The 3.5" drives are fastened in place with thumb screws, that also have a handy Philips screwdriver slot for those times when you over tighten the screws and can't get them out with your bare hands. The good news is that the screws seemed very secure once I installed them, and are very unlikely to back out of their threaded holes under normal use. Although it seems like more work to install or remove an HDD with this arrangement, I prefer it to the drive mounting design on the Lian Li Armorsuit PC-P50R, just for the simplicity. Everyone has their own favorite mounting method, so YMMV.
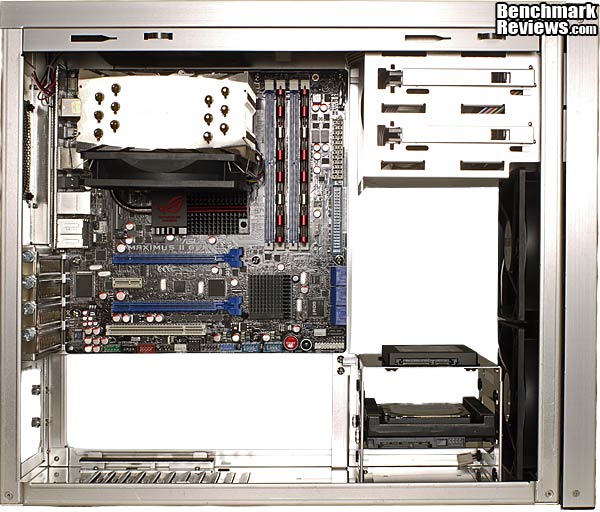
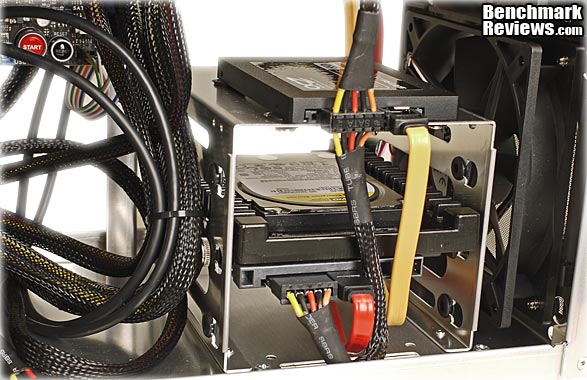
I'm getting ahead of myself, but as long as we're looking at the drive cage, we may as well look at the final installation. Besides the fact that right angle plugs on the SATA signal connectors would have been much neater, my biggest difficulty is always with the SATA power connectors. The wires are so stiff, and the distance between the connectors never seems to be optimized to fit the drive spacing in the HDD cages. It seems no matter what I do, I'm always putting stress on the thin little plastic strip that sticks out from the back of the drive. I haven't broken one off yet, but I know people who have. It's just a bad design for a power connector, where you're always going to have some external stress from the cabling. Now that we've thoroughly toured both the inside and outside of the Lian Li PC-P50R, there's only one thing left to do, start building a system with it. I've chosen some typical gaming components to see both how they fit and how the cooling system performs. Lian Li PC-A04 Build NotesThe rubber meets the road when you start putting all your carefully chosen components into the case that was hopefully chosen with equal care. Almost every other PC component interacts with the case in some way, so it's not unusual for people to spend even more time researching and deciding on which gaming chassis to buy. In my experience, people also tend to keep their cases and monitors longer than any other PC component, so the extra effort is worth it. Here's what my first full build looks like. It's pretty straightforward: air cooling, single GPU and a few drives. Unlike most builds, it wasn't as hard to find places to hide all the unused PSU cables, since I used a very modest PSU. This time, I used every single cable, believe it or not. I figure most people aren't spending the extra $$ for modular power supplies, even though it's usually only about a $20 cost adder. I used the lower HDD cage which didn't leave any space below it to store any extra PSU cables. I ran the 8-pin 12V ATX power cable around the back side of the motherboard tray; I had plenty of cable length, and was able to take advantage of the cutout above the mobo that is specifically designed for this cable. The main motherboard power cable was another story, as there was no way to route it around the back of the case, and get it out of the main airflow path. One of the biggest problems I experienced was one that you almost never have; most of the cables seemed too long.
One of the key specs for any gaming chassis is the maximum length of video card that it can accommodate. Depending on how many HDD cages you choose to deploy and where the HDD cage is located, the PC-A04 can take a pair of any cards, up to an HD 5970 in stride. The biggest cards are only about 305mm long and this case can manage units that are 370mm in length. That's a huge amount of flexibility left over for cable routing, even with the world's biggest video card. Unlike the ROG board I'm showing above, not many uATX motherboards are going to support multi-GPU arrangements. Due to the limited number of PCI Express slots available on this form factor, most motherboard designs make do with only one 16x PCI-E slot. This case design will support almost any CrossFireX or SLI arrangement, and if you go that route you should definitely spring for a beefier power supply than I used here, and make it modular, too.
There isn't much cable routing going on behind the motherboard tray, which is good, because there isn't a lot of space there. As I mentioned in the Closer Look section, there is between 10mm and 11.5mm of gap between the motherboard tray and the exterior side panel. That's enough room for any of the smaller cable sets, but not wide enough for the main power cable. The lack of any tie-down points is pretty obvious from this view, as well. I guess you could use some of the aftermarket ones with adhesive mounts, but I usually shy away from those. All of the right edges on the interior panels have folded edges in order to eliminate any sharp or rough spots that would damage cables (and your hands!) while they were being routed from spot to spot. The area behind the drive cage(s) is wide open, and serves as a kind of alley-way for cables in this area. Once again, some localized tie-down points would have been a welcome feature here. My cable management at this point in the build process looks awful, but in 3-dimensions it makes a little more sense than it does in a 2-d photo.
The power supply fit right into place without any issues or concerns, and the black crinkle finish was a perfect complement to the brushed bare aluminum finish of the chassis. The mounting holes lined up perfectly, which you might think is very easy to do, and quite normal. I wish it were true, but I always seem to have to drive one screw in on a slight angle when installing a PSU in a typical PC chassis. I like the look of the black screws against the silver background, but chrome ones might also look OK. Matte finish stainless steel would match up best, but good luck finding those in a compatible thread size. The slide-in feature that I mentioned earlier worked great, and as I was installing the PSU I thought of a couple of builds in the past where I had to go through some random series of contortionist moves to get the PSU past various parts of the motherboard and things hanging off it. I came close to knocking off a few SMD capacitors once or twice, which is nearly impossible to do with this design.
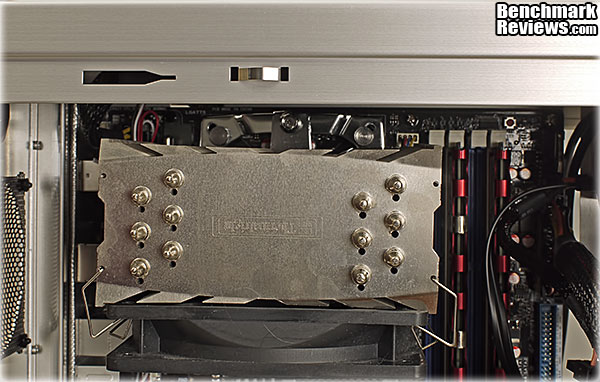
Another major concern for gamers and PC enthusiasts is how well the case and its cooling system will work with their CPU and GPU coolers. The two front-mounted fans are going to provide enough outside air to the video card area, so that's pretty well taken care of for any sane video card choice. Let's take a detailed look at how the CPU cooler fits in. If you want to push things to the extreme, you are going to have to be very careful about the physical dimensions of your cooler. The two things that will constrain your choice are the distance from the CPU center to the bottom of the top-mounted fan, which is approximately 55mm. Quick-calculating readers will recognize right away that this is less than half the width of a 120mm fan. Unless you go with a downsized cooler and a 92mm fan, forget about having the airflow go from front to back. The other limitation is the height above the motherboard tray, which I measured as 173mm. My first choice for the CPU cooler was the Thermalright Venomous X, because I had one on the shelf and I am admittedly obsessive/compulsive about component temperatures. It seems like overkill, but my plan was to run a fairly low speed, high quality fan, in order to minimize noise. The specs for this cooler list its height as 160mm, which is a common figure for this type and general class of cooler. I've never had an issue with cooler height before, as most full-sized cases will take a 160mm cooler in their stride. On this occasion, I experienced about 4-5mm of interference between the tips of the cooler's heat pipes and the side panel of the PC-A04. I also tried a Cooler Master Hyper 212 RR-CCH-LB12-GP, which saved me about 2mm, and allowed me to get the side panel on with a bit of scraping. I used this cooler for my testing, since I needed to be able to install the side panel - scrapes or no, to get representative cooling results.
The large cutout on the motherboard tray is big enough to handle any type of motherboard CPU backplate, either AMD or one of the various Intel sockets. There's enough room for future expansion, if it comes to that. Considering the size of the case, I expected to face a lot more issues with the build than I did. The two things that stick out are the limits on CPU cooler size, and the lack of arrangements for cable routing. In a case this small, every little advantage helps and I felt like I was back in the old days before PC building became an art form. Let's plug it in and run some thermal benchmarks, to see how well the cooling system works. I think everything is going to rest on how well those two fans in front push cool air into the case. Lian Li PC-A04 Testing & ResultsTesting the cooling performance of a case is not that difficult, but it is time consuming. It takes a long time for component temperatures to reach steady state. They'll get to within a degree or two within 10 minutes, but they continue to climb, almost imperceptibly, for 3-4 times that long. It's not that any one component is getting that much hotter; it's the combined effect of all the components feeding off one another that causes the slow rise to the final maximum temperature. For the load tests, I used a mix of applications that I've used for benchmarking in the past and I'm familiar with how they stress individual components. No one application gives the maximum load for all components, so the load temps reported here are the maximum each piece of hardware reached during the testing. I don't have any comparison results, but potential users of this case are not the ones looking for the last few degrees of cooling, at all costs. They just want to know if it's reasonable to run "X" hardware in a case this small. Test System:
Benchmark Applications:
Test Support Products:
Results:I've had several cases in house recently with side panel fans installed, or the capability to install them. In every case, the side fan improved the cooling of the video card, so I was a little concerned that the Lian Li PC-A04 would be at a disadvantage. The actual test results show that either I worry too much, or I was over thinking this one. All temperatures are reported as measured, in degrees Celsius, and the ambient temperature for all tests was 25C. Let's look at the results:
The idle results for the Lian Li PC-A04 are in a very typical range for all of the components I measured: the Northbridge, the CPU, and the GPU. Nothing unusual here, the only thing I noticed during testing is that it took a good while to get that last degree of temperature before it reached absolute steady-state conditions. Since most people's PC spends a lot of time idling, it's good to see that having a small, quiet case doesn't mean that you have to overcook your components every night while you sleep, leading to an untimely death. Load performance is the real test, because modern PCs have gotten very good at throttling back under idle conditions. They have also been getting better at keeping load temps under control, but the manufacturers continue to push for maximum performance, so naturally the load temps aren't going down as much as the idle temps have. So, the $64 question is, can the diminutive Lian Li PC-A04 handle mid-level gaming components? Yes, it can, with a slight penalty in load temps, compared to the big gaming cases. I wouldn't put an NVIDIA GTX 590 in here, even though it would fit with room to spare. It would be possible to keep the temps in line, if you replaced all three 120mm fans with high flow models. You would lose the low noise capability of the case, but it would still look like the sleek, Architectural Digest style statement that it is. You can make it sound like a hovercraft if you want to, but you can't ruin the appearance, unless you do something hideous like cover it in stickers. Still, anyone who found themselves in the same room with it would immediately have their attention drawn to the noisy box in the corner, if you made that kind of modification. I took a decidedly different tack with this build, using components that might not seem like obvious choices. The PC-A04 is a classy mini-tower that has a lot of curb appeal, and while some will just care about the exterior, I wanted to show that it is very capable of handling 90% of the high-end parts you might throw at it. I don't recommend throwing an Intel CoreTM i7-990X Extreme Edition in this case, unless you swap the case fans for some high RPM 38mm Deltas. But you and I both know that's a silly proposition; it's an obvious mismatch of components that only an extreme case-modder would try. There's a good chance they could succeed, but not with the stock configuration. Final ThoughtsWhat's in a name...? Micro; it sounds appropriately like a computer tem, and it gives the impression of "smallness". When you think about it, almost every good thing that has happened in the PC industry in the last 20 years has been a byproduct of making things smaller. So why is it that the Build-It-Myself (AKA DIY) market has shunned micro-ATX form factor motherboards and stuck resolutely with the ATX standard? The first computer I ever built was an AT clone with a motherboard that measured 305mm x 350 mm, or 1068 cm2. My next system was a Baby-AT form factor of 330mm x 216mm, or 713 cm2. Shortly after, I built a machine with the new ATX style motherboard, measuring 305mm x 244mm, or 744 cm2. Wait, you say; that's bigger than the Baby-AT it replaced. True, and this moment in history was an inflection point, where the emphasis switched from making it smaller to making it more powerful. A lot of this is related to the excellent packaging design Intel achieved with the ATX. Any complaints we have today about component layout pale in comparison to the miserable mess of cables you ultimately ended up with, whenever you finished a Baby-AT build. The ATX specification, and products that met it, appeared in 1995. For awhile, its future was unsure, as there was a large installed base of baby-AT systems out there, and upgrading was as popular then as it is now. Many new cases sold at the time could be adapted to accept either style of motherboard. Eventually though, the superior packaging of the ATX won over all the system builders, and the remaining 14 years is history. The micro-ATX (uATX) specification was released in late 1997, and products started appearing in 1998. The new board came in at 244mm square; or 595 cm2. This time, there was less of an evolutionary emphasis, and more of a branch in the design tree. ATX would continue for the mainstream segment, and uATX would be used for specialty products. There was still a market for smaller and more attractive systems, the same as today. Ultimately, Apple won over that market, and the large OEMs like IBM, HP, DELL and Compaq competed by using proprietary motherboard designs, or a variant of the emerging BTX spec, in order to squeeze the overall footprint of the system down to the smallest possible size. This left the uATX product lines high and dry for a long stretch of time. In the last several years, uATX motherboards have made a bit of a comeback, as the Home Theatre PC (HTPC) market has taken off. For some strange reason, this market has not been catered to as aggressively by the OEMs, so home builders have been stuffing uATX boards into attractive little HTPC cases and showing off their talents to members of the family who, until now, never had much appreciation of their resident computer geek's construction skills.
BTX was supposed to be the next generation, but it was too restrictive a specification for adoption by the DIY market. Its fatal flaw was reliance on the PSU fan for case airflow. The ATX form was updated to split the airflow for cooling the PSU and components mounted on the motherboard. This flexibility allowed ATX to meet a wider variety of requirements, and secured its future, as well as the future of its offspring and all the peripheral components that support the system. The power supply section of the ATX spec has been updated many times in 14 years, with two major revisions. Again, the theme for ATX has been adaptability, and it has been a successful one. Until now, performance of uATX boards has been fractionally lower than their full sized cousins. The inclusion in recent years of on-board (integrated) graphics processors (IGP) have made them ideal for low cost systems that don't have to meet the higher performance requirements or gaming, image processing and graphics production. So, they got a reputation as weak sisters, unable to do the heavy lifting. Well, now that's all changed, with the introduction of a significant number of offerings from all the big names in motherboards. Suddenly, there are uATX boards that make no excuses. They may have been developed to meet the narrow requirements of gaming at LAN parties, but this could be a turning point for a format that has lived in the shadow of its larger brother for a long, long time. Lian Li PC-A04 Aluminum Mini Tower ConclusionPerformance in a PC gaming or enthusiast chassis is mostly about cooling, and the noise that usually occurs to achieve it. Features and appearance can both have an effect on performance, but in the end you have to be able to measure something in order to describe the performance. The Lian Li PC-A04 provided decent cooling capability in a very small case, something that's typically hard to achieve. By doubling up on the front (120mm) fans, they were able to get good airflow, with low noise to boot. They also left the door open for case modders to boost performance with higher flow fan units, at the expense of additional noise. There is not a lot of open area for air to pass through on this chassis, and that pays dividends in keeping the noise down. One limitation is the height of the CPU cooler that will fit in the limited space above the motherboard tray. I recommend selecting a down-flow type of CPU cooler, in order to get the dual benefits of a larger diameter cooling fan - higher airflow and lower noise. It's going to be very tough to find a vertical-style heatpipe cooler that sports a 120mm fan and will not interfere with the side panel. The magic number is ~ 155mm for the height of the cooler, anything more than that won't fit. The appearance of the PC-A04 is probably going to be the main motivation for buyers of this Lian Li case. I think it looks fantastic, and if I had one, I would keep it out in a prominent place, on display. It belongs on top of the desk, not buried down beneath it. The bare anodized aluminum finish is very attractive and visually striking; the black version blends in a bit better with typical home or office surroundings. The black accent strip on the top seems superfluous, but it doesn't bother me. On the interior, Lian Li has taken full advantage of the aluminum construction to make an equally stunning design. The only possible negative on the interior is that the lack of any slick cable management features means it's going to be very hard to keep their appearance as clean as it should be, to match the uncluttered design of the case. Construction has always been a strong suit at Lian Li and the PC-A04 is no exception. There might be one or two equals in the PC chassis business, but there are none better. The design is fairly lightweight, which is a nice change from all the steel gaming cases I've reviewed lately. Some may take exception with the ruggedness of this case, but low weight was a design priority. It's not something you take into battle with you, or toss into a typical teenager's room. Due to its small size, it's actually a bit more rigid than some of the larger cases. Functionality is also a strong suit for this Lian Li chassis. The flexible mounting arrangement of the two combined HDD cages means this is one of the few micro-ATX cases that will easily handle an HD 6990 video card. The case also accepts oversized power supplies and holds them in place firmly with a removable rear mounting plate and raised support rails. The capability to slide in the PSU from the rear of the case is a real bonus that is typically only seen on big-game gaming cases that need to support kilowatt+ power supplies. The expansion cards are held in with thumbscrews this time, instead of the slick clamps we've seen from Lian Li on some of the more expensive cases we've reviewed recently. Cable management is one area that is lacking, and I really missed it when working with a chassis this small. There is not much room behind the motherboard tray to run or store cables, and no place to tie them down properly either. The tool-less mounting for all of the drives is simple and effective, with vibration dampening features, and the mounting holes for 2.5" drives were definitely useful. All the areas where air is entering the case fans have filters built in, which are easy to access and remove for cleaning. As of late May in 2010, Newegg is selling the LIAN LI PC-A04A Silver Aluminum MicroATX Mini Tower Computer Case for $109.99. Lian Li offers one other version, a black model with a silver interior for the same price. For me, I like the silver exterior, it's the closest thing to a Mac design that I've seen for PCs. In the grand scheme of all things related to money, $110 is not a small amount of cash, but I think if you look at the cases that are available in this general price range, you will see two things. Only Lian Li and Silverstone are offering full aluminum cases at this price point, and everything else looks like plastic coated pretenders styled by imaginative teenagers. For what you are getting, it's a good value, IMHO.
In the Great Hackintosh Debate on our site, someone called PCs "ugly", and I think they have a point. When Form follows Function there is always an opportunity for a radical streamlining of the design, where it is distilled down to its most basic elements. Those instances tend to become classics, and some of them have ended up being displayed by the Museum of Modern Art in New York. The PC-A04 isn't a trend setter in terms of art, but I hope it cements a trend in the computer industry, that PC cases don't have to be ugly to be functional. Pros:
|
|


Comments
I'm curious what CPU cooling solution you ended up with, on your build. I bought the Coooler Master COOLER MASTER Hyper N 520, which looks like one of the better 92mm units out there.
/forum/showthread.php?t=17082
You're right about Lian Li; as I said in the review, they may have some equals, but there are none that are better.
It'll be interesting to see if others move towards that type of modular architecture. One problem with it, is cost. To me, that's one of the required functions, and I don't see how to make a case like the level 10 as cheaply as you can make a rectangular box. Sadly, most consumers will buy anything, as long as it is cheap!
The case: needs to be 12mm wider, to provide room for full tower cpu coolers and to provide a little more space behind the mb. 210mm would be better still, of course.
The rear fan opening is just right . . . for a front-to-back heatsink setup. It should be bigger, of cousre, which it would be if the case were wider. And it needs a fan fingerguard rather than a grill to facilitate easy outflow.
I continue to be disappointed by Lian Li's providing cases only with rear fan positions on the tops of many of their cases. With provision for two fans you could have a top intake in front and block off that rear top fan position. That would allow room for a cpu heatsinkk to be mounted front to back. Then with three intake fans the air would easily and quietly make its own way out the back, no exhaust fan required. Air goes where you push it. It need not rise.
I like reviews like this. They tell me when I should not buy a case. For this I am grateful. Thanks for this review.
It's funny, I don't think I've ever seen the perfect case. Logically I think it must exist, somewhere.
I think I'm going to pick up an 80mm finger guard for the back; the mesh part is easily removed and replaced, if desired. Should work nice with the Hyper N 520 I just got.
CPU: Intel Core i5-2500K 3.3GHz, 6MB, LGA1155, BOX
+ Zalman CNPS 10X Performa Cooler
RAM: GoodRam 4GB (2x3GB) 1333MHz CL9
MOBO: AsRock H67M-GE/HT mATX
GPU: Sapphire ATI Radeon HD6950 1GB DDR5/256bit DVI/HDMI/mDP PCI-Express
AUDIO: Asus Xonar DX
WLAN: D-Link DWA-131
HDD: Samsung SpinPoint F3 HD103SJ 1TB SATAII 7200rpm 32MB cache
SDD: Ocz Vertex 2 OC2SSD2-2VTXE90G 90GB SATA II
PSU: XFX Core 550W
ODD: Liteon iHAS124 SATA (black)
CASE: Lian Li PC-A04 + Lian Li USB3.0 connector UC-01
And I'm wondering if mentioned graphic card and cooler will fit in this case. What do you think Bruce?
Since you are only looking at two drives, the graphics card possibilities are unlimited. Unfortunately, Sapphire does not publish the dimensions of the card you mentioned, so I can't say if it will fit without removing one of the drive cages. My ruler says anything less than 250mm will fit, and the Sapphire has the power cables at the top of the card, so that's not an issue.
Sounds like a nice build.